Saturday, March 30, 2013

Easter Inspiration

Happy Saturday!  I can't believe Easter is already here!  To inspire you and get you in the "hoppin' down the bunny trail" mood, here is a card I designed for my TGIF class this month:

Easter card featuring the Ears to You single stamp and the Birds of a Feather DSP
I just can't get enough of these sweet bunnies!  This single stamp is one that will remain in my stash for a while to come!  For this card I split the bunnies up, punching each out with the 1" square punch and then layering on the scalloped square.  I chose my colour scheme from those in the DSP:  Island Indigo, Summer Starfruit, Primrose Petals and Pool Party...very spring-y, no?

 I also get to show another project from Craft Project Central today!  This one is brought to you by Kim Score:

Candy Box and Card designed by Kim Score


As always, you can access the tutorial for this and 9 other terrific projects by subscribing to March over at Craft Project Central.  Don't forget to stop by Kim's blog to see some of her other amazing work.

I am so looking forward to time this weekend to do some spring cleaning in my stamp corner!  I'll let you know how I make out next week!  Until then, enjoy the weekend!

Friday, March 29, 2013

Make A Wish CASE

Sometimes when I'm in a rush for a design I find myself CASE'ing the work of my fellow demonstrators on our online forum.  Today's card was originally designed by Deena Boos.  You can view her original design here.  This is my take on it:

Birthday card featuring the Summer Silhouettes and Papillon Potpourri stamp sets with sentiment from Sweet Essentials
As you can see, I pretty much CASE'd Deena's design exactly with the exception of the addition of the DSP layer behind the card front and the use of the larger butterfly.  I love the monochromatic look of this design and the vellum butterflies are just so pretty and delicate.  The next time you're stuck for an idea, start by CASE'ing something you like.  You'll be amazed at how it can spark your own creativity!

Thursday, March 28, 2013

Lots to show you!

I have lots to show you today!  Firstly, yesterday I promised I would show you the birthday invitations my son and I made for his upcoming 6th birthday party.  He wants a Mario theme!  So, here are the invitations we made, based on a design I found on Pinterest:

Punch Art Mario Birthday Invitation


Fun, huh?  Now before I get a zillion questions about the how-to, here is the list of punches and dies I used to create Mario's face:

Hat brim:  3rd smallest oval in the Ovals Collection Framelits
White Circle on hat:  1-1/4" circle punch (M is from the retired Billboard decorative strip die)
Eyes:  White XL oval punch, blue L oval punch, black small oval punch (retired)
Nose:  XL oval punch
Moustache:  1-3/4" circle cut in half and 1-1/4" circle cut in half - run all through the Big Shot with the Woodgrain TIEF

The key to good looking punch art is sponging!  Sponging all of the pieces gives the design depth.  I also added a wee highlight to Mario's eyes with my white gel pen which really brings him to life.  Max was thrilled with these and, so far his friends are excited to attend his party too!  Now for the hard part...figuring out how to entertain 15 5-year olds for two hours!!

Now, I'm a bit behind posting this week's projects from Craft Project Central, so here are two fantastic designs for you.  The first is by Amanda Corbett:

Patterned Posies Gift Set designed by Amanda Corbett
The second, just in time for Easter, is from Heidi King:

Hoppy Spring Treats and Place Setting Ensemble designed by Heidi King
Both of these fantastic projects are available with a March subscription to Craft Project Central. 

Wednesday, March 27, 2013

Twirly Whirly Birthday

I most definitely have birthdays on the brain lately, as we are deep into preparations for my son's 6th birthday party.  I will show you the invitations we made tomorrrow, but  for now I want to show you a fun birthday card I designed for last weekend's card buffet. 

Birthday card featuring the Wishes Your Way stamp set and Sycamore Street DSP
I designed this card with kids in mind, but who wouldn't love a birthday card with a cute pinwheel on it?  I started with a Whisper White background embossed with the Cloudy Day TIEF.  The pinwheel was formed from a 2-1/4" square of Sycamore Street DSP and is held together with a glimmer brad.  The scalloped Tangerine Tango strip was done with the Large Scallop Edgelit and is layered behind a strip of Sycamore Street DSP.  I stamped the sentiment from Wishes Your Way and hand-trimmed a pennant.
I can't wait to show you the fun invitations Max and I made for his party tomorrow...be sure to stop by and check them out!

Monday, March 25, 2013

Fabric Frenzy!


Happy Monday Morning everyone!  I hope you had a great weekend with lots of stamping fun!  I sure did!  With my Spring Fling card buffets on Friday evening and Sunday afternoon, I was kept hopping.  On top of that I finally finished the invitations for my son's 6th birthday party...more on those later this week!  Today I want to tell you about a fantastic, limited-time promotion from Stampin' Up! 
The week after Sale-a-bration is usually a bit of a let-down...all the fun of free product is gone and we are left wondering what the next great promotion will be.  Well wait no longer!  This week all of our beautiful Designer Fabric is half price!!  This is the perfect time to stock up for all of those spring and summer projects you're planning to create.  Our Designer Fabric is designed to coordinate with Stampin' Up! inks, paper, and other accessories, and is perfect for adding a stylish touch to traditional paper projects. Available in an extra-wide fat quarters (18" x 26"). Use it for quilting, clothing, home décor, and more!
Check out these amazing prices:

Page Item Description Retail Price Sale Price 
170 126892 Essentials Designer Fabric $36.95 $18.48 
171 126893 Floral District Designer Fabric $12.50 $6.25 
171 126894 Comfort Café Designer Fabric $12.50 $6.25 
171 125411 Summer Smooches Designer Fabric $12.50 $6.25 
171 125412 Twitterpated Designer Fabric $12.50 $6.25 
171 122337 Timeless Portrait Designer Fabric $12.50 $6.25 
171 122336 Beau Chateau Designer Fabric  $12.50 $6.25 
171 124066 Spice Cake Designer Fabric $12.50 $6.25 
171 122335 Flirtatious Designer Fabric $12.50 $6.25 
6* 129308 Tea for Two Designer Fabric $12.50 $6.25 
13* 129307  More Amore Designer Fabric $12.50$6.25 

*spring catalog
I'll be placing my order toward the end of the week, so if you'd like to get in on these terrific prices, call or email your order to me by Friday...or better yet, check out my online store and order yours today!

Now here is some project inspiration from some of my fellow demonstrators:

An easy no-sewing-required option from Amanda Fowler:


Love these little guys from Victoria Rogers:


A beautiful gift idea (also no-sewing required!) from Lynne Fahey:


Use fabric instead of ribbon on a card from Jill Hilliard:


Fabric flowers...so pretty...and it can be removed from the card and worn as a pin! From Kathleen Warhank:

Sunday, March 24, 2013

More Sketch Inspiration

Today I have another sample I did using this month's sketch inspiration...check it out:

Father's Day card featuring the You Rule stamp set with sentiment from Family Reunion

I designed this sample for my Spring Fling Card Buffet that is happening this afternoon.  It is likely hard to tell in the photo, but the crown is heat embossed using pewter embossing powder...very shiny and regal-looking...fit for the King of the Household...dear ol' Dad!  I added texture to the background with my Argyle TIEF, as well as a bit of Basic Gray stitched grosgrain ribbon.  I also added interest to the focal point with my piercing template and paper piercer.  I didn't photograph the inside of this one...oops!  It says "You Rule"...and then below it "Happy Father's Day".  If you missed the sketch for Marcch, simply click the Monthly Sketch Inspiration tab at the top of this page to view the sketch and other samples made using it.

Saturday, March 23, 2013

A New Product Line!


Happy Saturday morning everyone!  I have some exciting news!  Stampin' Up! has announced a brand-new product line called This and That.  Similar to the Smashbooks that are so hot right now, This and That offers a collection of coordinating products such as Washi tape, stickers, a cool new rotary stamp and more for creating your own scrapbook/journal/organizer/memorybook.  There really is no limit to the possibilities for these fantastic products!  Click HERE to view a PDF of the first round of products in this new line.  The best part is that for a limited time you can get the entire bundle of This and That products bundled for 15% off!  This deal is only good until April 30th, so place your order today!

As if a new product line weren't exciting enough, Stampin' Up is also giving away a free trip for two to San Diego!!

image description


Visit Stampin' Up's Facebook page to learn more and to enter and while you're there check out more details about our new products!

Friday, March 22, 2013

Beyond Cute!

Happy Friday!!  Today is a big day...my Spring Fling card buffet kicks off tonight and today is also the last day of Sale-a-bration!  I also get to show you this ADORABLE project from fellow Craft Project Central designer Tara Bourgoin.  Check it out:

Jungle in A Box Gift Set designed by Tara Bourgoin
Isn't that just too cute?!?  I can't wait to make these little guys!!  Tara is amazingly talented!  You can access Tara's tutorial by subscribing to March over at Craft Project Central.  These guys alone are worth the $10 subscription fee!!


Thursday, March 21, 2013

Elegant Congrats

Today I want to show you another card I designed for my Spring Fling Card Buffet this weekend.  Have a look:

Elegant Wedding card featuring the Flowering Flourish and Layered Labels stamp sets.
This photo really doesn't do this card justice!  It is so sparkly and pretty in real life!  The background is heat embossed in silver, as is the sentiment panel.  I love the combination of Basic Black and Pool Party...they compliment each other so nicely!  I also added a little extra bling with strategically placed rhinestones and the gorgeous Designer Builder brad.
If you still haven't registered for this weekend's Spring Fling card buffet, it's not too late!  Call or email today to confirm your seat, but hurry...tomorrow will be too late!

Speaking of too late, don't miss your final chance to earn FREE product during the final days of Sale-a-bration.. This fantastic promotion ends tomorrow at midnight.  Hurry and place your order or, better yet, join my team of demonstrators and get 25% more product in your Starter Kit.  These great deals will soon disappear...don't miss out!

Wednesday, March 20, 2013

Step it Up!

Today I want to show you how easy it is to take an inpiration design and step it up to make it your own.  First I want to show you a card I CASE'd that was originally designed by Tammy Fite:

Masculine birthday card featuring the Collage Curios stamp set with sentiment from Perfectly Penned
This is an exact copy of Tammy's card.  Now here is my stepped up version...

Stepped up version:  changed to landscape orientation, embossed background, added more ribbon and crushed Soda Pop Top
Whaddya think?  Cool, eh?  I love the addition of the crushed Soda Pop Top with the stamped images in the middle.  It just  take the design to a whole new level!  I challenge you to try stepping up a design that inspires you...you'll be amazed at what you come up with!
This card is one of the samples that will be available for my Spring Fling card buffet coming up this weekend!  For more information click HERE. There are still seats available for both the Friday evening  and Sunday afternoon time slots.  Call or email today to reserve your spot!

Tuesday, March 19, 2013

This week at CPC...and more!

...You'll find a great new home decor project from fellow designer Chris Galbraith!  Check it out:

Nautical Picture and card set by Chris Galbraith
This nautical picture and matching card are perfect for gift giving or for hanging in a room in your house!  The 8" x 10" frame can be changed to white or brown to match any decor.  Not only is the picture beautiful, but it is quick and simple to make!  This project is also a fun camp, class or club project!  To access the tutorial for this and 9 other fantastic projects, simply subscribe to March over at Craft Project Central.  It is just $10, which is a great value for some wonderful inspiration!

I also want to show you another card I designed for my Spring Fling Card Buffet coming up this weekend.  Check it out:

Mother's Day card featuring the Pleasant Poppies background stamp with sentiment from Family Reunion
 The nice thing about this card is that although I designed it to be a Mother's Day card, it could easily be changed to a birthday card by changing the sentiment. If you haven't registered by the Spring Fling yet hurry!  Seats are filling up quickly...call or email to reserve your spot today 

Now for some REALLY BIG NEWS! 

Click  HERE to learn more about this exciting news!

Stampin' Up has lowered the price on My Digital Studio design software by 75%!!  This isn't just a sale..this is forever!!  If you've ever considered trying this amazing program now is the time to go for it!  As a bonus you'll get a FREE orientation session with me to help you get started.  Visit my online store to purchase your copy today.  Because it is a download there is no shipping cost...just purchase, download and start designing right away!


Monday, March 18, 2013

March Sketch Inspiration...a little late!

I have to admit I am a wee bit behind posting my samples for this month's sketch inspiration!  Here it is the third week of March and I've only shown you one lonely sample!  Well this week will be a two-fer!  Here is another project using this month's sketch:

This is the sketch, in case you missed it!

Birthday card featuring the Summer Silhouettes stamp set with sentiment from Sweet Essentials
For this example I turned the sketch on it's side!  I still kept all of the elements, but instead of putting my sentiment where it is in the sketch, I put it where the embellishments were...I even kept it to three words!  I moved my embellishment to where the sentiment was in the sketch.  And what an awesome embellishment those Designer Builder Brads are!!  I also added a little butterfly from the Papillon Potpourri set that I punched out with the new Bitty Buttefly punch...did you know the small butterfly images in that set fit the punch?  Love it!  The butterfly is stamped on Vellum to give it a different texture and add interest.
This card just happens to be one of the designs that will be available at my Spring Fling Card Buffet next weekend.  If you haven't registered yet it's not too late!  There are still spots available for both the Friday and the Sunday sessions.  Call or email to reserve your seat today!

Sunday, March 17, 2013

A Double-embossed Easter

Happy Sunday, everyone!  I hope the sun is shining as brightly where you are as it is here this Sunday morning.  Now if only the temperature would warm up, it would really feeling like  Spring! 
This morning I have a cute little Easter card I did with my monthly techniques  class last week.  It uses the Double Embossing technique...see what you think:

Cute Easter note card featuring the Everybunny stamp set with sentiment from Teeny Tiny Wishes
I just love the Everybunny stamp set!  The images are so sweet and such fun to colour!  On this card I just used my markers to colour the image and then my Aquapainter to watercolour the grass.  It was quick and easy to do.  The other element that makes this card stand out is the double embossed panel.  To create it I used my Argyle TIEF, which I covered in Versamark before inserting the piece of DSP.  I ran the folder through my Big Shot.  I removed the DSP and then sprinkled Melon Mambo embossing powder all over it, shaking off the excess.  I heated the powder until it was shiny.  The result is very cool...double embossed DSP!  Try this technique on your next project...you will be amazed at the textural interest it will add to your design!

Saturday, March 16, 2013

Oh, Hello...

...I'm hoping I'll be saying that a lot today as I spend the day at the Guelph Mompreneurs Showcase.  I hope you'll stop by (admission is a donation to Kids' Ability) and say hi if you're out and about today.  In the meantime, I get to show you another great project from one of the designers at Craft Project Central.  This one is brought to you by Monika Davis:

Gift Box and Note Card set designed by Monika Davis for Craft Project Central.
This cute little gift set is perfect to give a child's teacher, a friend or just about anyone who could use a little appreciation.  To access the tutorial for this project, subscribe to March at Craft Project Central.  Just $10 gets you 10 full-colour step-by-step tutorials.  To view my project for this month click HERE...it is included in your March subscription!  Don't forget to stop by Monika's blog and show her some love...then head on over to the Delta Hotel and Conference Centre in Guelph and say HELLO!

Friday, March 15, 2013

Double Embossed Thanks

Last night my monthly techniques group met.  We always have great fun crafting together and learning new things to incorporate in our own creations.  One of the techniques covered last night was Double Embossing.  Have a look at this card we made:

Thank you card featuring the Established Elegance stamp set with sentiment from the Vintage Verses Sale-a-bration set.
I love this technique...especially for creating fantastic backgrounds on Vintage-style designs.  Here I used pewter embossing powder with First Edition DSP and the Vintage Wallpaper TIEF.  To achieve this look simply apply Versamark all over the SMOOTH side of the embossing folder.  Place the paper in folder with the desired pattern face-down against the inked side of the folder.  Run it through the Big Shot and remove the embossed paper.  Then sprinkle embossing powder all over the embossed paper, shake off the excess and heat.  The result is stunning!  The rest of the card is simply a collage of stamped images from the Established Elegance stamp set that I stamped on a label cut with my Window Frames Collection Framelits.  I used Basic Black, Cherry Cobbler and Basic Gray ink to stamp the images.  I added a little paper-pierced detail around the label using my Occasions Paper Piercing Pack (still available!).  I also heat embossed the seal in the upper left of the focal image using pewter embossing powder.  The sentiment is also heat embossed in petwer on black card stock.  I added a pop of colour with some Cherry Cobbler seam binding ribbon and a silver Basic Designer button.  Lots of shine on this card...my heat tool got a serious workout...but it is so worth the effort!

Thursday, March 14, 2013

We all need a little Sunshine

When the latest set of single stamps were made available I fell in love with just about every one of them.  There was one, however, that I just HAD to have.  I used it on this card I designed for my technqiues class that meets tonight.  Have a look:


Card for someone special featuring the Sunshine single stamp (132671).

Focal image detail

Ever since my son was a newborn I have sung the song "You are my Sunshine" to him to put him to sleep.  Now that he's a "big boy" - almost 6! - I don't get to sing it as often as I once did, but it still holds a special place in both of our hearts.  When I saw the Sunshine single stamp I knew I had to have it.  I used the Bouncing Brayer technique to create the background behind the stamped image...so perfect for the sentiment!  I stamped the image itself in Versamark and then heat embossed using Melon Mambo, Tempting Turquoise and Gumball Green embossing powders.  I like the rainbow-like effect it gave the image.  The background DSP is from the Sunshine and Sprinkles DSP pack and to add extra texture, I ran it through the Big Shot with the Cloudy Day TIEF.  I am so pleased with the final result...I hope my class members will like it too!

Wednesday, March 13, 2013

Bloomin' Sunflower

I love this card I designed for my TGIF class this Friday night!  I based the layout on this week's sketch challenge over at Retro Sketches.  Check out the sketch...


And  here's my version:

Any-occasion card for RS54 featuring the Sunflower background stamp, Collage Curios stamp set with sentiment from Bloomin' Marvelous.
I love sunflowers.  They exemplify summer for me and, since summer seems like a LONG ways away these days, I just had to pull out this stamp for this challenge to remind me of sun-soaked days and long, sultry nights.  I embossed the background with the new Honeycomb TIEF and then stamped  the little bees from the Collage Curios set (so cute!).  The sentiment is from the Bloomin' Marvelous Sale-a-bration set, which is only available for another 10 days.  (If you haven't got this set yet, hurrry...you'll be sorry if you miss it!). 
Soo much to love about this card...join me on Friday evening and make one for yourself!

Spring Centrepiece

I have another great project for you from the designers over at Craft Project Central to show you!  This one comes from Christy Fulk.  Have a look:

Vintage Spring Centrepiece designed by Christy Fulk
Isn't that gorgeous?!?  So pretty!  To learn how to make this project subscribe to March at Craft Project Central.  You'll get 10 full-colour step-by-step tutorials for just $10...what a deal!  Don't forget to stop by Christy's blog to let her know what you think of this beautiful project.

Tuesday, March 12, 2013

Easter for TGIF

Today I have a card I designed for this month's TGIF class.  With  Easter coming up in just a few weeks I thought it was appropriate to do a cute Easter card.  Have a look:

Easter card featuring the Spring Sampler stamp set with setiment from Teeny Tiny  Wishes
I love the colours in the Sunshine and Sprinkles DSP pack.  So fresh and spring-like!  It is perfect for this cute Easter card.  I used three of the images from the Spring Sampler set and coloured them with my Daffodil Delight, Melon Mambo and Lucky Limeade markers.  I cut little banners with my  Hearts A-Flutter Framelits from coordinating card  stock and embossed them with my Perfect Polka Dots TIEF.  I also added a little texture to the card base with my Clouds TIEF....love that new addition to the line-up!
Have you signed up yet for my TGIF class?  You'd better hurry...class is this Friday at 7:00...call or email to reserve your spot today!

Monday, March 11, 2013

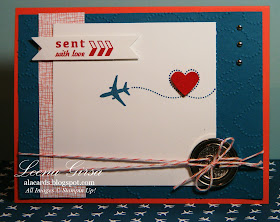
Sent with Love Birthday

Happy Monday!  It is a REALLY happy Monday in our household because it marks the first day of March Break!  No school for anybody...woohoo!  I'm looking forward to a week of checking jobs off my To-Do List and my son is planning a week of playdates!  Not sure how both are going to happen, but we'll see.
Today I have another card I designed using the Sent With Love Bundle that is currently on promotion.  I am so loving this fun DSP...it is terrific for making masculine cards.  Check this one out:

Birthday card featuring the Sent With Love bundle and sentiment from  the Essentials set
We made this card at my team meeting last week and it was a hit!  Everyone loves the DSP and this card really showcases it well.  I used a stamp from the Essentials set, which is a great font and the perfect size for this design.  I embossed the card base using the Houndstooth TIEF, leaving a portion at the bottom smooth for interest.
On another note, if you LIKED my Facebook page this month, be sure to stop by later today to see if you the lucky winner to a free month's subscription for Craft Project Central.  If you are, I'll be in touch soon with the details about your subscription! 
Have a great week everyone!

Sunday, March 10, 2013

Another FAB Project from CPC

I hope you are all having a fantastic weekend!  We are  enjoying some beautiful spring-like weather here in Southern Ontario...I just wish it would last all week!  Alas tomorrow is calling for rain...and lots of it!  At least it will wash away the last of the snow and winter grime!
Today I get to show you another fabulous project from Craft Project Central, designed by Amanda Corbett.  Have a look:

CREATE Banner designed by Amanda Corbett
Isn't that fantaastic?!  I so love this project I am going to make one for the wall in my stamping corner.  To access the tutorial for this and the other 9 projects for this month head over the Craft Project Central and subscribe to March.  Or, head over to my Facebook page and LIKE me!  I'll be drawing a winner tomorrow morning (March 11th) who will win a free month's subscription!  I'll post the winner's name on my Facebook page, so stop by tomorrow to see if you've won!

Friday, March 8, 2013

The latest from CPC


Happy Friday!!  This is the tri-fecta of Fridays...not only is it the end of the workweek, but it is also the start of March Break (a week free from marking and lesson prep and full of stamping fun!) AND it's PAYDAY (more $ to spend on fun stamping goodies!).  I hope your Friday is as fabulous as mine will be!

Today I have this cute note card set designed by Regina Andari to show you.  Regina used the soon-to-be-retiring In-colours as the theme for her design.  This set includes custom coordinating envelopes, that can then be bundled into a package that’s styled after a little pizza box! Easy to open and close, the box is compact and neat and can be re-purposed once all of the cards have been mailed.  Best of all, this pretty project is surprisingly quick and easy and oh so fun!  Fun to make for yourself, a friend, or as a class or club project!  To access the tutorial for this and this month's 9 other projects, simply head over to Craft Project Central and subscribe.  To win your mont'h's subscription FREE, head over to my Facebook page and LIKE it to enter my draw.  I'll announce the winner on March 11th, so don't delay...LIKE me today!

Thursday, March 7, 2013

Feeling the Love

Today I want to show you one of the projects I designed for my monthly team meeting.  I am featuring the Sent With Love bundle that is on for 20% off until the end of April.  Have a look:

Birthday card featuring the Sent With Love Bundle (132851)
I so love the DSP in this bundle!  The patterns are bold and fun and so different from anything else we carry.  On this card I used just a strip of DSP as an accent behind the sentiment...such a great way to add colour and pattern to a project.  The sentiment is from the Essentials stamp set (126370), which is an economical, must have for every stamp collection.  The size and font of the sentiment are perfect for so many projects!  The postage stamp image fits our Postage Stamp punch perfectly and, to add interest, I punched out the little heart in the centre with the Small Heart punch and then popped it up on the 1-1/4" square mat.  This would be a wonderful card to send to someone who lives far away whose birthday you want to honour.  In fact, I have an uncle in Austria celebrating a birthday in a couple of weeks, who just happens to work as grounds crew at an airport. How perfect!!

Wednesday, March 6, 2013

Sent With Love Sketch Inspiration

In case you missed it, I posted a new sketch on the Monthly Sketch Inspiration page to get your creative juices flowing.  Here is this month's sketch:


Today I have a different take on it that uses the Sent With Love bundle that is currently on promotion for 20% off.  Have a look:

Any-occasion card featuring the Sent With Love Bundle
As you can see, I switched it up a little bit from the sketch.  I moved my sentiment to the upper left corner and replaced it with the large button.  I also added a little strip of DSP as an accent.  Working from a sketch doesn't have to be restrictive...in fact, the opposite is true!  It is a jumping off point for your own creativity!  Don't be afraid to try something new with an existing design...experimentation is when good things happen!

Tuesday, March 5, 2013

For Baby


Today I have a cute baby card I designed for a couple of online challenges.  Friday Mashup's challenge this week is to create a baby card using Pool Party, Real Red, So Saffron and a neutral.  Hand Stamped Sentiments has a great sketch challenge that worked just perfectly for what I had in mind.  Check them out:
 Here is the sketch challenge:


And here is my take on BOTH challenges:


Baby card for FM99 and HSS154 featuring the Two by Two stamp
Close up of focal image


Can you believe I've had this stamp for months and this is the first time I've inked it up?!?  I know, I should be ashamed of myself!  I knew as soon as I saw the Friday Mash-up challenge that I wanted to use this stamp for it.   The DSP I used came from two different packs:  Sent With Love (132182) and Storytime (126907).  I also used some Core'dinations for the background, embossed it with the Perfect Polka Dots TIEF and sanded it lightly to bring out the lighter shade.  I used Crumb Cake as my neutral choice which I incorporated in the 3/8" Taffeta Ribbon as per the sketch.  I love the way this turned out...I will most certainly be making better use of this stamp in the future!


Monday, March 4, 2013

For the Bride

Happy Monday everyone!  I am especially enjoying this one because in just four short days I'll be on holidays for a week!  Yippee...more time to stamp!  I'm also excited to show you my project for this month over at Craft Project Central.  Check it out:

Bridal Shower Ensemble featuring a favour box, invitation and coordinating Thank You card.

Invitation with embossed envelope

Cute favour boxes

Coordinating Thank You note
So, whaddya think?  I had great fun designing these projects!  I've had the idea for the favour box for quite a while and this was the perfect chance to make it happen.  I also love that it is customizable...change the accent colour to coordinate with the Bride's wedding colours.  It could also easily be changed up for a little girl's princess party.  (Almost makes me wish I had a little girl to make this for...almost!)
There are two ways you can get your hands on the tutorial for these projects:  you can subscribe to March over at Craft Project Central for just $10 where you'll get this and 9 other fantastic projects, or you can head over to my Facebook page and LIKE me!  You'll be entered into a draw for a free month's subscription.  How easy is that?!?  Just do it before March 10th, as I'll be drawing a winner and posting it on Facebook on the 11th.

Sunday, March 3, 2013

Photopoly-what??

Stampin' Up! has done it again!  They've surprised us all with a brand new product announcement that none of us anticipated!

Introducing new Photopolymer stamps.  Yep, that's right...Stampin' Up now has a truly CLEAR option.  For a long time we demonstrators were told that Photopolymer stamps just weren't an option for Stampin' Up! because they just didn't meet the strict quality standards our stamps are known for.  Well, here's the news we received on Friday:

We've searched long and hard for just the right material to be able to introduce completely clear stamping. And we've found it. We're excited to announce that we now have wood-mount, clear-mount AND photopolymer stamps! The new photopolymer will be an addition to our stamp line and will appeal to all types of stampers. Our top-quality photopolymer has just enough give to create a perfectly stamped image every time and with the introduction of our firm-foam pads, let's just say they're meant for each other! Photopolymer stamps will also be unique, fun designs that will inspire you and provide more versatile options you may not see in our traditional wood- and clear-mount stamp options. 
So, what makes them so great?
  • They're entirely transparent for perfect placement every time 
  • They are durable. The photopolymer material is designed to last. 
  • Can you say sticky? (Don't worry; in a good way.) These stamps stick amazingly well to our clear blocks.
  • They're age tested. They won't yellow or cloud up over time. 
  • They use FDA, food-safe material. How far can you stretch your stamping creativity?
  • They're economical!  This first-ever offering, called Designer Typeset, features 57 pieces for just $16.95
Check out this fun video from Stampin' Up!


 Now, keep in mind that these stamps are being offered on a trial basis.  Based on popularity, they hope to release more photopolymer stamp sets over the coming months. At this time Stampin' Up! doesn't plan on offering a line of photopolymer sets as expansive as the wood-mount and clear-mount lines.  The Designer Typeset photopolymer stamp set will not be offered in wood mount or clear mount options.  To learn more about this fantastic new stamp line, click HERE.