Monday, March 31, 2014

Twisted Masking Tape

Happy Monday!  Today is a good day...it finally feels like Spring may just be springing!!  Warm sunshine, birdsong and melting snow...sure looks like spring to me!  Today I have a springtime project I designed for this week's challenge over at The Technique Twist.  We are all about the Masking Tape technique this time and I decided to  use it to create a soft background for an Easter card. 

Easter card featuring the Masking Tape technique and using the Papaya Collage, Petite Petals, Lacy and Lovely and Blessed Easter stamp sets.
Pretty, huh?  Here are some quick tips:
  • I used Soft Sky, Pistachio Pudding and Pink Pirhouette ink for my masking tape background.  
  • I die cut the oval after I had applied the ink so that I could get the best possible coverage.  I also stamped a doily from the Lacy and Lovely set in Sahara Sand ink to add a little bit of interest.  
 

  • The foliage is from the Papaya Collage stamp set and is heat embossed in pewter.  
  • The flowers are stamped in Crisp Cantaloupe and are punched with the Petite Petals punch. 
  • The sentiment is from the Blessed Easter set in the Occasions catty and is punched with the Bracket Label punch.
  • The background is embossed using the Beautifully Baroque TIEF.

I left the inside fairly simple, stamping the foliage in Sahara Sand and the flowers in Crisp Cantaloupe. 

Just a friendly reminder that today is the LAST DAY of SALE-A-BRATION!!  Last chance to earn fabulous freebies...after today they are gone for good!  Be sure to get your order in before midnight to qualify for your free Sale-a-bration rewards.

Friday, March 28, 2014

Pumpkin In the Bag

Happy Friday!  I know I've not been around much the past couple of weeks.  Please bear with me, as our family is going through some challenging changes of late.  My stamping time has been very limited, not to mention the fact that my stamping space still hasn't completely recovered from our flood.  I am doing my best to stay on top of things but when challenges arise, it's the fun stuff that tends to get pushed aside.  I have a couple more weeks of craziness to get through and then (hopefully!) things will settle down again.

I am so loving the latest Paper Pumpkin kits!  The March kit was so much fun.  As usual I made one sample just as shown in the instructions and then I played a little...check it out:

February Paper Pumpkin project.  The kit contatined FIVE gift bags and tons of accessories to decorate them.
I made this bag and three others like it to give to my monthly Techniques Group ladies.  I thought it would be a cute way for them to take their projects and technique cards home with them and I knew they would appreciate the little surprise :)  (I was right!!)  The March kit included five generously-sized, heavy-weight gift bags, pre-printed letters, sheets of self-adhesive die cuts, twine and clothespins, as well as two background stamps and an ink spot.  A great value!
Then I decided to use a few pieces from the Heartfelt Banner Sale-a-bration kit...

I added the little canvas hearts on either end of the little banner.  Not much, but it adds a little something extra. 
Then I stepped it up even further.  I found some plain Kraft gift bags in my stash and added more pieces from the Heartfelt Banner Kit...

Fun, huh?  I love those little pom-poms!  They add whimsical pops of colour against the plain background.

I really have been very impressed with the latest Paper Pumpkin kits.  They offer great value and tons of fun project ideas.  If you haven't tried Paper Pumpkin yet, now is the time!  Until the end of March you'll receive a bonus pack of In-Colour markers when you subscribe...that's a $19.95 value, which is almost the equivalent of your first month's subscription for FREE.  It is such fun to receive the kits each month in the mail...it's like getting a little birthday surprise every month.  The best part is there is no obligation...if you aren't satisfied you can unsubscribe any time...but I know you'll love the fun projects you'll recieve each month.  To subscribe visit mypaperpumpkin.com and be sure to do so before March 31st to claim your free set of markers!

Monday, March 24, 2014

Shaving Cream Eggs

Well, long time no see, huh?  The past few days have been a whirlwind.  My DH's aunt passed away early last week and we had the visitation and funeral this weekend.  I have had little time to think about stamping, but I do want to show you another project I did for this week's challenge at The Technique Twist.  We are all about the shaving cream background technique this time around and I decided it was the perfect look for Easter Eggs.  Check them out:

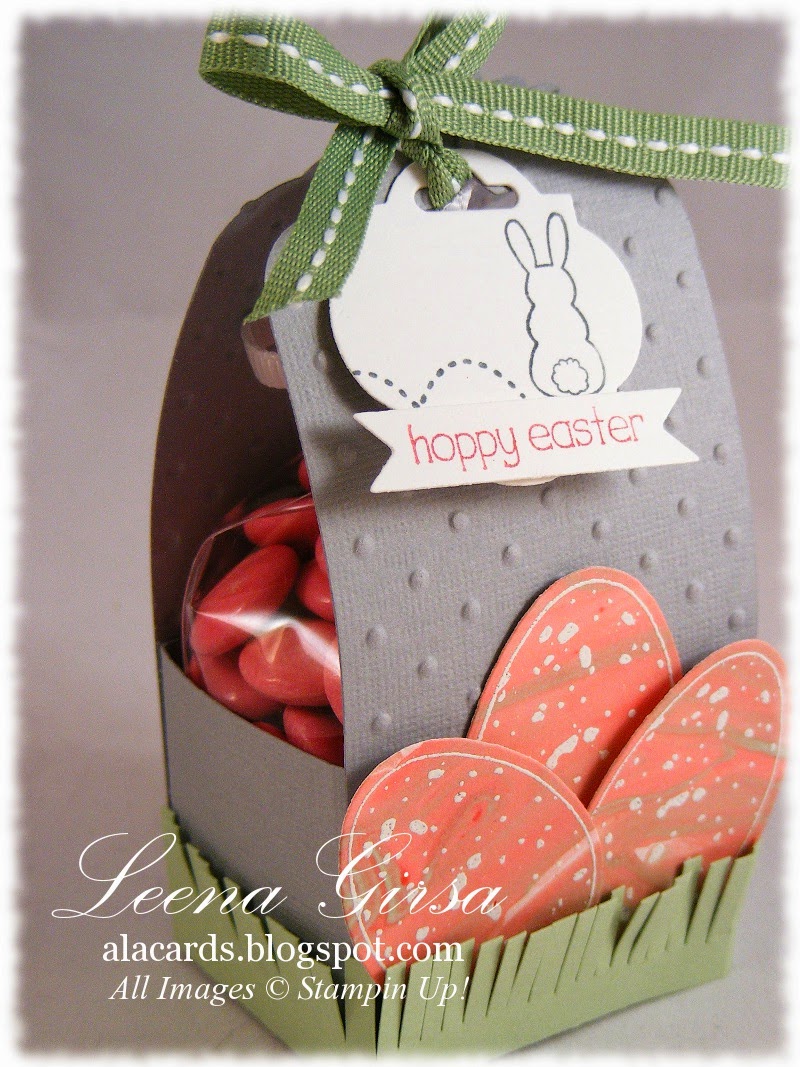
Easter treat holder made using the Scalloped Tag Topper punch and featuring the Shaving Cream background technique.

Aren't those eggs fabulous??  I love the marbled effect achieved with the Shaving Cream technique!  I created the look following the steps I outlined HERE and then stamped the egg from the Backyard Basics stamp set in Versamark and heat embossed in white.  I then die cut the eggs using the coordinating Backyard Basics Framelits.  Perfect Easter Eggs! 


I added a little strip of Pistachio Pudding grass that I fringed with my paper snips (my Fringe Scissors are on their way!) and nestled the eggs amongst it.


The little tag is stamped with the Eggstra Spectacular stamp set and then die cut using the Window Frames and Bitty Banners Framelits.  I tied the treat holder closed with a piece of Wild Wasabi stitched grosgrain ribbon.  A quick and easy treat holder sure to make anyone smile.  I think I may just do one for each of the teachers at my son's school just to let them know how much they are appreciated!

I'm sorry I've been neglecting my blog of late.  Sometimes life just gets in the way of the things we want to do.  Between flooded stamp spaces and dying relatives there hasn't been a whole lot of time for fun!  Hopefully this week will be much less eventful and I can get back to putting rubber to ink.  In the meantime, have a great week!

Wednesday, March 19, 2014

Minion Madness!!

Well I finally got my stamping stuff put back together sufficiently to allow me to get the invitations finished for my son's 7th birthday party.  This year it is a Minion theme!  If you don't have kids you likely have no idea what I'm talking about, but minions are the cute little critters from the Despicable Me movies.  Here is the invitation I made:

Birthday party invitation featuring a punch art Minion!
Cute, huh?  My son loves them, so I guess that's all that matters, but it's nice when I like it too!!  To put this guy together I pretty much followed the tutorial by Donna S I found HERE.  I changed the shape of the head by using one of the Ovals Collection Framelits to round the top of the head evenly...I like the look better than what I would have ended up with had I tried to do it by hand!  I also decided to change up the goggles a bit, using silver foil card stock instead of Basic Gray and popping up the frames and adding window sheet circles to make them look more like goggles.

I also added some detail to the eyes and overalls using my Chalk Marker and used black Candy Dots instead of cardstock for the buttons on the overalls.  As I always do with all of my punch art, I sponged all the pieces with ink of the same colour to add dimension and really make the character come to life.  Instead of using the "G" for Gru on the pocket, I stamped "You're Invited" instead (from a long-retired set), as these are invitations to the birthday bash.  Now all that is left is to print the party info for the inside of the card and they're ready to go!  Now unlike last year, when I had to make a million Mario-themed decorations because there were none in the store, I found a ton of great stuff online for the Minion party...wahoo!  Saves me a ton of time for other fun projects!!  Gotta love the internet ;)

Tuesday, March 18, 2014

Simple Kid's Birthday Card

Well, March Break is over and it certainly went out with a bang...and not in a good way!  Saturday morning I discovered water in our basement...in the corner where I have my stamping stuff!!  The carpet was sopping wet as were many of my projects and supplies.  After shedding some tears, it was full damage-control mode, getting as much of my stuff out of harm's way as quickly as I could.  Then it was all about the clean up and rearranging our basement.  Not the way I wanted to spend my Saturday, but I am happy to say that I now have a new (dry!) stamp area that is a little leaner on supplies, but that works better than my old set-up.

Now, if only I had time to use it!  Sunday morning we got word that my husband's 94-year-old aunt had a massive stroke and was nearing the end of her life.  My DH dropped everything and drove 2-1/2 hours to see her in the hospital.  Needless to say yesterday was not a good day.  As of my writing this post, she is still hanging on, but barely; which means a funeral and all that entails later this week.

As if that weren't enough, the person who does our morning childcare and gets our son off to school each day is out of the country for the next four weeks, which means we have to pick up the slack.  My DH and I are taking turns going into work late each day, which means a hectic flurry of trying to get caught up when I do finally get there.  Monday morning was the first day of what promises to be a very long four weeks!  Ugh!

So, enough complaining...if you're still reading, let me show you a really quick and easy birthday card I made a while back...

Birthday card featuring the Tag It stamp set and Birthday Basics DSP
This was another one of those use-up-what's-on-your-desk cards.  I had lots of scraps of Birthday Basics DSP sitting around as well as bits of Stitched Satin Ribbon.  This card kind of made itself...except for the stamping, which I did by inking the stamp using markers to achieve the multi-coloured image.  It's a bit tedious, but worth the effort when you see the end result.  Sadly, I forgot to take a picture of the inside of this one and my photo cube isn't set up yet after Saturday's fiasco!  You'll just have to use your imagination!!

Before I let you go, here are this week's Weekly Deals...lots of my favourite embellishments on sale...time to stock up!


Pewter Stampin' Emboss Powder Item # 124114
Regular Price: $4.75 US/$5.95 CAN
Discounted Price: $3.56 US/$4.46 CAN


Silver Glass Glitter Item # 120995
Regular Price: $3.95 US/$4.95 CAN
Discounted Price: $2.96 US/$3.71 CAN


Tempting Turquoise Stampin' Emboss Powder Item # 122950
Regular Price: $4.75 US/$5.95 CAN
Discounted Price: $3.56 US/$4.46 CAN


In Color Boutique Details Item # 130938
Regular Price: $8.95 US/$11.50 CAN
Discounted Price: $6.71 US/$8.63 CAN


Vintage Trinkets Accents & Elements Item # 118764
Regular Price: $5.95 US/$7.50 CAN
Discounted Price: $4.46 US/$5.63 CAN


Scallop Trim Border Punch Item # 118402
Regular Price: $15.95 US/$20.95 CAN
Discounted Price: $11.96 US/$15.71 CAN


Crisp Cantaloupe 3/8" Ruffle Stretch Trim Item # 130021
Regular Price: $8.95 US/$12.50 CAN
Discounted Price: $6.71 US/$9.38 CAN


Grad Party Ensemble - Digital Download Item # 129877
Regular Price: $9.95 US/$10.95 CAN
Discounted Price: $5.97 US/$6.57 CAN

Saturday, March 15, 2014

Messy fun!

Happy Saturday!!  Normally I'd be ecstatic about the weekend's arrival, however the weekend at the end of a week of holidays?  Not so much!  Back to work on Monday I go :(

Here's a little something to get your crafting Mojo working this weekend.  It is time for a new challenge over at The Technique Twist and this time we are all about getting messy with shaving cream!  I did this technique with my monthly group this past week and it was such fun!  Here is the card I designed for the challenge, which we also made at my class:

Thinking of you card featuring the Shaving Cream Background technique and using the Hello Lovely, Petite Petals, Flower Shop and Gorgeous Grunge stamp sets
I love the way this one turned out!  It is so pretty and girlie and just plain yummy!  I am so loving all the trendy gold that is turning up these days, so I decided to embrace it on this card.  Here is how I put this together:
  • To create the marbled background, I started by squirting shaving cream (don't use gel...it doesn't work so well) onto a disposable plate.  I smoothed it out and then added several drops of Strawberry Slush and Crisp Cantaloupe reinker.  I swirled the ink around into the shaving cream, taking care not to over mix it so that I could still see the two distinct colours.  I laid my card stock down into the shaving cream and pressed it down to make sure I picked up as much colour as possible.  I removed the card stock and wiped off the shaving cream in a circular motion to reveal the marbled colour beneath.  So messy, but so very cool!!
  • The gold doily is simply one of the white Tea Lace Doilies that I inked completely with Versamark and then heat embossed in gold...such an easy way to get a golden gilded doily!
  • The sentiment is heat embossed in gold and punched with the Decorative Label punch.
  • The flowers are stamped in Strawberry Slush and punched with the Pansy (large) and Petitie Petals (small) punches.  I added a little touch of gold to each flower by inking the edges with Versamark and then heat embossing in gold.
  • Once the marbled background piece was dry I stamped it using the Gorgeous Grunge stamp set and Metallic Gold Encore ink.

On the inside, I stamped a few more flowers in the lower right corner.  The sentiment is from the Best of Greetings stamp set (only available till March 31st...get it now!), stamped in Strawberry Slush and punched with the Decorative Label punch.  I added a punched flower and adhered it with dimensionals.


So, are you ready to get messy this weekend?  Get out the shaving cream and have some fun!  Then be sure to link up over at The Technique Twist so we can all see your fabulous creation! 

Thursday, March 13, 2014

Bubble Background Birthday

This month my techniques group is learning how to do the Bubble Background technique.  I showcased it a while back as one of the challenges over at The Technique Twist, but never got to show it to my monthly group.  I decided it was time!  Here is the card we'll be making at tonight's class:

Birthday card featuring the Bubble Background technique with the Petal Parade and Sassy Salutations stamp sets.
Can you tell I'm ready for spring??  Two days ago it was a beautifully mild, sunny day...warm enough for shirt sleeves.  Yesterday we received 20 cm of snow and today it's a high of -10 C!!  I am SO sick of winter, so I decided to make this card as spring-like as possible. 


My colour scheme is Coastal Cabana, Daffodil Delight and Crumb Cake.  I went a little hog-wild with the embellishments on this one, but I love the texture the layers of ribbon add and the sparkle from the little rhinestones.  Check out my how-to HERE for creating the bubble backgound.  It's a fun technique that can be a wee bit addictive!! 

Inside view with sentiment from Bring on the Cake and images from Petal Parade and Banner Blast Sale-a-bration stamp sets.

 I hope my class participants like this one...I know I would love to receive a card like this in the mail on this cold and snowy day!!  I sure hope the weather is nicer wherever you are today!

Wednesday, March 12, 2014

Wedding Wishes

We are invited to a wedding at the end of this month.  The colour scheme is black, white and red, so I thought I'd be pro-active and get the card made ahead of time.

Bridal card featuring the So Very Grateful stamp set with sentiment from the Express Yourself hostess set.
I love the way the images from the So Very Grateful stamp set looked embossed in white on black card stock!  I had planned on taking this card in a completely different direction, but shifted gears after doing the heat embossing.  It really is a super-simple card, in terms of layout and design.  I added a bit of (retired) Real Red satin ribbon and a black glimmer brad, not to mention some rhinestones in the centres of the flowers. 

Inside view with sentiments from Love & Laughter
On the inside I reversed the images, stamping in black on white card stock, and added two sentiments from the Love and Laughter stamp set.  Unfortunately we are not able to attend the wedding...hope this card expresses our best wishes for us!

Monday, March 10, 2014

Cool Kid

Happy Monday...and happy March Break!  I am so happy to have a week off work to spend at home with my boy.  We have lots of fun activities planned (plus a little stamping time for Mommy too!).  Here is a card I put together that I plan to tuck into my son's lunchbox when he heads back to school next week to remind him how much I love him and how much fun I had being home with him this week:

Any-occasion card featuring the Cool Kid stamp set and Fresh Prints DSP

When I first saw the Cool Kid stamp set in the Occasions Catalogue I knew I had to own it.  I have so very few fun stamp sets for kids and this one is so versatile!

Here are some quick tips for putting this one together:

  • I stamped the cat in Crumb Cake ink and die cut the banner using the Banners Framelits.  The bow tie is stamped in Coastal Cabana and adhered with a dimensional.
  • The background is embossed using the Decorative Dots TIEF.  The red banner is embossed using the Arrows TIEF.
  • Both pieces of DSP are from the Fresh Prints stack.
  • The airplaine is stamped, fussy cut and then adhered with a dimensional.
  • The Linen Thread was originally tied in a bow...I accidentally snipped one of the loops of the bow, liked the look and snipped the second loop.
  • I die cut the right edge of the chevron patterned DSP using the Finishing Touches Edgelits.
 On the inside I stamped the sentiment using Real Red ink, the loop and the airplane using black Staz On.  Simple, easy and fun...just what I'm hoping this March Break will be!!

Thursday, March 6, 2014

Frosted Sympathy

I recently found myself in need of a sympathy card for someone from our church.  This is what I came up with:

Sympathy card featuring Natural Compositions DSP and sentiment from the Simply Sketched hostess set.
Can you believe the only stamping on this card is the sentiment?  I used some of the gorgeous Natural Compositions specialty paper, which has all of those beautiful floral images already clear embossed on it.  I just sponged it all over with Whisper White craft ink to make the images pop and give it all a frosted look...so appropriate, given the current temperatures around here!  To get the halo around the focal point I left the framelit in place after die cutting the circle to act as a mask.


I added a bit of Delicate Details Lace Tape and then the sentiment from Simply Sketched which I stamped in Baked Brown Sugar and punched with the Large Oval punch.  I layered it on a scalloped oval which I punched from some scrap Baked Brown Sugar card stock.  I highlighted the sentiment with tiny pearls and added a vellum butterfly I die cut using the Beautiful Butterflies Embosslit.
Sympathy cards are often hard to make, given their purpose, but are so appreciated when they are given to someone mourning the loss of a loved one.  I hope this one gives a little comfort to the person who receives it.

Wednesday, March 5, 2014

His and hers baby cards

Several aquaintances and customers of mine are expecting babies in the next little while, so I figured I had better stock up on some baby cards.  I decided to try another type of card I've seen popping up all over Pinterest lately that uses the Scalloped Tag Topper punch to create a unique closure.  Have a look:

His & Hers Baby cards featuring the Label Love stamp set.
I decided to make both a girl and a boy card so I would be prepared for either.  I kept the same basic design for both but used Blushing Bride for the girl card and Pool Party for the boy one.  Crumb Cake and Whisper White made for versatile neutrals for both.  Here is a closer look at the girl card:

For the card base I started with a 4-1/4" x 9-7/8" piece of Crumb Cake card stock, which I scored at 5-1/2".  I marked the centre on each short side and then inserted each end into the scalloped tag topper punch over top of the guides for inserting a tag.  (This took some wiggling and care, but it will slide in there!)  I punched both ends and then trimmed the excess card stock with my paper trimmer.  I scored the resulting tab on the longer half of the card (this is the back side) and then folded along the score line.  I also folded the original score line to fold the card in half.  The result is a front that is smaller than the back, to allow the scalloped tabs to overlap.


To decorate the card I used some DSP from the Fresh Prints stack and added half a Tea Lace doily...love those for baby projects! I punched a heart from Blushing Bride card stock, using the Full Heart punch, and then embossed it using the Perfect Polka Dots TIEF.  I punched a little glimmer heart using the Small Heart punch.  The label is stamped in Crumb Cake and then punched using the Artisan Label punch.  I then layered a 7/8" scalloped heart punched from Silver Glimmer paper over top.  I stamped the label again in Blushing Bride, punched out the text using the 3/4" circle punch and adhered it to the centre of the label using a dimensional.  I added a little Vintage Faceted Button with a bit of white Baker's Twine and a tiny little flower punched with the Itty Bitty Shapes pack.  I tied it shut using a bit of Blushing Bride Stitched Grosgrain ribbon.

Inside view with sentiment from Cuddles and Kisses and images from Banner Blast sets.
On the inside I embossed the right edge of the Whisper White layer using the Delicate Designs TIEF and then stamped the sentiment from Cuddles and Kisses in Crumb Cake.  I added a couple of little hearts from the Banner Blast set stamped in Blushing Bride ink.

Here is the boy version:


The only variation here is the use of Pool Party instead of Blushing Bride and stars instead of the small heart and flower.


The finished size of both of these cards is 4-1/4" x 4-5/8".  Cute and still appropriately-sized to mail...gotta love it!

Tuesday, March 4, 2014

It's about time...for a Card-in-a-box

Well, I figure it's about time I jumped on the bandwagon.  These cards-in-a-box are everywhere these days, so I decided it was about time I gave one a go.  I'm reasonably happy with my first attempt...see what you think:

Birthday Card-in-a-box featuring the Secret Garden, Petite Petals, Label Love and Flower Shop stamp sets.
I decided to try one that is sized to fit in a standard Whisper White envelope.  It made for a slightly smaller canvas to work with, given this was my first try.  I made the box from Sahara Sand card stock and covered the panels using Sweet Sorbet DSP.  The flowers came from a variety of sets, all with coordinating punches or Framelits to eliminate the need to fussy cut.  I wanted to go for quick and easy, since I will likely do this one in a class at some point. 


The Summer Starfruit and large Pool Party flowers came from the Secret Garden set and were die cut using the matching Framelits.  The Crisp Cantaloupe flowers came from the Flower Shop set and were punched with the Pansy punch.  The small Pool Party flowers came from the new Petite Petals set and were punched with the matching punch.  I die cut the leaves from Pistachio Pudding card stock using the Secret Garden Framelits and then ran them through the Perfect Polka Dots TIEF to add a bit of texture.


I used strips of window sheets to attach the flowers to the box and then adhered other flowers with glue dots or dimensionals to complete my bouquet.  It really was like arranging real flowers putting this together!  Lots of fun!  The sentiment is from the Label Love stamp set and is punched using the Artisan Label punch.

I left room on the back of the box to write a personal greeting to the recipient, decorating it with a few stamped flowers.
Ok, so now I see why this syle of card is so popular!  They offer a real WOW and are such fun to create!  I plan to try a few more in different sizes...stay tuned!

Monday, March 3, 2014

Paper-pieced Birthday

Happy Monday!  I hope you had a great weekend.  Mine was good...lots of stamping time for me...yippee!  I have lots of new projects to show you this week, starting with this one that I made using the sketch over at Freshly Made Sketches.  Check out this week's sketch:


...and here is my take on it:

Birthday card for FMS125 featuring the Another Great Year Stamp set and Sweet Sorbet DSP.
Now, I didn't do anything dramatic with this sketch.  In fact, when I first saw it this card immediately came to mind!  That doesn't happen very often...usually there is a whole lot of trial and error involved.  To get the coloured banners, I paper-pieced them by stamping the image a second time on some Sweet Sorbet DSP, fussy cutting them and then adhering them to the stamped image.


I did the same thing with the icing on the little cupcake, as well as the banner on the inside of the card.


I also stamped the sentiment from the Another Great Year set  and coloured the candles using my Pool Party, Pistachio Pudding, Summer Starfruit and Crisp Cantaloupe markers.
There really is nothing like a sketch to get your creative juices flowing!  I really needed a little kick-start and this was the perfect way to get it!  Give it a go...you'll be amazed at what you'll come up with.  Have a great week!

Saturday, March 1, 2014

Faux Frame Challenge

Happy Saturday and happy March!  I hope you have some stamping planned this weekend!  We have a fun new challenge over at The Technique Twist for you to play along with.  We're all about the Faux Frames this week!  Now, do a quick online search and you'll find TONS of variations on this technique.  That is our challenge...find a new way to create a faux frame.  Here is my take on it:

Birthday card featuring the Faux Frame technique with the Summer Silhouettes, Secret Garden, Papillon Potpourri and Sweet Essentials stamp sets.
For my faux frame I used Simply Pressed Clay in my Woodgrain TIEF!  I went for a faded driftwood kinda look.  I love the effect and am so going to try it with other patterns.  Here is how I created my frame:
  • Press Simply Pressed Clay onto the open Woodgrain TIEF, making sure it is fairly thick...too thin and it will tear when you run it through the Big Shot.
  • Close the folder and run it through the Big Shot with no tabs on the multipurpose platform.
  • Set the folder, with clay inside, aside to dry for at least 24 hours.
  • Carefully remove the dried clay from the folder, taking care not to tear the clay.  (Don't worry if it does tear...mine did (several times) and I just put it back together when I glued the frame to my project.
  • Using the Squares Collection Framelits, die cut a square frame from the embossed clay.  You can play with the width of the frame by trying different sizes of framelits until you're happy with the look of it.
  • Sponge the entire frame with Smokey Slate ink, following the grain of the "wood".  Be sure to get into the grooves to eliminate any white clay showing through.  Be sure to also sponge the inside and outside edges so they are no longer white.
  • Sponge the entire frame again with Basic Gray ink, but this time go against the grain to highlight the texture.
  • Sponge lightly one more time, against the grain, with Basic Black ink to add more depth and texture.


Once I had my frame made the rest of the card was a piece of cake.  I stamped the floral images from the Summer Silhouettes set on a 3-1/4" square piece of card stock using Basic Gray, Island Indigo and Pool Party inks.  To glue the frame to the card stock I used Sticky Strip.  Tombow will also work with Simply Pressed Clay but I didn't want to wait for the liquid glue to dry ;)
The leaves on the frame are from the Secret Garden stamp set, are heat embossed in silver and are die cut with the coordinaring Framelits.  I glued them to the frame using Tombow.  The little butterfly is stamped in Basic Gray ink on vellum and punched with the Bitty Butterfly punch.  It is also adhered with Tombow.
The background is a piece of Pool Party card stock that I embossed using the Pretty Print TIEF...sure hope that one comes back in the new Annual Catty!  I left a smooth strip at the bottom so that I could stamp the sentiment from Sweet Essentials in Basic Gray.

Inside view with sentiment from Simply Sketched.
On the inside I stamped the same floral images I used on the front and added the sentiment from the Simply Sketched hostess set.

I hope you'll make time this weekend to try creating a faux frame.  There are SO many possibilities!  Check out the projects by my fellow design team members over at The Technique Twist and then give it a go.  We'd love to see what you create!
Related Posts Plugin for WordPress, Blogger...