Showing posts with label Something to Celebrate Stamp Set. Show all posts

Monday, April 2, 2018

Tulips for Mom

Happy belated Easter! I hope you had a wonderful weekend filled with the love of family and friends. We had a fabulous time celebrating the resurrection with our family.
Today I thought I would share a project I designed for my all-occasions card buffet last week featuring the Tranquil Tulips host set...

I absolutely LOVE this stamp set! I only wish I had discovered it sooner. It is such fun to create beautiful tulips in a rainbow of colours. Here I used Berry Burst and Sweet Sugarplum for the blooms and Emerald Envy for the stems and leaves. Here's a closer look...

I stamped off the background layer for each bloom so that the more detailed foreground image would stand out more. I used Basic Black to add the centres to each flower. The sentiment is from a long-retired host set called Something to Celebrate...I just love the scripty font. I stamped the sentiment in Basic Black on a label cut with the Petals and More framelits and then layered it on a filigree label die-cut with the same set. The paint-chip DSP along the side is from the Colour Theory DSP pack.


On the inside I added a Whisper White card stock layer on which I stamped another Berry Burst tulip and a sentiment from the Special Celebrations set.

The nice thing about this card is that a simple change in the sentiment on the front would make a lovely birthday or get well card...gotta love versatility!

Have a super week...thanks for stopping by!


Product List
Big Shot
[143263]
$136.00

Tuesday, September 2, 2014

It's the First Day of School!

Well...the inevitable has happened.  Summer is over and school starts today.  My sweet little boy is starting grade two at a brand new school.  Being a teacher myself, it is nearly impossible for me to take the day off to see him off to school...I'll be gone before he even gets up, so I made a special card to tuck in his backpack for him to find when he gets to school.  We are all a little nervous about the new school and all that it entails and I want him to know I'm thinking about him and hoping his day goes well.

If you've been around Stampin' Up! for a while you'll recognize the DSP and stamp set I used.  The DSP is from the long-retired Storytime pack.  I just love it, especially for occasions like today!  It has some fabulous school-themed prints that come in handy many times.  The good news is that it is still available on the Clearance Rack AND this paper is available as a digital download for My Digital Studio, so you can still get this great paper.  If you have kids or are a teacher (or both!) you should own this paper!

I used several different stamp sets, some current, some long-retired.  The word Happy comes from a retired Hostess set called Something to Celebrate.  The first day of grade and the A+ are from another retired set called First Day.  The little boy is from the still-current photopolymer set called Dear Heart.  I coloured him using the Skin Tone assortment and Daffodil Delight Blendabilities


On the inside I made some punch art textbooks using the Word Window punch.  The apple is die cut using the retired Cannery Framelits, which are also still available on the Clearance Rack.  The sentiment is from the Dear Heart set.

I hope this little card is a reminder to my sweet boy just how much his Mommy loves him and hopes he has a great year in grade two!

Wednesday, April 30, 2014

Celebrating Mom

Happy last day of April!!  With Mother's Day just around the corner I've found myself creating lots of projects to celebrate the Moms in my life.  I used this week's sketch from The Paper Players for this one...

Here's the sketch:


...and here is my version:

Mother's Day card for PP193 featuring the soon-to-be-retired Secret Garden stamp set with Gingham Garden DSP.  Sentiment is from Remembering Your Birthday.
I have to say I am going to seriously miss the Secret Garden stamp set and coordinating Framelits!  I love how quickly and easy it is to add flowers to a project WITHOUT fussy cutting!  These are two retiring products that will not be leaving my stash any time soon. 


I made a vow to stop buying every single pack of DSP from every catalogue this year, as I always end up with TONS of it left over...not because I don't use it, but because I just buy SO much!  Unfortunately I haven't kept my promise!  I have lots of DSP left to use up before the end of the catalogue year, so I pulled out the Gingham Garden pack for this project and even made a matching envelope liner ;)
Other retiring products on this project include the stitched grosgrain ribbon in Daffodil Delight and the Large Rhinestone jewels.  Both are items I use a lot and will miss but I just know there is going to be so much in the new catalogue to love I will soon forget all about these beloved favourites!

Inside view with sentiments from Perfect Words (retired) and Something to Celebrate (retired)
 On the inside I pulled out a couple of long-retired hostess sets.  Both had exactly the sentiments I was looking for.  See?  Sometimes it pays to be a hoarder!
Now to decide which of the special Moms in my life to send this one to...

Monday, April 21, 2014

Petals for Mom...Retiring Lists and FREE SHIPPING!!

http://www.stampinup.com/ECWeb/default.aspx?email=lgirsa%40gmail.com&phone=%28519%29+574-6059
Click the image above to place your online order NOW!  Your order will ship directly to you for FREE!  WOOHOO!!

Nope.  Your eyes are NOT deceiving you.  Stampin' Up! is offering FREE SHIPPING on everything beginning today until this Friday, April 25th!  Are you excited?  Can you handle even more great news?


The Retiring Lists are now available too, with great deals on products to which we'll soon be saying a fond farewell.  All items on the Retiring Lists (including stamps) are available only while supplies last .  Get them now and don't pay for shipping...can it get any better??

Click HERE to view the list of Retiring Stamp Sets
Click HERE to view the list of Retiring Accessories

I have a sweet little project that I designed for my Brides, Babies and Birthday Card Buffet this week.  It is the perfect way to let your Mom know how much you appreciate her this Mother's Day...

Mother's Day card featuring the Petite Petals stamp set with sentiment from Delightful Dozen
I just love this colour combo of Smokey Slate, Coastal Cabana and Crushed Curry.  I was inspired by the Eastern Elegance DSP pack, which just happens to be on the Retiring Accessories List!  I wanted to try doing an angled layout, as I've seen many lately that I just love.

Interestingly, this was another project I put together using odds and ends from the pile on my stamp desk!  I had the scrap of DSP, a bit of ruffled ribbon and half a doily laying around from other projects, so I put 'em all together and this is what I ended up with.  I liked it so much I decided to incorporate it into the line-up for this week's event.

Inside view with sentiment from the Something to Celebrate (retired) Hostess set.
Now, I'm off to browse the Retiring Lists and place my order before everything on my Wish List sells out...you should do the same!!

Friday, June 24, 2011

A promise kept...

Last night I was just too tired to stamp anything to post.  Tonight I was too busy!  I just finished my Hostess Appreciation event and it was a blast!  My hostesses from the past year got spoiled silly and we had lots of fun, games and, of course, stamping!  Now don't click away mad...I do have a card for you!  It is the card I designed for my guest design gig over at A La Card Monkey.  The theme and sketch were a little tough, given that I am Canadian.  Have a look and see what I mean:
Interestingly, the challenge at the Pals Paper Arts this week is to use stars as a design element.  So, I don't have much in the way of patriotic American stamps, but I do have lots of red, white, and blue ink and cardstock and I have stars....so here is what I came up with:

"Patriotic" Red, White, and Blue card for Monkey62 and PPA99 using Grunge Rock and Extreme Elements stamp sets

Close up of focal image

Inside of card

I really love working with these two stamp sets.  They are so easy to layer and have fun with and, let's face it, they're cool!  I also got to use my spritzer tool on this card, which ALWAYS makes me happy!  The sentiment is from a retired Level 2 hostess set called Something to Celebrate and was just perfect for this card.  In the end, what started out as a major challenge ended up as something I really like!  Thanks so much to the ladies over at A La Card Monkey for giving me another guest designer experience...always such fun!

Sunday, March 20, 2011

Spring is in the air...

The weather this week has been gorgeous!  I was out on Thursday and Friday with no jacket and my almost-4-year-old son hopped on his bike and was flying around our court in only a light sweater.  We still have a mountain of snow in the centre of the court, where the plows have been piling it all winter, but it is getting smaller and smaller every day.  Inspired by all this nice weather and the fact I have three workshops and two monthly clubs in the next seven days, I worked on some Easter/spring-themed projects.  For the ones I'm going to show you today, I pulled out one of my very favourite DSP's from the catalogue:  Nursery Suite!!  I love the colours and patterns in that paper and they are so perfect for springtime cards.  They work especially well for Easter...check these out!
I just love those little bunnies!!  So Cute !  (By the way, that's also the name of the stamp set that coordinates with this paper!)

Inside of Nursery Suite Easter card...I looked at it and thought..."Gee, that's a cute cardfront", so...

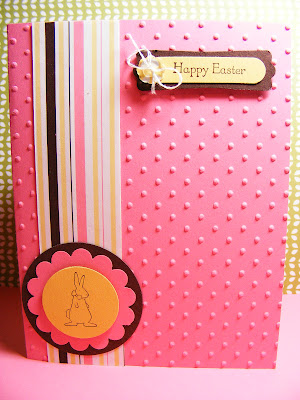
Here it is!  A quick and easy Easter card that will likely make it into my Spring Stamp-A-Stack line-up!
Aren't those paper patterns just the sweetest??  Both of these cards went together pretty quickly and easily...here are the deets:

Card 1:  Using the so saffron bunny patterned paper from the Nursery Suite pack, I cut a piece that included 4 complete bunnies (nothing like spare bunny parts to ruin your Easter fun!).  I layered that on a slightly larger piece of regal rose cardstock and then layered that on a slightly larger piece of chocolate chip.  Setting that aside, I cut a 5 1/4" x 4" piece of chocolate chip cardstock and a 5 1/8" x 3 7/8" piece of so saffron DSP and layered them.  I took a piece of so saffron grosgrain ribbon (retired, from SAB a couple of years ago!), wrapped it around the layers and secured the ends using glue dots.  I then took a so saffron flower brad, wrapped the prongs around the ribbon and stuck it through the cardstock layers, opening the prongs on the back to secure the brad.  I then adhered the entire piece to a regal rose card base.  I added my bunnies and then stamped the sentiment (from the Something to Celebrate level two hostess set in the mini), punched it out and adhered it below the brad.
For the inside of the card, I cut a strip of the striped patterned DSP and adhered it along the right side of the card.  I stamped the little bunny from the So Cute set in chocolate chip cardstock, punched it out using my 1 1/4" circle punch and then layered it on a 1 3/8" circle in regal rose.  I adhered it using dimensionals.  I really liked the look of this, so I did a second card, making the inside of this one into the front of the new one!

Card 2:  Starting with a regal rose card base, I ran it through my Big Shot using the perfect polka dots embossing folder.  I cut a strip of the striped patterned DSP and adhered it along the left side of the cardfront.  I then stamped the little bunny from the So Cute set in chocolate chip ink on so saffron cardstock.  I punched him out using my 1 1/4" circle punch and layered it on a 1 3/4" scalloped circle in regal rose and then a 2" circle in chocolate chip. I adhered it using dimensionals.  I stamped the sentiment, from the Teeny Tiny Wishes set, in chocolate chip ink on so saffron cardstock, punched it out using my word window punch and layered it on a modern label in chocolate chip.  I threaded an itty bitty clear button with white embroidery floss, tied a bow and adhered it to the sentiment piece using a glue dot.  I then adhere the sentiment using dimensionals.  How fast and easy was that?!?
Related Posts Plugin for WordPress, Blogger...