Showing posts with label floral essence stamp set. Show all posts

Monday, January 4, 2021

Countdown to Sale-a-bration - Heal Your Heart

 Happy Monday, and welcome to day 7 of my countdown to Sale-a-bration series! Just one more sleep till the BEST promotion of the year begins! There is nothing like FREE stamping products to get me excited!

Today I am focusing on the Heal Your Heart stamp set and the Flower and Field Designer Paper. Both of these are GORGEOUS products!

stampin' up!


Paper this beautiful called for an extra-special card...check out this fun-fold design:


Heal your heart saleabration 2021


heal your heart saleabration 2021

heal your heart saleabration 2021

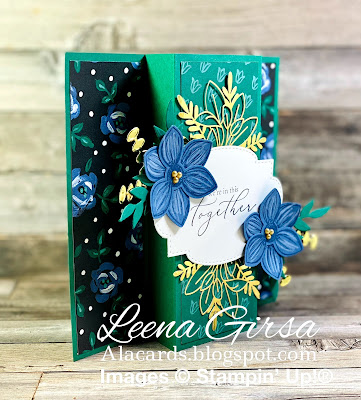
Although this is a super-simple fun fold to make, it sure packs a huge WOW! I wish I could take credit for this fold, but I must give credit to my friend and card-making hero, Patty Bennet for the basic layout. To create the card base, start with a 5-1/2" x 8-1/2" piece of card stock and then, with the 8-1/2" side at the top, score at: 2", 3-1/8", 5-3/8" and 6-1/2". 

I used a single piece of Flower and Field DSP for my background. The blue floral pattern on the side panels are one side of the paper and the green pattern on the centre panel is the reverse side. The sentiment label is die-cut from Whisper White card stock using the Stitched So Sweetly dies. I stamped the sentiment from the Heal Your Heart stamp set in black ink. The gold filigree element behind the label is from the Forever Gold Laser-Cut Specialty Paper. The flowers are from the Floral Essence stamp set. I stamped them in Misty Moonlight ink on card stock of the same shade and then punched them out with the Perennial Flower punch. I added white highlights to the petals using a white watercolour pencil and some gold metallic pearls to the centres. I added some greenery, die-cut using the Forever Flourishing dies, from Shaded Spruce card stock. Here's a closer look...

heal your heart saleabration 2021

I demonstrated this card in the video below:


Measurements:
5-1/2" x 8-1/2" Shaded Spruce card stock scored (with 8-1/2" side at the top) at 2", 3-1/8", 5-3/8" and 6-1/2" 
1-3/4" x 5-1/4" Flower & Field Designer Paper (x2)
 2" x 5-1/4" Flower & Field Designer Paper 
Scrap Misty Moonlight and Whisper White card stock for punching/die-cutting 
Forever Gold Laser-cut Specialty Paper

Thanks so much for joining me today...have a fantastic week and don't forget to check in tomorrow for all of the details of Sale-a-bration AND the new January-June Mini Catalogue.


heal your heart saleabration 2021


Product List

Tuesday, May 12, 2020

Operation #stophoardingpaper

Happy Tuesday! I hope you had a good weekend and, for those celebrating, a happy Mother's Day. Here it felt more like Christmas than Mother's Day as we had record cold and SNOW! My poor daffodils and tulips were NOT impressed...and neither was I! My family, though, made it a lovely day with a huge, yummy breakfast and thoughtful gift. You'll see the benefit of my gift in the photos below...courtesy of my new iPhone 11 Pro! I have to say, the camera(s) in that phone are incredible! I'm so loving the quality of photos I'm able to take!

As we wind down one annual catalogue and gear up for a brand new one I am always faced with the dilemma of having WAY too much beautiful Designer Series Paper sitting around. Can you relate? Do you feel guilty buying the pretty new papers when you have shelves full of perfectly lovely papers from past catalogues? Well, today is THE DAY we stop hoarding and finally start USING that beautiful paper. Check out these projects...


When I first saw my friend Patty Bennett post this ingenious fold, I knew I HAD to try it! Believe it or not, each of these three designs starts with the same basic cutting and scoring...and it's SUPER easy! You start with a piece of Designer Series Paper that is 5-1/4" x 11-3/4" and then score with the long side at the top at: 1-3/4", 4-3/4" and 7-3/4"....that's it! Then it's just a matter of adhering various sections to create the different looks...here's a closer look at each one...

This one is the most basic and involves simply adhering the scored and folded Designer Paper to a 4-1/4" x 5-1/2" card stock base...super simple!


This next one is a step up and requires adhering the front panel to the middle one...


This last one involves turning the design horizontally and creating pockets by adhering the edges of each panel. The back pocket contains a slide-out card for a message and the front pocket will accommodate a gift card...


For all of these designs I used the GORGEOUS Perennial Essence Designer Series Paper and coordinating Floral Essence stamp set and coordinating Perennial Flower Punch. I also used some new items from the upcoming 2020/21 Annual Catalogue, including the Tasteful Labels, Ornate Borders, and Ornate Layers Dies. I love it when I can combine products I have had for a while with new ones!

Now, several of the products I used here are retiring, so if you haven't already done so, you'll want to scoop them up before they disappear forever. These include the Perennial Essence Designer Paper and the Floral Essence Bundle. 

I'll be demonstrating this versatile fold in today's Live @ Five video over on my Facebook Business page. I hope you'll join me live, but if you miss me, you can catch the replay over on my YouTube channel shortly afterwards. 

Thanks for stopping by today...have a super week and be sure to stop by on Friday for our monthly Stamping Symphony Blog Hop!


Product List
Leaf Punch
[144667]
$22.00
Related Posts Plugin for WordPress, Blogger...