Thursday, August 7, 2014

BeYoutiful Flower Patch

Are you sick of the Flower Patch stamp set yet?  If so, stop reading now!  Today I have the final sample from my Fabulous Flower Patch class coming up at the end of the month.  I turned to the new In-Colours for the colour scheme for this one...

Any-occasion card featuring the Flower Patch stamp set.
This is a super-simple, quick and easy card.  I started by stamping the various flowers using the following colour cobminations:  Perfect Plum and Blackberry Bliss, Lost Lagoon and Island Indigo, Mossy Meadow and Sahara Sand.  Then I ran the stamped piece through the Big Shot with the Perfect Polka Dots TIEF and mounted it on a Lost Lagoon mat before adhering it to a Sahara Sand card base.  The sentiment is inked with Lost Lagoon and Blackberry Bliss markers and die cut using the Project Life Cards and Labels framelits.  I adhered it to a strip of Lost Lagoon card stock that I embellished with some Blackberry Bliss stitched satin ribbon, and then adhered it to the card with dimensionals.


On the inside of the card I stamped more flowers.  Quick and easy and under 10 minutes from start to finish...gotta love it!

Wednesday, August 6, 2014

Monochromatic Flower Patch

Yesterday I showed you a card I made using the Emerging Colours technique with the Flower Patch stamp set.  Today I have another version, but this time it is a monochromatic colour scheme...

Thinking of You card featuring the Flower Patch and A Dozen Thoughts stamp sets and using the Emerging Colours technique
Totally different look, no?  On this one I used the following colours:  Pool Party, Coastal Cabana, Lost Lagoon, Island Indigo and Night of Navy.  The flower is stamped in Lost Lagoon and Island Indigo and die cut with the Flower Fair Framelits.  I added a little bling in the centre of the flower with some rhinestones and made ribbon leaves from Lost Lagoon stitched satin ribbon.

The sentiment is from the A Dozen Thoughts set, is stamped in Night of Navy and die cut using the Project Life Cards and Labels framelits. 

On the inside I stamped more flowers and omitted a sentiment to all space to write an encouraging message.
I have just the person in mind to send this one to.  Hope it brightens her day!

Tuesday, August 5, 2014

Emerging Flower Patch

Well?  How was your long weekend?  Mine was good, but yesterday I discovered a leak under our kitchen sink which led to replacing the entire sink.  The new sink was larger than the original one, which led to cutting a larger hole in the counter top which led to a big mess...oh and did I mention that all of this started at 3:00 pm yesterday?  I was vaccuuming sawdust and wiping down kitchen cabinets at 11:00 last night!  Ah well, the new sink looks great and I'm glad there is no more leak.
Today I have one of the projects I designed for my upcoming Fabulous Flower Patch class. 

Birthday card featuring the Flower Patch and not-yet-released Good Greetings Hostess set and using the Emerging Colours technique.
Kinda funkadelic retro, no?  I have to say the photo doesn't really do it justice...the colours really pop!  So how'd I do it?  I started by sponging Crushed Curry and Melon Mambo ink in random splotches all over a piece of Whisper White card stock.  The cool part it that where those two colours overlap I got a shade remarkably close to Pumpkin Pie!  Once the ink had dried (important to allow time for this!)  I rubbed my embossing buddy all over the inked surface (this is also a VERY important step).  Then I stamped various images from the Flower Patch stamp set using Versamark ink all over the sponged card stock.  I sprinkled on clear embossing powder and the heat embossed it.  Then the magic happened,  I sponged Blackberry Bliss ink over the entire surface.  The ink adheres to the card stock, but not to the embossed images, making those colourful flowers just pop.


The rest of the card was pretty simple.  To do the background stripes I cut 3/4" wide strips of Melon Mambo, Pumpkin Pie and Crushed Curry card stock and adhered them to a 2-1/4" wide strip of Whisper White card stock.  Then I ran the whole thing through the Big Shot with the Arrows TIEF.  I glued the strip to a Black Berry Bliss card base at a 45 degree angle and trimmed off the excess.  The sentiment is from a new set called Good Greetings that will be part of a Host promotion for the upcoming Holiday Catalogue.  I punched it out with the Curly Label punch and adhered it to the stamped piece, adding a wee Vintage Faceted button and some Crushed Curry baker's twine.

Inside view with sentiment from Endless Birthday Wishes.
On the inside I stamped several of the same flower images in Melon Mambo, Crushed Curry and Pumpkin Pie ink and then added a sentiment from the Endless Birthday Wishes set.  I love how this one turned out!

Now since its Tuesdaym here are this week's deals:

Alphabet Press Textured Impressions Embossing Folder
Price: $9.95 
Sale: $7.46
Bermuda Bay Classic Stampin' Pad
Price: $7.25  
Sale: $5.44
Delicate Designs Textured Impressions Embossing Folder
Price: $10.95  
Sale: $8.21
Hearts a Flutter Framelits Die
Hearts A Flutter Framelits Die
Price: $30.95  
Sale: $23.21
Oh Baby Photobook Template -- Digital Download
Oh Baby Photobook Template - Digital Download
Price: $19.95  
Sale: $11.97
Wisteria Wonder 3/4 Chevron Ribbon Wisteria Wonder 3/4" Chevron Ribbon
Price: $12.50 
Sale: $9.38
 
Pear Pizzaz Classic Stampin' Pad
Price: $7.25 
Sale: $5.44
Smoky Slate Classic Stampin' Pad
Price: $7.25  
Sale: $5.44
Travel Log Kit -- Digital Download
Travel Log Kit - Digital Download
Price: $10.95 
Sale:  $6.57

Saturday, August 2, 2014

On the Fringe with the Twist

It's the first Saturday of a brand-new month which means it's time for a new challenge at The Technique Twist.  This time we're all on the fringe...scissors, that is!  I've had my pair of fringees for a while and have used them a fair bit, but not nearly as much as on this card...check it out!

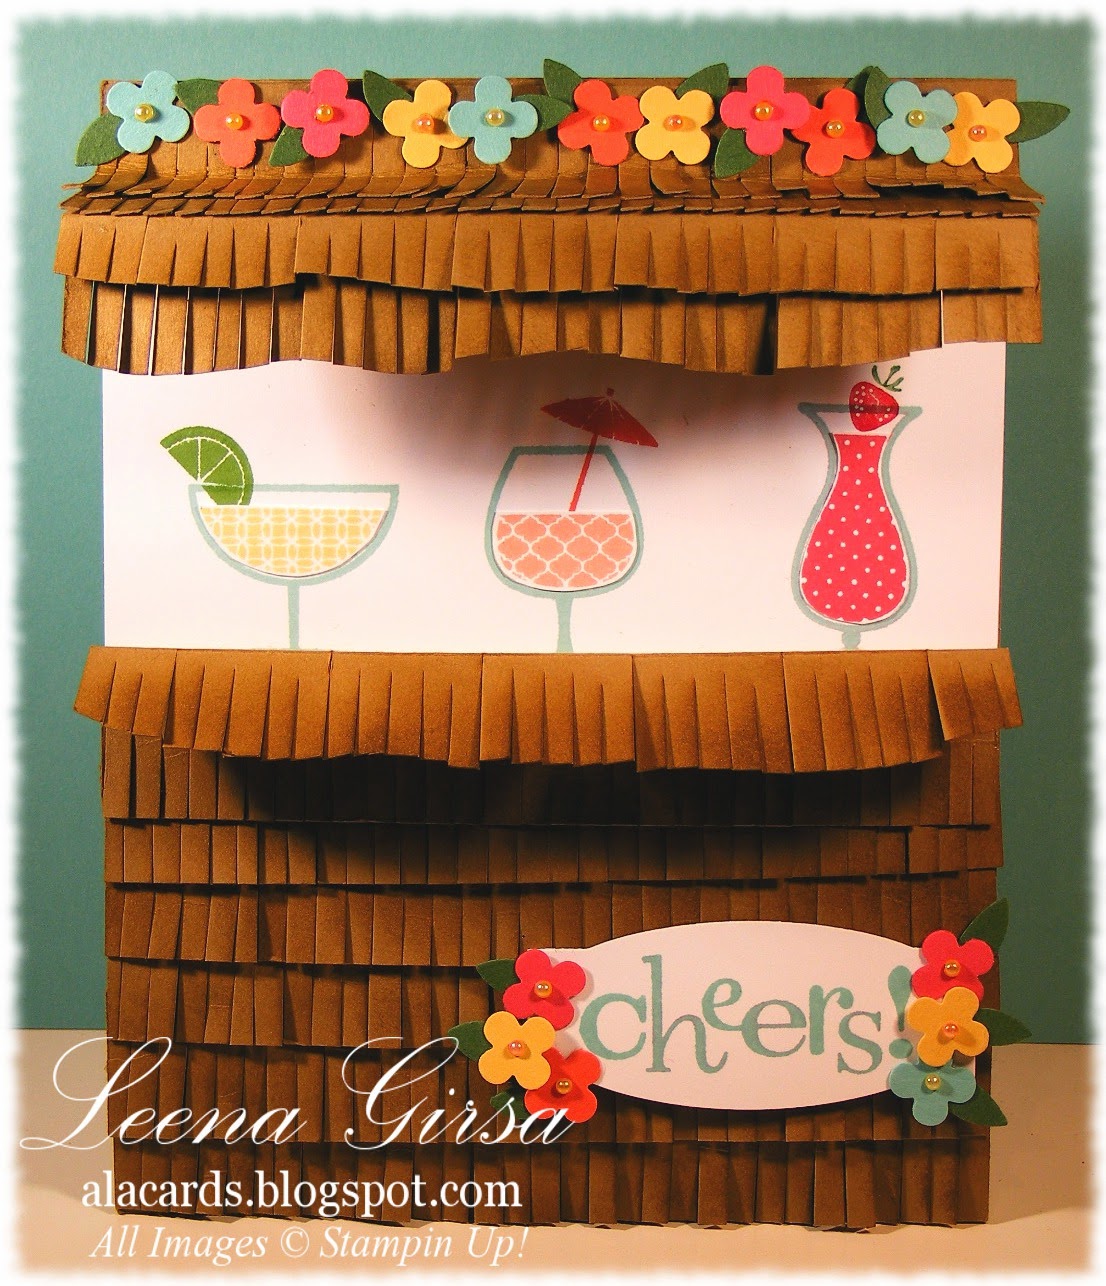
Birthday card featuring the Happy Hour stamp set and my trusty fringe scissors!
This was such fun to make!  I had seen awning cards before but had never made one, so I played around for a bit until I got my measurements right and then started fringing!  To get the wavy edges I free-hand trimmed the fringes with my paper snips.


I know someone out there is going to ask me for measurements, but I really don't know.  I just kept scoring and folding and trimming till I got something that worked.  I do know that each of the little fringe strips is 3/4" wide, but as for the larger parts of the card I have no clue!  This was truly a process of trial and error.  I did sponge each little strip with Baked Brown Sugar ink (I used Baked Brown Sugar card stock) to give them some texture and dimension.


Along the top of my little tiki hut I added some wee flowers punched with the Itty Bitty punch pack (retired) and added a leaf from the Bird Builder punch to each one, as well as some bitty pearls that I coloured with my Blendabilities.  Colours I used were Coast Cabana, Calypso Coral, Strawberry Slush, So Saffron and Garden Green for the leaves.  The drinks are stamped in Pool Party and then paperpieced using So Saffron (margarita), Crisp Cantaloupe (peach daiquiri) and Strawberry Slush (strawberry daiquiri)...can you tell I like my frosty beverages?  ;)

The sentiment is stamped in Coastal Cabana and die cut using the Project Life Cards & Labels framelits.  I added a few more flowers to add island flair.

The inside is sort of anti-climatic...sorry!  I simply stamped a sentiment from the Happy Hour set, along with a little paper umbrella.  After all that effort on the front I had nothing left for the inside..haha!

I hope you'll give this challenge a try.  Even if you don't have fringe scissors you can fake it (psst...I know at least two members of the Twisted Design Team who don't own fringees!).  It adds such fun texture and dimension to projects...you should give it a go and then post it over at The Twist so we can all admire your fringy goodness!

Friday, August 1, 2014

A New Month and A New Promotion!

If you asked my what my single most valuable tool is, aside from stamps and ink, my resounding response would be my Big Shot.  It is the one tool that I use on almost everything I design.  In fact, I have challenged myself in the past to design without using the Big Shot and found it extremely difficult.  That's why I am SO excited about this month's promotion!

Click the image to view all of the fabulous exclusive bundles available.

If you've been waiting for the right time to purchase a Big Shot, that time is during the month of August and starts TODAY!  Now through August 31, you'll receive your choice of one of five FREE exclusive Stampin' Up! stamp set and framelits bundles when you purchase a Big Shot Die Cutting Machine. That's up to a $65 value absolutely free! 

BIG SHOT FREE bundle choices are below. 

Bundle Name Item # Stamp Name Framelit 15% OFF PRICE
Sumthin' with Bubbly Words
Clear-Mount Bundle
138920 Sumthin' Sumthin' Word Bubbles  $ 38.95
Sumthin' with Bubbly Words
Wood-Mount Bundle
138923 Sumthin' Sumthin' Word Bubbles  $41.50
Decorative Goodies
Clear-Mount Bundle
138921 Oh My Goodies Deco Labels Collection   $44.75
Decorative Goodies
Wood-Mount Bundle
138924 Oh My Goodies Deco Labels Collection   $52.50
Celebrating Chalk Talk
Clear-Mount Bundle
138922 Day of Celebration Chalk Talk   $45.75
Celebrating Chalk Talk
Wood-Mount Bundle
138925 Day of Celebration Chalk Talk   $53.25
Flowery Daydream
Clear-Mount Bundle
138910 Daydream Medallions Floral Collection  $55.95
Flowery Daydream
Wood-Mount Bundle
138911 Daydream Medallions Floral Collection  $65.95
Bright & Beautiful Stars
Clear-Mount Bundle
138200 Bright & Beautiful* Star   $54.25
Bright & Beautiful Stars
Wood-Mount Bundle
138644 Bright & Beautiful* Star   $62.75
* Stamp set in the upcoming 2014-15 Holiday Catalogue
Do you already own a Big Shot?  You can get a 15% discount on the bundles above.  Please be sure to use the product numbers listed to ensure you get your discount!

Now for a project!  Today is the day that we demonstrators get to start pre-ordering products from the upcoming Holiday Catalogue.  I have my order in and can not wait until it arrives...so many awesome new goodies for the fall and Holiday season!  Today I want to feature a pair of cards I did using the Beauty of the Season stamp set, which is available right now(!) and is a sneak peek of the Holiday catty.  Check them out...

This one is done using an aquapainter and ink pads for a watercolour look...

Holiday card featuring the Beauty of the Season stamp set and watercoloured using an aquapainter.

...and this one is coloured using Blendabilities:

Holiday card featuring the Beauty of the Season stamp set with sentiment from Teeny Tiny Wishes and coloured using Blendabilities.
As you can see you get two very different looks with the two different colouring media.  I can't say I prefer the look of one over the other...they are just very different.  So you have a preference?  Leave me a comment and let me know what you think!

Thursday, July 31, 2014

Celebrate in Pink

Can you believe it's the last day of July already???  Where did the month go?  My holidays are passing way too quickly!  August means I have to start on school work again to prepare for classes to start in September.  Let the Back-to-School dreams (nightmares!) begin!  Today I decided to try this week's challenge over at Sunday Stamps.  It is all about the pink!


I am not generally a big fan of girlie pink, but I AM happy with the way this card turned out.  I based my design on an old sketch challenge from CAS(E) this Sketch...

Birthday card featuring the masking technique and sentiment from And Many More (134276)
To create the different circles, I began by punching sticky notes with various sizes of circle punches ranging from 1-1/4" down to 1/2".  Then I stuck one at a time on my card stock and, using sponge daubers, sponged on Blushing Bride and then Strawberry Slush ink.  I didn't cover the entire area with the Strawberry Slush so that I got a cool shadow effect.  Once I finished all of the circles I ran the card stock through the Big Shot using the Decorative Dots TIEF to add some texture.  I matted it on Strawberry Slush card stock and adhered it to a Ver Vanilla card base.

The sentiment, from the And Many More set, is stamped in Strawberry Slush and then trimmed with the Banner punch.  I embellished it with a bit of Strawberry Slush thick Baker's Twine, a glimmer star and a Vintage Faceted button before adhering it to the card with dimensionals.

Inside view with another sentiment from the Any Many More set.
On the inside I sponged a few more circles, stamped the sentiment in Strawberry Slush and added a few more rhinestone.
The ONLY thing that is saving me from utter dispair over the end of my month of total freedom is the fact that August brings the Holiday Catty pre-order for demonstrators!!  I am so in love with just about everything in this new catalogue that I simply cannot wait to get my order in.  I'll be up at the crack of dawn tomorrow placing my order in the hope that it ships out by the weekend.  That means I'll have my goodies by next weekend...woohoo!  So many fun new products to play with!!

Wednesday, July 30, 2014

Bloom With Hope Meets Blendabilities

Yesterday I promised you a project using the Bloom With Hope hostess set and Blendabilities.  Here you go...

CAS Birthday card featuring the Bloom With Hope and Papillon Potpourri stamp sets.
Isn't that flower yummy??  I coloured it using the Calypso Coral and Smokey Slate Blenda colour sets.  both of those sets will be available for order starting Friday...be sure to add them to your wishlist.  They are stunning!  This flower reminds me of the beautiful poppies I have growing in my backyard in the spring.
I kept the design for this one really CAS, adding just the wee vellum butterfly and some rhinestones for embellishment.

The background is embossed using the Honeycomb TIEF and the whole thing is on a Basic Black card base.

On the inside I reversed the colour scheme a bit, leaving the flower in black and white and the butterly in Calypso Coral.  The sentiment is also from the Bloom With Hope set.

In case you missed it, I have posted a photo of the projects we'll be making at my Fabulous Flower Patch class coming up at the end of August.  Click HERE for more information.

Now yesterday I forgot to show this week's Weekly Deals!  There are some awesome projects on sale this week!

1/2 Circle Punch
1/2" Circle Punch
Price: $7.95 
 Sale: $5.96
Brights Designer Buttons
Price: $10.95  
Sale: $8.21
Clear Oval Accent Bigz Die
Price: $26.95  
Sale: $20.21
Cupcake Builder Punch
Price: $22.95  
Sale: $17.21
Delight In The Day Photobook Template -- Digital Download
Delight In The Day Photobook Template - Digital Download
Price: $21.95  
Sale: $13.17
Gift Bow Bigz L Die
Gift Bow Bigz L Die
Price: $40.95  
Sale: $30.71
Little Book of Coupons Designer Swatchbook Template -- Digital Download
Little Book Of Coupons Designer Swatchbook Template - Digital Download
Price: $13.95  
Sale: $8.35
Pool Party Stampin' Emboss Powder
Price: $6.25  
Sale: $4.69
Watercolor Wonder Designer Washi Tape 
  Watercolor Wonder Designer Washi Tape  
Price: $6.50  
Sale: $4.88
Related Posts Plugin for WordPress, Blogger...