Showing posts with label Clock Works stamp set. Show all posts

Monday, February 3, 2014

Birthday Bomb

Happy Monday!  Can you believe the weekend is over already??  I spent most of mine in bed with this yucky sinus thing...it just won't give up!  It sure makes doing much of anything difficult these days!
Today I have a project I designed a couple of weeks ago.  I love the grungy feel to it...check it out:

Masculine birthday card featuring the Bombs Away Birthday stamp set, as well as Gorgeous Grunge, Clockworks and Off The Grid.
I kind of went a little crazy with this one!  I used stamps from four different sets, but love the result!


I know I typically give you a run-down of how to recreate my projects, but today I am just feeling too darned crummy.  I hope you'll forgive me.  Here is a peek at the inside...


 Have a good week everyone.  I am hoping this week will see the end of this illness for me!  Enough is enough already!!  Time to start feeling better and get back to normal :)

Tuesday, January 14, 2014

Man Birthday

This is one for the boys.  Yep, they deserve handmade cards too!  I've got another sample to share with you that I designed for my Birthday Card Buffet next week.

Masculine birthday card featuring the You're Amazing and Clockworks stamp sets.
One of the things I love about making masculine cards is that it gives me an excuse to get grungy.  I love sponging and spritzing and distressing...lots of fun!


Here is a quick how-to for this one:

  • I used Naturals Ivory card stock for the base and stamped the balloon image from the You're Amazing set repeatedly using Sahara Sand ink.  I stamped one of the flourishes from the Clockworks set around the edges using Crumb Cake ink.
  • I spritzed the card base using my Colour Spritzer tool and my Basic Black marker.
  • I cut the red pennant from Cherry Cobbler Core'dinations card stock and embossed it with the Argyle TIEF and then lightly sanded it to bring out the lighter coloured core.
  • I cut a pennant from the Modern Medley DSP and stamped the balloon image in Cherry Cobbler and the flourish from Clockworks in Sahara Sand.
  • I layered the two paper pennants with a piece of burlap ribbon cut into a pennant....tip: use Sticky Strip to adhere the burlap!
  • I stamped the sentiment in Basic Black ink on some scrap Crumb Cake card stock and then die the label using the Apothecary Accents framelits.  I stamped the flourish from Clockworks again using Crumb Cake ink.
  •  I layered it on Basic Black using the technique shown on the Tutorials tab above.  I adhered the whole thing to the card using dimensionals.
  • I stamped two little tickets on Sahara Sand card stock using Basic Black ink and punched them with the Ticket Duo punch.  I clipped them in place using a mini library clip I had in my stash.
Inside view with sentiment from Bring on the Cake.
On the inside I just did a little stamping, tying in the images and colours from the front of the card.  I also added the sentiment image from Bring on the Cake, which I stamped in Basic Black.

I hope you enjoyed this little project...maybe the man in your life will too!

Sunday, September 15, 2013

Time for a new Twisted Challenge

Today is the 15th which means its time for a new technique challenge over at The Technique Twist!  This week we're all about Faux Patina...one of my very favourite techniques!  Today I'm going to share one of two cards I did for this challenge...

Any-occasion Man-card featuring the Faux Patina technique, along with the Seasonal Sayings (128009), Clockworks (131973) and Off the Grid (130736) stamp sets.
There is lots going on on this card!  I did this one with my monthly techniques group last week and they loved it.  Here is a rundown on what I did:
  • To create the Faux Patina panel I inked the smooth side of my Alphabet Press TIEF with my Crumb Cake ink pad and then ran a piece of Whisper White card stock through it.  I then sponged with Island Indigo, Always Artichoke and Early Espresso ink (in that order) to get the depth of colour.  Then I lightly rubbed my Versamark ink pad across the whole panel and heat embossed with both gold and silver embossing powder.
  • The background panel is a piece of Early Espresso card stock that I stamped with the Off the Grid stamp and then heat embossed with Early Espresso embossing powder.  I then stamped the gears from the Clockworks stamp set using the silver Encore Metallic ink pad (132142).
  • The sentiment is also heat embossed but this time I used gold, silver and Early Espresso embossing powder.  I sponged the edges lightly with Early Espresso ink and curled the banner with my bone folder before adding the Antique Brad (117273).
I really loved creating this card.  It has been a while since I did this technique...it really can be addicting, especially when you start playing with other ink colour combinations.  Be sure to visit the other design team members' blogs to see their fantastic creations the stop by later this week to see my second project and you'll see how switching up the ink colours gives a whole new look to this technique. 

Sunday, August 4, 2013

More fun with Faux Wax Seal

Happy Saturday!  We have a long weekend here in Ontario and it is the first of the summer when my DH hasn't had to work!  The weather is gorgeous and we are looking forward to a fabulous family time!
Today I want to show you another project I designed for this week's challenge at The Technique Twist.

Any-Occasion card featuring the Clockworks set with sentiment from Really Good Greetings
Clock was done using the burnished vellum technique. 
Close up of 3D clock face
Inside view
I have to say this is one of my favourite designs ever.  I had such fun playing around with various techniques and embellishments to achieve the look I wanted.  It isn't often that I have the time to just play like this! 

Here's a quick how-to for the faux wax seal:
  • On a piece of scrap vellum dump a small pile of gold embossing powder.  
  • Heat the vellum from underneath, taking care not to scorch the vellum, until all of the powder has melted.  
  • Quickly place the gear stamp into the molten pool of gold and leave it in place until the liquid has hardened.  
  • Remove the stamp.  Trim the image so that you have a border of gold all the way around. 
  •  Sponge the edges with Early Espresso ink and adhere to card using Multipurpose Liquid Glue.

Here's how I did the clock:
  • On a scrap of Brushed Gold card stock, stamp the clock image in Versamrk.  
  • Heat emboss in gold.  Fussy cut the clock.  
  • Punch the centre of the clock out using the 1-3/4" circle punch.  
  • Stamp clock face numbers on a scrap of vellum card stock.  
  • Lay the stamped vellum, stamped-side-down, on the back of the clock, centering the numbers in the punched circle.
  • Using a stylus, burnish the non-stamped side of the vellum clockface inside the punched circle.  It will turn opaque white.
  • Adhere the clock to the burnished vellum using liquid glue.  
  • Trim the vellum so that it doesn't show around the clock body.
  • Pierce a hole in the centre of the clock face.  Insert a brad from the back side of the clock face so that the prongs become the hands of the clock.
  • Adhere clock to card using Dimensionals.
The rest of the design is just about sponging and distressing and generally getting grungy.  Such fun!!

Tuesday, January 29, 2013

More Clockworks Manliness

I am so on a roll with the Man-cards this week!  I mentioned last week that I am working on a new Kit-to-Go that features the Clockworks set.  Today I'd like to show you a card I designed based on this week's sketch challenge over at The Paper Players.  It's a great sketch with so many possibilities...have a look:


Here's my manly take on it:

Masculine Thank You card for PP130 featuring the Clockworks stamp set with sentiment from Essentials.

Inside view
I just love this stamp set!  It is so much fun to just play with.  For this card I completely omitted the actual pocket watch image and stuck to just the gears and backgrounds.  This design will most certainly make it into the line-up for my Kit...stay tuned for more previews.  The kit launches Feb. 1st!
Speaking of February, have you RSVP'd for my Sale-a-bration Extravaganza yet?  It is coming up this Saturrday afternoon.  It is a FREE event, but I need to order food, so please confirm your attendance by Wednesday, January 30th.

Friday, January 25, 2013

Friday at last!

Wahoo it's Friday!  Another week in the books!  I hope your week was a productive one and that you've got lots of R & R planned for the weekend.  We're heading off to my nephew's christening, so lots of family time on tap for us.
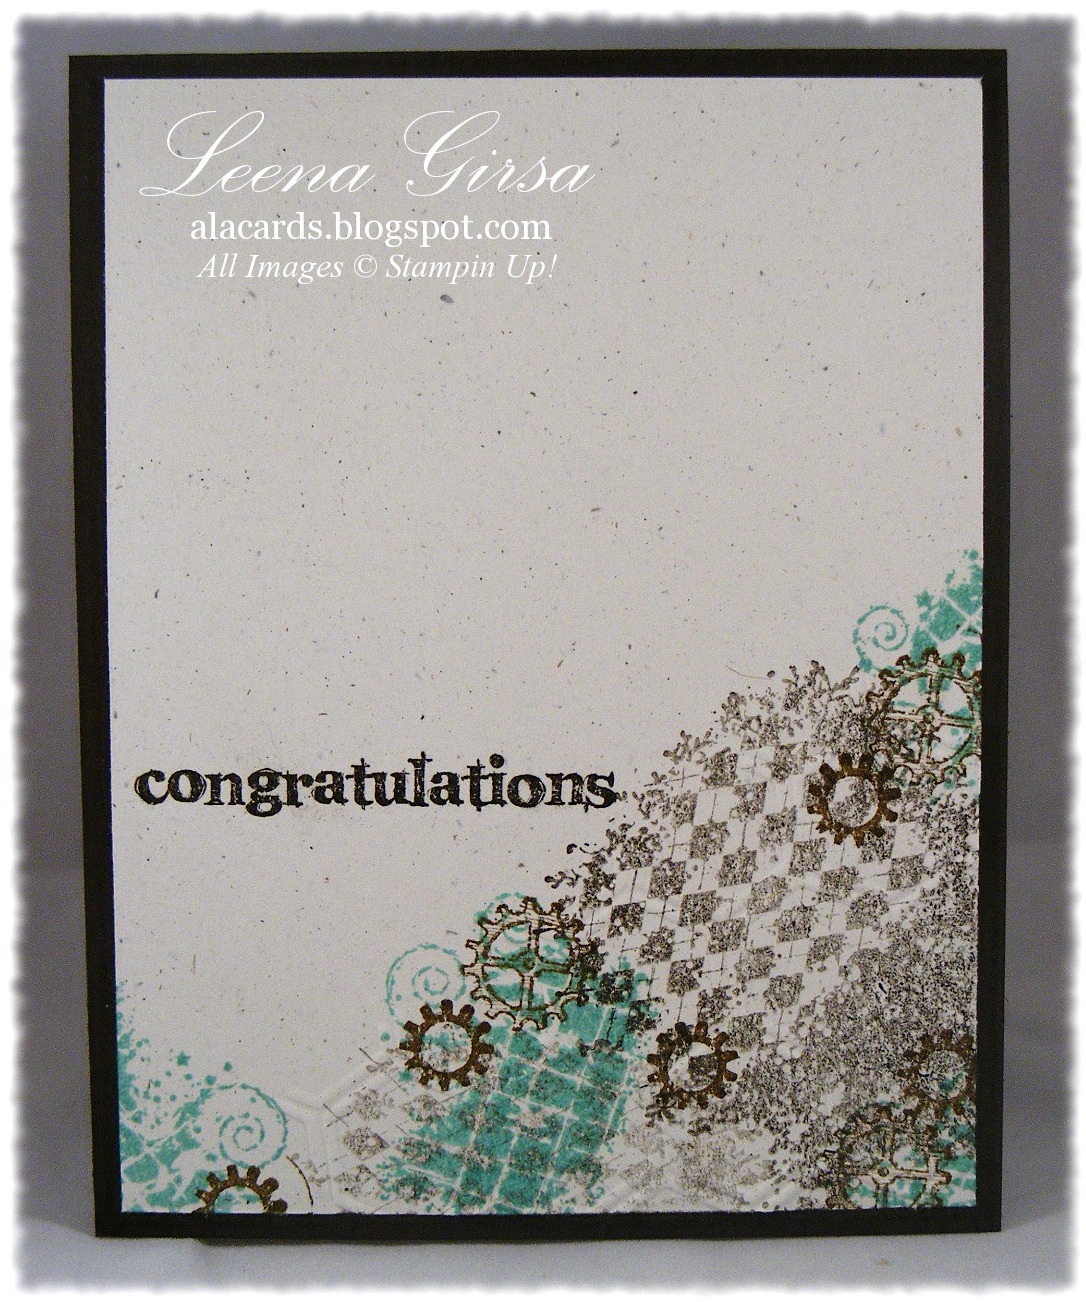
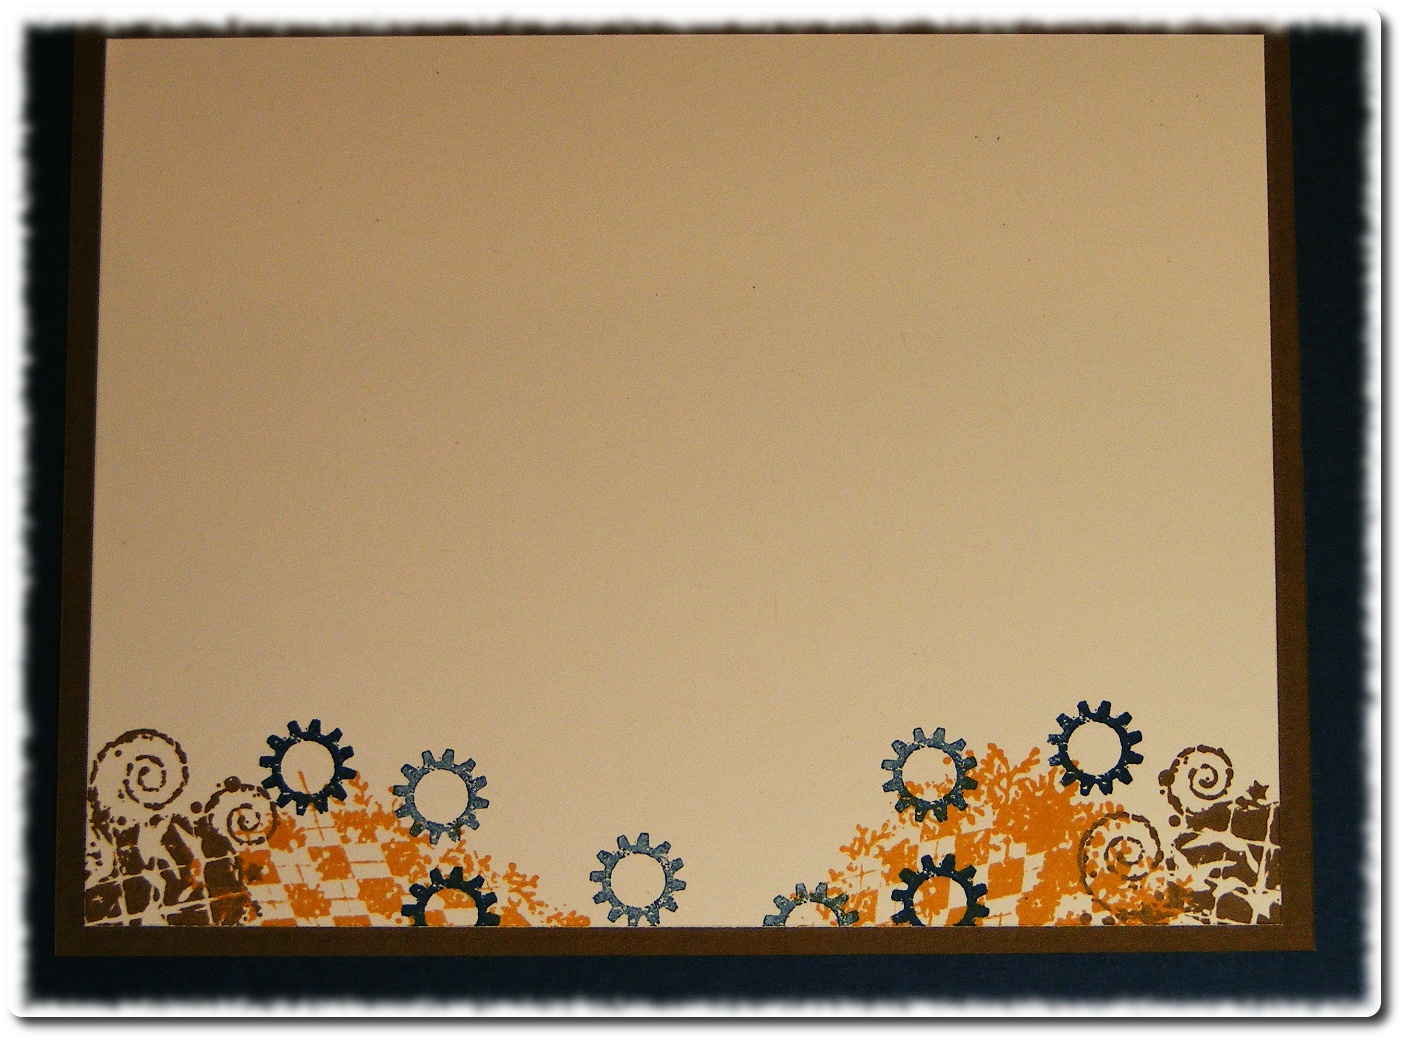
Today I want to show you a card I designed as I've been playing around with new ideas for Kits-to-Go.  You may have noticed that tab disappeared from the top of this page a while ago, but fear not, there will be new kits coming soon!  Anyhow, I am working on a kit to make Man-cards.  So many people I talk to have trouble designing projects for male recipients, I thought it might be helpful if I offered a kit that focuses exclusively on that demographic.  At this point I'm playing with the Clockworks set, which is perfect for just about any guy.  Here is the first card I came up with:

Birthday card featuring the Clockworks stamp set and sentiment from Made For You.
Now, remember, this design is a work in progress...I'm not entirely satisfied with it, but it is a good start.  One thing I am sure of is the colour scheme of More Mustard, Soft Suede and Midnight Muse...such warm, rich, vibrant colours!  I'm going to have fun playing with them as I finalize my designs for this kit!  I also really love the First Edition DSP for adding interest without overwhelming a design with pattern.  It is one of my go-to elements, for sure.  Speaking of go-to products, I couldn't resist using an Antique Brad here...still my very favourite embellishment of all time!!  Every project just looks better with one of those beauties on it somewhere!! ;)

Thursday, January 17, 2013

Waxy Valentine

Tonight my monthly techniques class meets and one of the techniques I'll be showing them is Waxed Paper Resist.  This easy-peasy technique is a fun way to create interesting backgrounds on your projects.  Here is one of the cards we'll be making tonight:

Masculine Valentine's card featuring the Clockworks stamp set with sentiment from Happy Hour.
Ok...the colour in this photo is WAY off!  It is supposed to be Soft Suede, Early Espresso and Cherry Cobbler...doesn't look anything like those gorgoues shades.  Man, do I need a new camera!! 
Anyhow, the background uses the Wax Paper Resist technique and then I stamped several of the images from the Clock Works set in various neutral shades:  Crumb Cake, Soft Suede and Early Espresso.  I also stamped the hand-drawn heart from the new Hearts A-flutter set in Cherry Cobbler.  The sentiment is from the Happy Hour stamp set, but I think works well with the clock images.  I added just a hint of texture to the card base with the new Needlepoint Border TIEF...love it!  Here is  shot of the inside of the card:

More stamped images from the Clock Works set and a sentiment from last year's P.S. I Love You set.  Here's hoping my class participants will like this technique as much as I do!

Monday, August 27, 2012

Regionals Make-n-Take

I know I promised you something new from me yesterday and I do have some new projects to show you, but first I wanted to show you one of the fantastic Make-n-Takes we did last weekend at Regionals.  I so love this project...so simple, but so great!  Check it out:

Envelope pouch made from Vellum card stock.  It holds 4 note cards and envelopes...so quick and easy to make!

These are the cards and envelopes that are inside the pouch.  We used the Clock Works and Sweet Essentials stamp sets.
Isn't that a great little gift ensemble??  I absolutely LOVE the colour combo we used:  Pool Party, Gumball Green, More Mustard, Calypso Coral and Basic Gray.  I would never have put those colours together myself, but I so love them!  These cards we SO easy to create...just stamp away!  No embellies or embossing to fuss with.  Just ink, paper and stamps.  Gotta love it!  I actually challenged those from my team who were with me at Regionals to create their own version of this ensemble, using different stamps and inks.  They're going to bring them to share at our next meeting which means I need to get busy on my own design! 
Related Posts Plugin for WordPress, Blogger...