Showing posts with label Truly Grateful stamp set. Show all posts

Tuesday, May 20, 2014

Blended Thanks

Happy Tuesday!  We had a simply glorious holiday Monday here...perfect weather with lots of sunshine and family time.  Today I have another project I created with my Blendabilities alcohol-based markers.  I am simply addicted to them!

Thinking of you card featuring the So Very Grateful stamp set with sentiment from the new Something To Say set, available June 2nd.
I used several new products on this one:  Hello Honey and Mossy Meadow card stock, Moonlight DSP and Blackberry Bliss stitched satin ribbon...so yummy!

I coloured the rhinestones with my dark Rich Razzleberry Blendabilities marker so that they match perfectly.  To colour the image I used the Old Olive, Rich Razzleberry, Coastal Cabana and Daffodil Delight marker sets.


I couldn't help colouring the inside too!  You really need to try these fantastic markers...I promise you will love them just as much as I do!

Monday, October 7, 2013

One more Bokeh...

I love learning new techniques and when I do I tend to go a little nuts with them.  Last week I showed you several samples using the Bokeh technique, which is featured this week over at The Technique Twist.  I decided I wanted to teach this fabulous technique to my team at our monthly meeting, which is happening  tonight.  Here is the Make-n-take we'll be doing:

Autumn-inspired thank you card featuring the Bokeh technique with sentiment from Truly Grateful (131733)
I love the way the silver metallic ink shimmers and catches the light...


I sure hope my team likes this technique as  much as I do!
**Sorry for the short post...I am swamped this week getting ready for my booth at the Rockton World's Fair.  I will try to post every day, but they'll be short and sweet!

Sunday, September 1, 2013

September....really??

I can't believe the summer is over.  How is it possible today is September 1st??  With a new month comes a new challenge over at The Technique Twist.  This time we're all about bleaching...

Thank you card  featuring the Magnificent Maple stamp (131868) with sentiment from Truly Grateful (131733)
I went a little crazy with the bleach on this card...I used it in three differnt ways!  Here's a quick how-to:
  • The background panel is a piece of Cajun Craze card stock that I spritzed with bleach (I just poured the bleach in a Stampin' Spritzer and went to town!).  That lovely yellow spatter is what the card stock bleached out to!
  • The focal panel started as a plain piece of Early Espresso card stock that I stamped with the Magnificent Maple stamp, using a home-made bleach ink pad (folded paper towel in a  plastic box moistened with bleach)
  • I stamped the leaf again in Versamark and heat embossed in gold.
  • I dabbed the edges of the focal panel with a bleach-soaked sponge.  (Amazing how the more concentrated bleach on the sponge resulted in a totally different shade than the leaf image in the background!)
  • I embossed the Crushed Curry layer with the Woodgrain TIEF (127821).
  • I added some 7/16" Natural Trim (129287) for a little more texture.
  • The sentiment is stamped in Early Espresso ink on Naturals Ivory card stock and is punched using the Large Oval Punch.
  • I used Crushed Curry Candy Dots (130932).
I love stamping with bleach.  One never knows what shades will emerge when coloured card stock is exposed to bleach. It makes the whole design process much more of an adventure!  Give it a try and then link up at The Technique Twist this week!

Monday, August 19, 2013

Perfect Project Kits Day 1


One of the most exciting things about the Holiday Catalogue is the wide assortment of kits and bundles available.  The Simply Created line has me particularly enthused because of all of the possibilities they hold.  This week, while I'm away enjoying some sun (I hope!) and R&R, I want to feature a couple of these kits and some of the fabulous things you can do with them.
My first focus will be the Thankful Tablescape Simply Created Kit (133463).  


Now, I have to admit that upon first glance I kind of wrote this kit off because I never host Thanksgiving dinner anymore...I am busy at my booth the Rockton World's Fair all of Thanksgiving Weekend!  However, when I received this kit for free as part of my Title Benefits Bundle, I decided to crack it open and see what possibilities it held.  Was I ever glad I did!
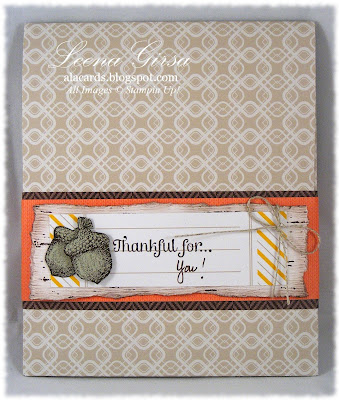

Thank you card and envelope made using the Thankful Tablescape Simply Created Kit (133463) and the Truly Grateful stamp set (131733)

Envelope made from the napkin holder pouch.  The belly band acts as the closure for the envelope...the flap just tucks in behind to secure it.


There is a TON of product included in this kit!  I was amazed at how much I could do with it and STILL have leftovers.  Today's project is one I designed as the Make-n-Take for my monthly team meeting.  Yep, I had enough product to make SEVEN of this card and envelope ensemble and still had lots left for the other projects I'll show you later in the week. The only thing I used that was not part of the kit is the Sahara Sand card stock for the base of the card.   At $24.95, here in Canada, this kit is a fantastic value!  Be sure to stop by tomorrow for another project.  In the meantime, here are a couple of tips for recreating this project:
  • When stampin on the chalkboard labels, be sure to use white Staz On ink...the white craft ink will smudge.
  • To create the box-pleated strip, which is 4" wide when folded, you'll need a 5-1/2" strip of the Tangerine Tango paper that is scored at:  1", 1-1/8", 1-3/8", 1-1/2", 2-1/2", 2-5/8", 2-7/8", 3", 4", 4-1/8", 4-3/8", and 4-1/2"
  • The leaves are sponged with Chocolate Chip ink.
  • The sentiment on the envelope is stamped in Chocolate Chip ink.  The acorns are also in Chocolate Chip ink and are stamped on Sahara Sand and fussy cut.

Saturday, August 17, 2013

Emerging Fall Colours

Yup.  The air this week has certainly has that fall chill to it.  A wee bit early for my liking, but it beats the sweltering heat of the past couple of summers around here!  Today I have another project I created for this week's challenge over at The Technique Twist.

Thank you card featuring the Wonderfall stamp set with sentiment from Truly Grateful and using the Emerging Colours technique
I really like the way this one turned out.  I am a huge fan of fall shades and it was such fun to play with colour and blends to get this look.  It was easy peasy...here's how I did it...

  • Starting with Whisper White card stock I sponged Crushed Curry, Tangerine Tango and Cherry Cobbler in various spots all over the panel.  I overlapped neighbouring colours, blending where they met.
  • I stamped the leaves in Versamark and heat embossed with clear embossing powder.
  • I sponged heavily with Early Espresso ink to bring out the pattern in the leaves and conceal the bright background colours.  This will take a bit of work, but it's worth the effort!  Be sure to wipe the excess ink off the embossed leaves when you're done to reveal the vivid colour underneath.
  • The kinky twine is from the Burlap ribbon.  A cool little trick where you cut off the stitched edge and then pull out the strands of twine.  They are kinky from being woven in the burlap.  I love the extra texture it adds!
  • The button is from last year's Holiday catty...sorry you can't get them anymore :(  If they ever show up on the Clearance Rack you'd better be quick to snatch them up before I get 'em!  Love those things!!)
  • The sentiment is from the Truly Grateful stamp set and is stamped in Early Espresso on Naturals Ivory card stock and then die cut with the Bitty Banners Framelits.

 Today I'm getting ready to head up north to my parents' place for some R&R before heading back to the classroom.  I'll be gone all of next week but, never fear, I will pre-post some projects so you don't miss me too much  while I'm gone :)  In the meantime, why not play along with us this week at The Technique Twist...its tons of fun!!

Wednesday, August 14, 2013

Grateful Team Swap

I held my monthly team meeting this week and we held our first-ever team swap!  Some of my gals were envious of all the fabulous swaps I received at convention and decided they wanted in on the swapping fun too!  I decided to focus on new Holiday catalogue products because I knew many of my gals wouldn't have them yet.

Thank you card featuring the Truly Grateful stamp set (131733) and Sweater Weather DSP (132184)
Don't you just love Soft Sky?  It is the prettiest, softest blue ever and paired with Chocolate Chip and Crushed Curry it is just perfection.  I based my design on the sketch from a couple of weeks ago at Mojo Monday.  It worked perfectly because it allowed me to feature some of that gorgeous Sweater Weather DSP!  Here are a few more tips:
  • I embossed the Soft Sky background with the Woodgrain TIEF, placing the card stock horizontally so the pattern went across the middle of the panel.  I also used the multi-purpose platform on no tabs so that I got a softer, more subtle impression.
  • The sentiment is stamped in Chocolate Chip ink on Naturals White card stock.  I also stamped the wheat sheaf image in Crushed Curry that I stamped off once first.  I die cut the oval using the Ovals Collection Framelits.
  • The label behind the sentiment is die cut with the Apothecary Accents Framelits.
  • The bulky bit of twine is actually from the Build-a-Banner Simply Created Kit!  I had a bit left over from another project, so I pulled it apart (the twine actually has three strands twisted together) and used one strand to tie my bow.

Wednesday, August 7, 2013

Lovely as a Thankful Tree

Holiday card featuring the Truly Grateful (131733) and  Lovely as a Tree (127793) stamp set.

Yesterday I showed you a Harvest-themed card using the new Truly Grateful stamp set.  Today I want to show you just how versatile that set can be!  Here I used the chevron background image behind the iconic fir tree from Lovely as a Tree to create a Christmas card.

Sentiment is from the Pennant Parade (122742) stamp set and is punched with the Little Labels punch pack (126881).  Star is punched with the Merry Minis punch pack...still available on the Carryover List!

I love that background image.  It is going to be in my collection for quite some time!  Here are some tips for recreating this one:
  • I used Naturals Ivory card stock to stamp on and for my card base...it adds a lovely rustic texture.
  • The chevron background is stamped in Crumb Cake ink.
  • The tree is heat embossed in pewter.
  • The panel behind the focal image is Soft Sky card stock embossed with the new Pretty Print TIEF(132175)
  • The focal image is matted on Crumb Cake card stock.
  • The little sentiment label and glimmer paper star are adhered to the knot of the bow with glue dots.
  • I used Soft Sky Seam Binding Ribbon (131210) to add softness and shine.
This is certainly one that will be joining my Holiday class line-up this fall!

Tuesday, August 6, 2013

Fall in the air?

Harvest-themed thank you card featuring the Truly Grateful stamp set (131733) and Sweater Weather DSP (132184)

I hate to admit it, but the past couple of evenings have been decidedly cool around here.  If it weren't only the beginning of August I'd think Fall was definitely in the air!  The cooler temperatures (and the arrival of my Holiday Catalogue order!) have me thinking ahead to my favourite season of the year.  This card is the first I attempted with my Sweater Weather DSP  and Truly Grateful stamp set.  I love how easy that image is to colour...I literally swiped my blender pen over it a few times and it was done! 
Z-fold card open


Here are some quick tips to recreate this one:
  • I used Naturals Ivory card stock (101849) to stamp on.  Not only does the texture in it work well with the design, but it also stands up to watercolouring with a blender pen really well!
  • I coloured the wheat with Crushed Curry, Sahara Sand and Pumpkin Pie ink
  • I used the Deco Labels Framelits (130102) to die cut the focal image
  • To get the Z-fold, score a 4-1/4" x 11" piece of Chocloate Chip card stock at 5-1/2" and 2-3/4"
  • That burlap ribbon (132140) is fantastic!!  To get a rustic look fray the ends by pulling at them
  • Don't forget the inside of your card...I stamped the wheat sheaf in Sahara Sand on the inner panel.
  • If you don't want your inner panel to be visible from the front of the card be sure it is the same size or smaller than your focal panel.  I did 3-3/4".
I really love this stamp set...expect to see much more of it in the coming weeks!!


Related Posts Plugin for WordPress, Blogger...