Showing posts with label scalloped tag topper punch. Show all posts

Monday, March 24, 2014

Shaving Cream Eggs

Well, long time no see, huh?  The past few days have been a whirlwind.  My DH's aunt passed away early last week and we had the visitation and funeral this weekend.  I have had little time to think about stamping, but I do want to show you another project I did for this week's challenge at The Technique Twist.  We are all about the shaving cream background technique this time around and I decided it was the perfect look for Easter Eggs.  Check them out:

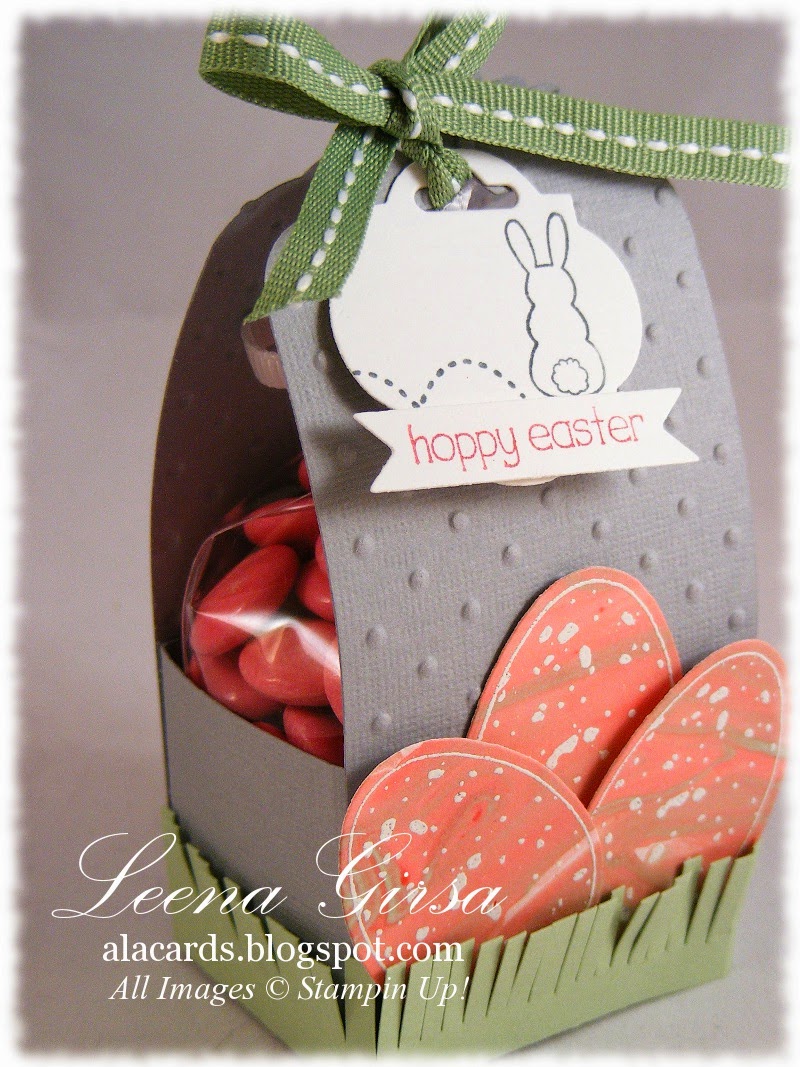
Easter treat holder made using the Scalloped Tag Topper punch and featuring the Shaving Cream background technique.

Aren't those eggs fabulous??  I love the marbled effect achieved with the Shaving Cream technique!  I created the look following the steps I outlined HERE and then stamped the egg from the Backyard Basics stamp set in Versamark and heat embossed in white.  I then die cut the eggs using the coordinating Backyard Basics Framelits.  Perfect Easter Eggs! 


I added a little strip of Pistachio Pudding grass that I fringed with my paper snips (my Fringe Scissors are on their way!) and nestled the eggs amongst it.


The little tag is stamped with the Eggstra Spectacular stamp set and then die cut using the Window Frames and Bitty Banners Framelits.  I tied the treat holder closed with a piece of Wild Wasabi stitched grosgrain ribbon.  A quick and easy treat holder sure to make anyone smile.  I think I may just do one for each of the teachers at my son's school just to let them know how much they are appreciated!

I'm sorry I've been neglecting my blog of late.  Sometimes life just gets in the way of the things we want to do.  Between flooded stamp spaces and dying relatives there hasn't been a whole lot of time for fun!  Hopefully this week will be much less eventful and I can get back to putting rubber to ink.  In the meantime, have a great week!

Wednesday, March 5, 2014

His and hers baby cards

Several aquaintances and customers of mine are expecting babies in the next little while, so I figured I had better stock up on some baby cards.  I decided to try another type of card I've seen popping up all over Pinterest lately that uses the Scalloped Tag Topper punch to create a unique closure.  Have a look:

His & Hers Baby cards featuring the Label Love stamp set.
I decided to make both a girl and a boy card so I would be prepared for either.  I kept the same basic design for both but used Blushing Bride for the girl card and Pool Party for the boy one.  Crumb Cake and Whisper White made for versatile neutrals for both.  Here is a closer look at the girl card:

For the card base I started with a 4-1/4" x 9-7/8" piece of Crumb Cake card stock, which I scored at 5-1/2".  I marked the centre on each short side and then inserted each end into the scalloped tag topper punch over top of the guides for inserting a tag.  (This took some wiggling and care, but it will slide in there!)  I punched both ends and then trimmed the excess card stock with my paper trimmer.  I scored the resulting tab on the longer half of the card (this is the back side) and then folded along the score line.  I also folded the original score line to fold the card in half.  The result is a front that is smaller than the back, to allow the scalloped tabs to overlap.


To decorate the card I used some DSP from the Fresh Prints stack and added half a Tea Lace doily...love those for baby projects! I punched a heart from Blushing Bride card stock, using the Full Heart punch, and then embossed it using the Perfect Polka Dots TIEF.  I punched a little glimmer heart using the Small Heart punch.  The label is stamped in Crumb Cake and then punched using the Artisan Label punch.  I then layered a 7/8" scalloped heart punched from Silver Glimmer paper over top.  I stamped the label again in Blushing Bride, punched out the text using the 3/4" circle punch and adhered it to the centre of the label using a dimensional.  I added a little Vintage Faceted Button with a bit of white Baker's Twine and a tiny little flower punched with the Itty Bitty Shapes pack.  I tied it shut using a bit of Blushing Bride Stitched Grosgrain ribbon.

Inside view with sentiment from Cuddles and Kisses and images from Banner Blast sets.
On the inside I embossed the right edge of the Whisper White layer using the Delicate Designs TIEF and then stamped the sentiment from Cuddles and Kisses in Crumb Cake.  I added a couple of little hearts from the Banner Blast set stamped in Blushing Bride ink.

Here is the boy version:


The only variation here is the use of Pool Party instead of Blushing Bride and stars instead of the small heart and flower.


The finished size of both of these cards is 4-1/4" x 4-5/8".  Cute and still appropriately-sized to mail...gotta love it!

Tuesday, February 4, 2014

Hello Baby

 A colleague of mine is expecting her first baby at the end of March and I am hosting a shower for her in a couple of weeks.  I put together some invitations for the shower based on her nursery colour scheme...

Baby card featuring the Baby We've Grown stamp set with sentiment from Sweet Essentials.
Isn't that little bunny the cutest thing?? I just adore him...he reminds me of The Velveteen Rabbit.  I stamped him in Staz on and coloured him in using a blender pen and Smokey Slate, Summer Starfruit and Crisp Cantaloupe markers.  The tag the bunny is stamped on was punched with the new Scalloped Tag Topper punch...love that thing!  So easy to make tags of any size...I'm also using it to make the favours for the shower...more on those later ;)


I made 19 of these, so I got lots of watercolouring practice ;)  Since the mommy-to-be doesn't know whether she's having a boy or a girl I kept it as gender-neutral as I could but couldn't resist adding a bit of lace and some bling for mommy (who is a real girlie-girl).  She loved it!

On the actual invitations I replaced the Hello Baby sentiment with You're Invited and then printed the shower details on the inside of the card.  I figured you wouldn't really be interested in where this gal is registered and what time her shower is at, so I changed up the inside for you...

Inside view with sentiment from Cuddles and Kisses.
I'm excited about this shower!  I have some fun ideas for decor that I'll show you when I get it made.  In the meantime, it's back to bed for me as I work on getting rid of this yucky sinus thing.  Have a great day, everyone!
Related Posts Plugin for WordPress, Blogger...