Showing posts with label The Open Sea stamp set. Show all posts

Thursday, January 29, 2015

Traveller Birthday

Happy Thursday...just one more day till the weekend...woohoo!
Today I have another of the projects I had on offer at my Birthday Blitz card buffet last week.  It was inspired by a card I saw on pinterest designed by Bonnie Klass.

Masculine birthday card featuring the Open Sea and Traveller stamp sets with sentiment from Petite Pairs.
I simplified Bonnie's design a little bit, eliminating some of the paper piercing, and adding embossing to the background layer.  I used the Pretty Print TIEF (retired) to add texture to the Naturals Ivory card stock.  The globe image, from the Open Sea stamp set, is stamped in Early Espresso ink and die-cut using the Circles Framelits.  I added colour with a sponge dauber and Pool Party ink and then pierced a border using the Essentials Paper Piercing template and a piercing tool.  I layered it on a circle, also cut with the Circles Framelits from Early Espresso card stock.  The suitcase, from the Traveller stamp set, is stamped in Early Espresso and coloured with a sponge dauber and Crumb Cake ink.  It is punched using the 1-3/4" circle punch and layered on a 2" circle in Early Espresso.  The compass, which is from the Open Sea set, is heat embossed in gold, punched with the 1-1/4" circle punch and then layered of a 1-3/8" Early Espresso circle.

The sentiment, from the Petite Pairs stamp set, is heat embossed in gold and die-cut using the Banners Framelits.

Inside view with sentiment from the World of Dreams stamp set.
On the inside I stamped the globe image again using Early Espresso ink, stamping off twice to ensure a very faded image.  The sentiment, from the World of Dreams set, is stamped full-strength in Early Espresso ink.
Have a thrilling Thursday!!

Monday, May 26, 2014

Courage & Strength

Happy Monday!  I hope your weekend was as gorgeous and sunny as ours was.  The weather was simply perfect...long may it last!!
Today I have a project I made a couple of weeks ago using some new products from the upcoming Annual 2014/15 Catalogue.  Check it out:

Masculine card featuring the World Map background stamp and The Open Sea stamp set, the Traveller stamp set with sentiment from the new Something to Say set (both available June 2nd)
I made this as a graduation or retirement card...some occasion that leads to a major change in life.  I used the new Lost Lagoon In-Colour...I love that tranquil shade of blue!  I also use some of the new Moonlight DSP pack, which includes Lost Lagoon in it's colour palette. 


The stamped images on the grid-patterned paper are from the new Traveller stamp set...I love the vintage images in that set...so perfect for masculine cards.  The sentiment is from the new Something to Say set, which includes several paired sentiments...one for the front of the card and one for the inside.  Speaking of the inside, I used another of the sentiments from that set as well as one of the images from the Traveller set.


As we draw closer to the end of yet another school year I know I'll be saying good-bye to some very special students as they head off for bigger and better things.  One of them will leave with a little piece of me when I give them this card! 

Monday, May 19, 2014

Imagine the world

Happy Victoria Day!  Today is a holiday for us here in Canada and I couldn't be happier to have a day at home with my family.  We're planning to spend time outdoors and just enjoy the warmer weather - finally!!
Today I'm taking a break from flowers...don't worry there'll be more tomorrow...to bring you a masculine card I made.  Check it out:

Masculine card featuring the World Map background stamp, the Open Sea stamp set and sentiment from Loving Thoughts.
 First let me say this was NOT a quick and easy one!  It has been a very long time since I  had time to just create without a specific purpose in mind.  When I do, I tend to make projects that are very involved...this is one of those times.  Can you believe that background panel started out as a plain piece of Whisper White card stock??  I started by stamping the World Map background stamp using the Memento Black ink pad (available June 2nd).  Then I pulled out my Blendabilities and started colouring.  I used the Old Olive set for the land and the Coastal Cabana set for the water.  It took a while to colour that whole map, let me tell you!  Then I sponged the entire thing in Soft Suede ink to antique it.  The colours started out quite vibrant but the layering of the Soft Suede gives the whole thing an aged, faded look.  Then, and it was hard to do this after I'd spent an hour colouring, I crumpled the whole thing up!  I also tore the edges and sponged them with Early Espresso ink.

The focal image also started out as a Whisper White die cut on which I stamped the ship from the Open Sea set using Early Espresso ink.  I sponged the entire thing with Crumb Cake ink and then sponged the edges with Early Espresso.  I created the seal using the faux wax seal technique with gold embossing powder.

Inside view featuring the Traveler stamp set with sentiment from Something To Say (both available June 2nd)
 On the inside I stamped both the globe and the sentiment in Early Espresso ink on Naturals Ivory card stock.  Both of these images are from new sets which will be available on June 2nd when the new Annual Catalogue goes live...I can't wait!!
Stay tuned for more fun with Blendabilities tomorrow ;)

Monday, May 13, 2013

Something Old, Something New...

Father's Day card featuring the Open Sea and Daring Adventure stamp sets.


No, today's project isn't a wedding card, but it does use both products that are retiring at the end of the month as well as some that are returning in the new catalogue.  I used the Open Sea stamp set which, thankfully, will be back for another year, at least.  I also used the Daring Adventure set which is, sadly, leaving soon.  My colour pallette uses Cherry Cobbler, Basic Gray and Not Quite Navy, the latter of which is a casualty of the Colour Refresh.   
This is one of three cards we'll be making at this month's TGIF class coming up this Friday.  There are still spots available, so call, click or email to reserve your place.  Have a great week!

Tuesday, July 31, 2012

Twelve Days of Christmas (in July!) Day 11

Can you feel the excitement??  Only one more sleep till the new Holiday Catalogue goes live!!  Today I have something a little different for you.  This card uses both new and old items, as well as something a little unexpected.  Check it out!

12 Days of Christmas Day 11 featuring the Open Sea and Greetings of the Season stamp sets.
Surprised?  I used the globe image from the Open  Sea set as the background for the sentiment.  I think it works rather well and I am always thrilled when I find new uses for a stamp set I love.  The other feature that helps make this card is the Holiday Frame TIEF.  It really sets off the focal image so nicely.  It is a gorgeous pattern and NOT just for the holidays!  Here is the complete list of products used on this project.  Starred items are available TOMORROW!!

The Open Sea (CM 123032, WM 123030)
*Greetings of the Season (CM 128033, WM 128030) pg. 8
Whisper White CS (100730)
Pool Party CS (122924)
Silver Glimmer Paper (124005)
Pool Party ink pad (126982)
Island Indigo ink pad (126986)
*Holiday Frame TIEF (127820) pg. 7
Big Shot (113439)
Pool Party Seam Binding ribbon (125582)
Vintage Faceted Designer buttons (127555)

If you've been enjoying this series, you're going to LOVE my Holiday kick-off event!  Check out my Upcoming Events page for details about my Ornament Keepsakes Stamp Camp happening at the end of August.  It will be SUPER fun (I sound like my 5-year-old there!) and will definitely get you going on your holiday crafting.  Here is a photo of the projects we'll be making:

Ornament Keepsakes Stamp Camp Projects


The best part is that in addition to leaving with 4 completed projects, you'll also get to keep your stamp set!  Call or email for additional information or to register. 
I'll be back tomorrow to celebrate the final day of the Twelve Days of Christmas and the launch of the new Holiday Catalogue...see you then!


Friday, May 18, 2012

Open Sea Techniques

Today's project is one I designed for my Stamp-a-Latte monthly techniques group.  I was inspired by a swap card I received at our team meeting last month by Christine Kokiw (yep, she's done it again!).  She used a really cool technique that I couldn't wait to show my club.  To view Christine's card click HERE.  Then check out my version...

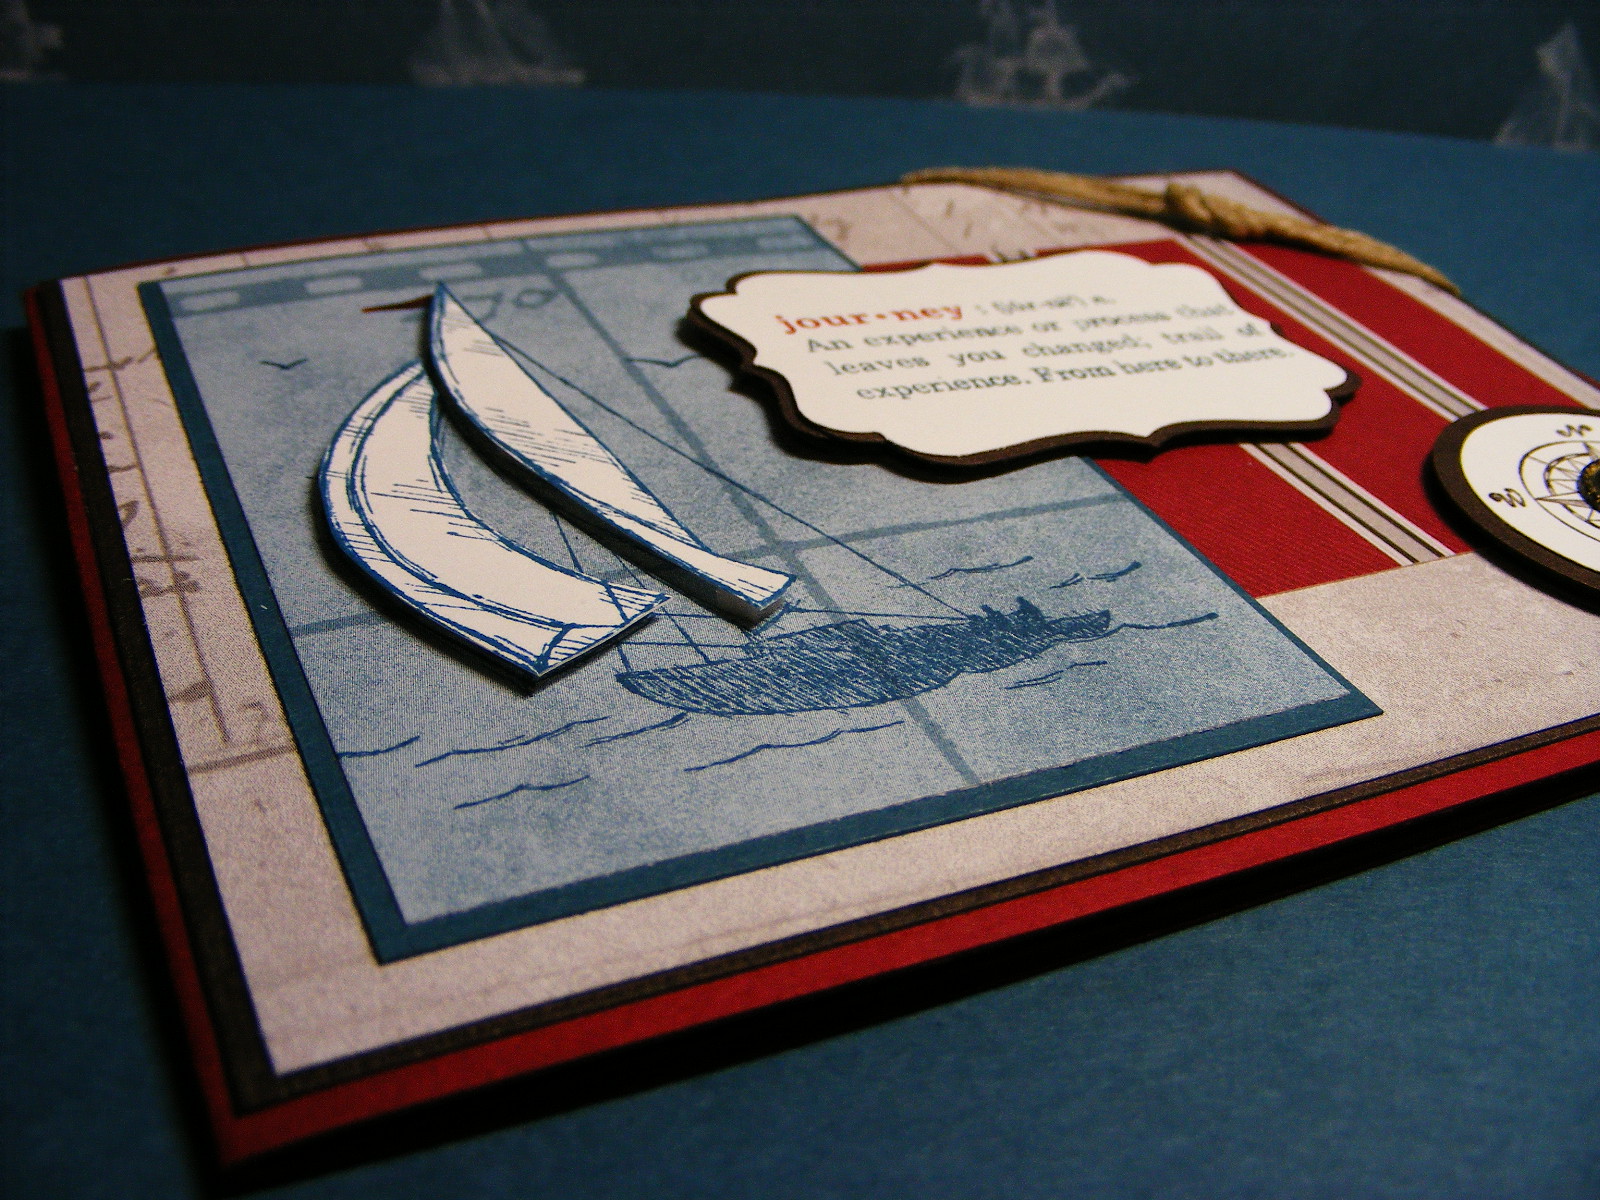
Father's Day card featuring the Dry-Embossed Vellum and Faux Wax Seal techniques
So, this card features TWO different techniques (well, not counting the distressing).  The first is one I'm called Dry Embossed Vellum.  It is hard to tell in this photo, but the sails of the ship are actually raised.  I accomplished that by burnishing the back side of the stamped piece of vellum with my stylus and the foam from my mat pack.  The vellum turns white when it is burnished, so the sails look puffy and white when you're finished.  Cool, eh?  My club members LOVED it!
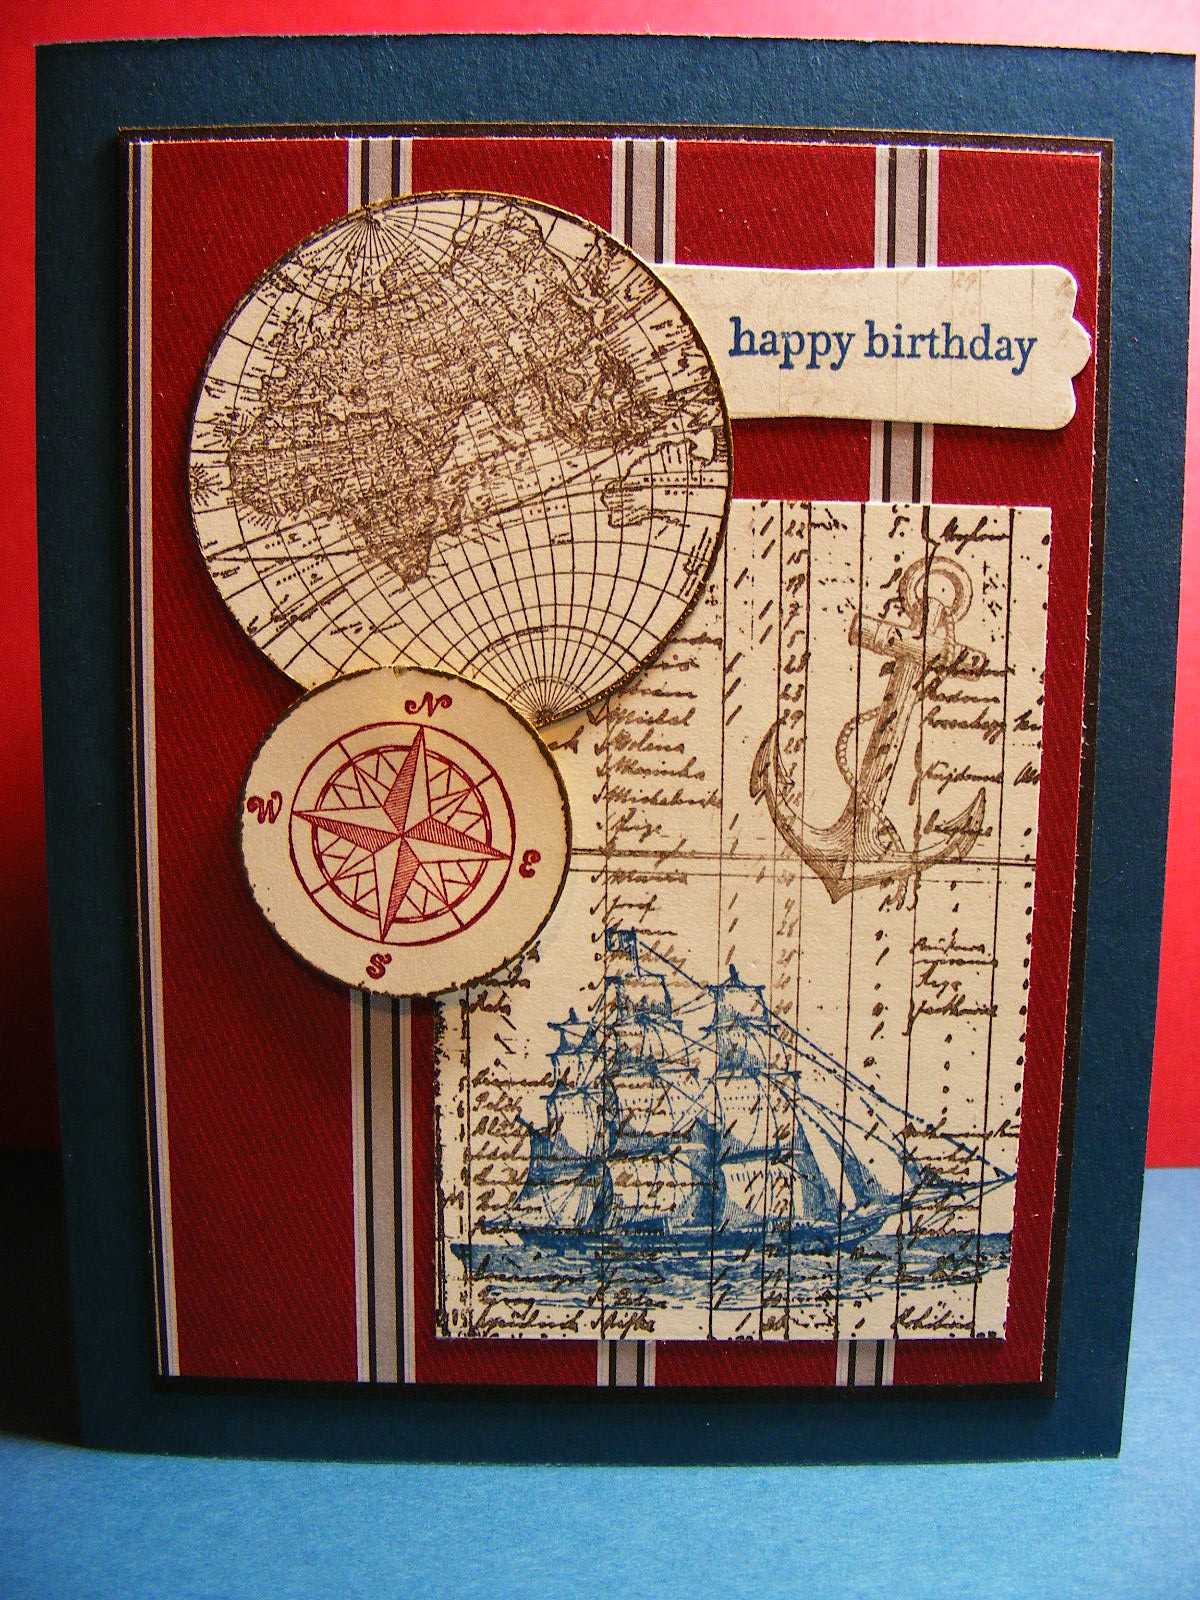
 The faux wax seal is a technique I stumbled across a while back while playing with my embossing powders.  To create it I poured a little puddle of embossing powder on a piece of cardstock and then heated it from beneath with my heat tool.  Once all the powder melted I pressed the compass stamp into it and left it there while the melted powder cooled and solidified.  I peeled the stamp off and was left with the impression of it in the embossing powder.  I then tore it out of the piece of cardstock, sponged the edges with Early Espresso ink and adhered it to my card. 
Now you may be wondering which dies I used to cut those layered labels in the background.  The larger one is the new Oval Accent die, which I am quickly growing to love!  The smaller one is from the Apothecary Accents framelits collection.  If you like the Labels framelits from the last mini, you'll love these too!! 
As for the rest of the card, I used the sentiment from the Best Dad Ever set, stamped it in Early Espresso (I used a new Early Espresso pad...the colour is fabulous!!) and hand cut it into a banner.  I added an antique brad (thank heavens those didn't retire!!) and attached it to the card front.  The card base is textured River Rock...really gonna miss the textured cardstock!  If you feel the same you may want to stock up before the 31st!

Saturday, May 28, 2011

Nautical Man-Card for A La Card Monkey

I'm a guest designed over at A La Card Monkey again this week!  The challenge is to create a Man-Card using the sketch provided:


It seems I've had to do a lot of Manly cards over the last couple of weeks and it has been a reminder that I am sadly lacking in my masculine stamp selection!  I can't wait for the new catty to come out so I can get shopping!!  In the meantime, I've used my fav set from the Summer Mini:  The Open Sea, along with the Nautical Expedition DSP.  See what you think:

Card for Monkey58 using The Open Sea set and sentiment from Define Your Life set.
 I went a little hog-wild distressing this one!  I wanted it to look worn and weathered...I think I succeeded!  I also discovered a new technique I'm calling "Faux Wax Seal".  I'm sure I'm not the first to come up with this, but I was pretty pleased with the result!  To get the look, start by pre-inking your stamp with Versamark...this is an important step!  Setting the stamp aside,  pour a small pile of embossing powder on your cardstock in the location you want your seal.   Spread out the powder so that it is even and then heat it FROM THE UNDERSIDE with your heat tool until the powder melts into a pool.  It will start to bubble, so stop when this happens.  Then immediately stamp your image into the pool of melted powder, holding it there for a few seconds to allow the pool to harden.  Gently peel your stamp away and voila...instant "wax" seal!  A couple of tips for this technique...make sure your pile of embossing powder is even and not too thick.  You want as uniform a depth as possible.  If you use too much powder, the pool will be too deep and you'll get a messy image.  It took me  a couple of tries on some scrap paper to get the amount of powder right.  Just play and experiment until you get something you're happy with.  It's worth the effort...I really like the look!

Friday, May 20, 2011

Sail Away...

Well the long Victoria Day weekend is finally here.  The first long weekend of the season...kick off to the summer...May two-four.  There are many reasons to enjoy this weekend, but for me it will simply be a chance to get caught up on some gardening, some stamping and this infernal course I am taking.  As three whole days stretch ahead of me, I am a little unsure where to start tackling my To-do list, so I figured I'd relax with a little stamp-therapy.  Its been almost a week since I put ink to paper and I needed a while to get the mojo working. Thankfully, there is the summer mini and the great nautical paper and stamps to inspire me.  Conveniently the challenge this week over at The Paper Players is a colour one that  uses the three colours  in the Nautical Expedition DSP:

So, here is my nautical card...even though I don't have a sea-worthy bone in my body!

Card for PP46 using the Sail Away a la carte stamp, and The Open Sea set and Define Your Life sets.

Trying to show the popped up, paper-pieced sails

My attempt at a nautical-looking knot!
Inside of card with sentiment from the Word Play set.
I wasn't kidding when I said I wasn't sea-worthy.  Boats make me sick...literally.  All I have to do is look at a boat bobbing on the waves and I turn green.  But I love this suite of new products!  There is something about the DSP and stamp images that just appeals to me and inspires my creativity.  This card is really straightforward...nothing tricky or special here!  At the end of a long, busy week, I don't feel much like doing a play-by-play how-to on this one...I hope you don't mind!  If you are stumped by anything, leave a comment and I'll try to help you out.  In the meantime, I'm going to enjoy my Friday evening...I hope you do too!

Wednesday, April 27, 2011

Vintage Paris

Yes...two posts in one day!  Hard to believe, I know!  I just had to get this up so that I can enter  the Stamping 411 sketch challenge for this week.  The challenge closes tomorrow morning at 8:00, so I had to get it posted tonight.  Here is the inspiration sketch:


And here is my version:

Card for SSC200 - rotated and flipped the sketch!

A tale of many stamp sets:  Artistic Etchings, The Open Sea, Define Your Life and En Francais!  Doncha love it when a card comes together?!

Inside of card - sentiment free...but it could be for a graduation, retirement, bon voyage etc...
So...I had some vintage fun with this one!  Here is what I did to create this card:
Starting with a strip of very vanilla cardstock, I ran it through my Big Shot using my Vintage Wallpaper embossing folder, which I had brayered with early espresso ink.  I then sponged the raised images with cajun craze and distressed the edges with the tool from my cutter kit.  I sponged the edges and then set it aside.  I then took a narrow strip of cajun craze and tore  it using my tearing edge.  I crumpled and winkled the cardstock and then adhered it to the embossed very vanilla piece.  I wrapped a piece of the new early espresso  baker's twine (from the Summer Mini) around the whole thing a couple of times, tied a knot, added a trinket key and tied it into a bow.  I secured the knot wth a glue dot.  Setting this aside, I took a narrow strip of very vanilla carrdstock and stamped the eiffel tower image from Artistic Etchings in early espresso ink.  I then inked the medallion from the same set in cajun craze, stamped off once and then stamped over the tip of the tower.  I stamped again in the lower right corner.  Finally, I inked my en Francais background stamp in early espresso, stamped off once and then stamped over the entire image.  I tore the top edge, distressed the others and then  inked all of them in cajun craze and then early espresso.  Setting that aside, I stamped the globe in early espresso (stamped off once) and punched it out.  I sponged the edges of the globe in early espresso.  The sentiment, from the Define Your Life Set, was again stamped on very vanilla in early espresso ink and then punched out with my decorative label punch..  I distressed and then sponged the edges, as well as lightly sponging the entire label.  The rest was easy...just assemble the various  elements on the card as in the photo! 
For the inside, I layered a piece of very vanilla on a mat of cajun craze after stamping both the globe and the tower (stamped off once).
I can't wait to show you the cute "Tooth Safes" I designed for my Mommy and Me class...stop by tomorrow to check them out!

Wednesday, April 13, 2011

Spring Stamp-A-Stack is filling fast!

Wow!  What a response to my Stamp-A-Stack!  There are only 6 seats remaining and I only announced the date 2 days ago!  If you're thinking about joining us but haven't gotten around to registering yet don't delay...you might be disappointed!  I can't wait to spend a whole morning stamping with all of you!  If you'd like more details on this event, click here.  For those of you still unsure, here is another preview of one of the designs we'll be creating on April 30th...

SAS Design #3 - Masculine card

My attempt at an artsy shot!  Notice the embossing around the edges of the compass and the globe...kinda cool, no?

Inside of card...this is a birthday sentiment, but it could easily be switched up for Father's Day or even a retirement card with an " Imagine the Possibilities" sentiment.  Or how about a "Journey" sentiment for someone taking a trip?  So many possibilities!!
Ok...The Open Sea stamp set and coordinating Nautical Expedition DSP are officially my favourite products from the upcoming Summer Mini.  I absolutely love the images and the detail...just gorgeous...and I don't even like sailing or even being in a boat (bad experience in Mexico once...long story!).  Every image in this set is so detailed and easy to work with...I see myself using this a TON in the next few months!  You'll be able to order it May 1st, so...why not come on out to the SAS to see it up close and in person and then place a $60 order so you get your class for FREE?!? 

Tomorrow I'll have yet another design for you...till then, happy stamping!

Sunday, April 10, 2011

More great new Summer Mini Sneak Peeks!

I had some serious stamping fun this evening...so much that I hadn't realized how late it had gotten!  This will be a quick post because I have to get to bed, but I couldn't wait to show you one of the cards I created this evening.  It uses two of my very favourite items from the upcoming  Summer Mini:  Nautical Expedition DSP and The Open Sea stamp set.  These two items are designed to work perfectly together and because they do, they make creating masculine cards SO easy!  Check this out and see what I mean...

Man-card using great new products from the upcoming Summer Mini available May 1st!

Close-up of some to the beautifully detailed artwork in The Open Sea stamp set.

Inside of card
Isn't this just fabulous?!? I had so much fun playing around with this card.  I did a ton of distressing and aging to make it look sea-worn.  I purposely left the sentiment vague so that it could be used for any guy-themed  occasion.  The "Imagine the Possibilities" sentiment on the front of the card is from the Word Play set...one I really love and use often.  I have lots more to show you this week, including some of my spring Stamp-A-Stack line-up.  Details later in the week...
Related Posts Plugin for WordPress, Blogger...