Friday, August 30, 2013

Holiday Head Start!

Last night I held my first Holiday Head Start event...a Stamp-a-Stack!  Here is one of the three designs we made:

Christmas card featuring the Joyful Christmas stamp set (131805) with sentiment from More Merry Messages (126402).
Each of my guests made four of this design, so I kept it fairly straight forward. 


It was the first time I inked up my Joyful Christmas set.  That poinsettia image is just gorgeous!

Inside view.  Sentiment is from More Merry Messages
Here are a couple of tips for putting this one together:
I can't wait to do more with this stamp set...it is so pretty!  Good thing we're just starting the Holiday card making season...lots more time to play.  Have a great weekend!!

Wednesday, August 28, 2013

One More Sketch-inspired Project

Today I have my last project using this month's inspiration sketch...and in my opinion, I've saved the best for last...

Holiday card featuring the Festive Flurry bundle (133285) and Expressions Thinlits.


This project came together easily thanks to the Festive Flurry stamp set and Framelits.  It will most certainly be part of my Holiday class line-up, but if you want to recreate it yourself, here are some tips:
Isn't it amazing how many different looks you can get from one simple sketch?  What a great way to inspire one's creativity!

Tuesday, August 27, 2013

More Sketchy Washi

I had such fun creating yesterday's project I decided to do a similar one with a Christmas theme:

Holiday card featuing the Tags 4 You bundle (133294), and Season of Style Designer Washi Tape (132155)
I mentioned  how quick and easy yesterday's sample was, so was this!

Inside Sentiment from the Oh, Goodie! stamp set
This is definitely going to be in my class line-up this Fall.  Super fun and super easy.  Here are some quick tips:
I love this  month's sketch so much I couldn't stop creating projects with it!  I have one more sample to show you tomorrow...stay tuned!

Monday, August 26, 2013

More Sketch Inspiration

Well, I'm home from my week at the lake.  Summer is officially over as this week is all about school:  getting both Max and I ready to head back and getting my classroom and curricula in shape for my students' return.  While I am a bit sad to see summer end, we are heading into my favourite season.  Today I have a decidedly Fall card for you...

Halloween card featuring the Tags 4 You bundle (133294) and Witches Brew Designer Washi Tape (132156)
I based this design on this month's inspiration sketch which (in case you've  forgotten) looks like this:


I couldn't resist pulling out my (retired) Spider Web TIEF for this card...it was just too perfect!


This is the quickest, easiest card ever, thanks to the Witches Brew Designer Washi Tape.  It literally took me 10 minutes to put together.  Here are some tips for you:
  • I applied the Washi tape before I embossed the card stock so that the tape would take on the embossed pattern
  • I used Naturals White card stock and then sponged very lightly with Basic Gray ink
  • The label is heat embossed in black on Pumpkin Pie card stock and then  punched out with the Bracket Label punch.  
  • The inside sentiment is from the Delightful Dozen stamp set (122652) and is also heat embossed in black.  I die cut the label using the Chalk Talk Framelits, which I then trimmed.
If you haven't yet tried this sketch, what are you waiting for??  There is more inspiration HERE...and be sure to stop by tomorrow for another sample.

Friday, August 23, 2013

Perfect Project Kits Day 5

Well, it's my last day of relaxation at the lake and I have one more kit-based project to show you. 


Gift set of eight 3"x 3" note cards with coordinating envelopes featuring the Festive Flurry bundle (133285), Winter Frost DSP stack (132183) and embellishments from the Christmas Banner Accessories Simply Created Kit (132697).  The "merry" sentiment is from the Pennant Parade stamp set (122742).


 This  box is one of the Decorative Window Gift Boxes (132146) and it holds a set of eight note cards with lined envelopes.  All of the ribbon and rhinestones were what I had left over from creating the banner I showed you yesterday.  The Christmas Banner Accessories kit has SO much product in it!  It is the perfect embellishment kit for any Holiday project...not just a banner!


Unbelieveably, I had enough ribbon and rhinestones to do two of each of the above cards and embellish the box!  It is an incredible value at just $11.95, here in Canada!  For about the price of a single roll of ribbon you get generous amounts of three different ribbons (one of which is exclusive to this kit), five Vintage Faceted Buttons, ten large rhinestones, four pre-scored strips of DSP to make rosettes, 4 die cut DSP circles, and three die cut glittery snowflakes.  Talk about awesome!!  Did I mention that it all coordinates?  And that it also coordinates with the Winter Frost suite of products in the Holiday catalogue?  So many options to create gorgeous Holiday projects for very little money.  These kits are one of my favourite things in the Holiday catalogue!
I hope you've enjoyed this little feature on two of my favourite Simply Created Kits.  Stay tuned over the coming weeks for more using these fabulous products.  Now here's the really great news...you can get your favourite project kit for FREE!  This month, new members of my Tri-City Stampers team get to choose a project kit to add to their Starter Kit for free!  What a great bonus!  Click HERE to learn more about this promotion and click "Join My Team" above to learn about all that Stampin' Up! has to offer you.  I would love to welcome you to my team!
Have a fabulous weekend!!

Thursday, August 22, 2013

Perfect Project Kits Day 4

So, now that I've given you some ideas for Fall, how about a few Christmas projects using the Simply Created Kits?  Today I have a gorgeous banner I created using the Build A Banner (133507) and Christmas Banner Accessories (132697) Simply Created Kits.


As you can see, this banner will be part of an upcoming stamp camp next month...more on that later...but it was so quick and easy to create with these two fabulous kits.  Once again I was amazed at how much product came in the Christmas Banner Accessories kit.  Every embellishment on the banner - all of the rosettes, the snowflakes, the ribbon, the buttons and the large rhinestones- came from just one kit.  What's even better is that I had enough ribbon and buttons left over to create a whole other project that I'll show you tomorrow.  The banner kit comes with 18 canvas pennants, background stencils, alphabet stencils a spritzer and twine to string the banner.  The stencils are reusable over and over again because they just rinse clean.  It took me no time at all to spritz the pennants - once I figured out that I had to hold the spritze at least 14" above my pennant (ask me how I figured that out!)- and they dried in minutes because I filled my spritzer with rubbing alcohol.  I can't wait to create other banners...this isn't the last you've seen of this kit!!
Be sure to stop by tomorrow to see another project using the Christmas Accessories Kit.

Wednesday, August 21, 2013

Perfect Project Kits Day 3

Happy Wednesday...time for another project featuring the Thankful Tablescape Simply Created Kit (133463).  This one is for all of you scrapbookers...

Thanksgiving-themed 12" x 12" Double scrapbook layout featuring products from the Thankful Tablescape kit.  Holds two 4"x 6" and two 2"x 2" photos

Now, I can't claim that everything on this layout is from the kit, but much of it is.  The only additional supplies I used  were two sheets of 12x12" Sahara Sand card stock, 1-1/2 sheets of Naturals Ivory card stock, three Naturals Designer Buttons, a scrap of Chocolate Chip card stock to die cut the "thankful" title and 14" of 1-1/4" Burlap Ribbon.  Now did I mention that I created all of the projects, including seven of Monday's ensemble using just a single kit??  AND I still have stuff leftover to use on other projects!


I plan to put photos of my family on this layout, using  the chalkboard banners to write their names and the journalling card to record my thoughts on just how grateful and blessed I feel to have them in my life. 

Now are you ready to order your  kit?  You might  want to wait till after you see what else I have in-store for you this week!  See you tomorrow! :)

Tuesday, August 20, 2013

Perfect Project Kits Day 2

If you're anything like me, your first reaction to this kit was "it's nice but I don't think I'd use it".  Well, think again!  Yesterday I showed you a project I did with my team at our monthly meeting.  Today I have another design that uses only elements from the kit...

Thank you card featuring  elements from the Thankful Tablescape Simply Created Kit (133463) and the Truly Grateful stamp set (131733)
As I mentioned yesterday, I am amazed at the value in this kit.  There is so much product for such a low price!  It is perfect for the crafter who doesn't want to invest in full packs of DSP, embellishments or a die cutting machine because it has everything in one fabulous kit...and, in true Stampin' Up! style,  it all coordinates!


All of thee supplies used on this card are from the kit...even the little banner is cut from one of the journalling cards...I just flipped it over and stamped on the unprinted side.  I did use a half sheet of Sahara Sand card stock for the base and a scrap for the acorn, but everything else is in this wonderful kit.  So, have I convinced you yet?  Well, I'm not done!  Stop by tomorrow for yet another project using this awesome product!

Monday, August 19, 2013

Perfect Project Kits Day 1


One of the most exciting things about the Holiday Catalogue is the wide assortment of kits and bundles available.  The Simply Created line has me particularly enthused because of all of the possibilities they hold.  This week, while I'm away enjoying some sun (I hope!) and R&R, I want to feature a couple of these kits and some of the fabulous things you can do with them.
My first focus will be the Thankful Tablescape Simply Created Kit (133463).  


Now, I have to admit that upon first glance I kind of wrote this kit off because I never host Thanksgiving dinner anymore...I am busy at my booth the Rockton World's Fair all of Thanksgiving Weekend!  However, when I received this kit for free as part of my Title Benefits Bundle, I decided to crack it open and see what possibilities it held.  Was I ever glad I did!


Thank you card and envelope made using the Thankful Tablescape Simply Created Kit (133463) and the Truly Grateful stamp set (131733)

Envelope made from the napkin holder pouch.  The belly band acts as the closure for the envelope...the flap just tucks in behind to secure it.


There is a TON of product included in this kit!  I was amazed at how much I could do with it and STILL have leftovers.  Today's project is one I designed as the Make-n-Take for my monthly team meeting.  Yep, I had enough product to make SEVEN of this card and envelope ensemble and still had lots left for the other projects I'll show you later in the week. The only thing I used that was not part of the kit is the Sahara Sand card stock for the base of the card.   At $24.95, here in Canada, this kit is a fantastic value!  Be sure to stop by tomorrow for another project.  In the meantime, here are a couple of tips for recreating this project:
  • When stampin on the chalkboard labels, be sure to use white Staz On ink...the white craft ink will smudge.
  • To create the box-pleated strip, which is 4" wide when folded, you'll need a 5-1/2" strip of the Tangerine Tango paper that is scored at:  1", 1-1/8", 1-3/8", 1-1/2", 2-1/2", 2-5/8", 2-7/8", 3", 4", 4-1/8", 4-3/8", and 4-1/2"
  • The leaves are sponged with Chocolate Chip ink.
  • The sentiment on the envelope is stamped in Chocolate Chip ink.  The acorns are also in Chocolate Chip ink and are stamped on Sahara Sand and fussy cut.

Saturday, August 17, 2013

Emerging Fall Colours

Yup.  The air this week has certainly has that fall chill to it.  A wee bit early for my liking, but it beats the sweltering heat of the past couple of summers around here!  Today I have another project I created for this week's challenge over at The Technique Twist.

Thank you card featuring the Wonderfall stamp set with sentiment from Truly Grateful and using the Emerging Colours technique
I really like the way this one turned out.  I am a huge fan of fall shades and it was such fun to play with colour and blends to get this look.  It was easy peasy...here's how I did it...

  • Starting with Whisper White card stock I sponged Crushed Curry, Tangerine Tango and Cherry Cobbler in various spots all over the panel.  I overlapped neighbouring colours, blending where they met.
  • I stamped the leaves in Versamark and heat embossed with clear embossing powder.
  • I sponged heavily with Early Espresso ink to bring out the pattern in the leaves and conceal the bright background colours.  This will take a bit of work, but it's worth the effort!  Be sure to wipe the excess ink off the embossed leaves when you're done to reveal the vivid colour underneath.
  • The kinky twine is from the Burlap ribbon.  A cool little trick where you cut off the stitched edge and then pull out the strands of twine.  They are kinky from being woven in the burlap.  I love the extra texture it adds!
  • The button is from last year's Holiday catty...sorry you can't get them anymore :(  If they ever show up on the Clearance Rack you'd better be quick to snatch them up before I get 'em!  Love those things!!)
  • The sentiment is from the Truly Grateful stamp set and is stamped in Early Espresso on Naturals Ivory card stock and then die cut with the Bitty Banners Framelits.

 Today I'm getting ready to head up north to my parents' place for some R&R before heading back to the classroom.  I'll be gone all of next week but, never fear, I will pre-post some projects so you don't miss me too much  while I'm gone :)  In the meantime, why not play along with us this week at The Technique Twist...its tons of fun!!

Friday, August 16, 2013

NEW Single Stamps!

I. Am. So. Excited!!!  Stampin' Up! has just released a brand new collection of single stamps and they are all Holiday themed!!  They are available now until January 31st, 2014.

Click the flyer to view larger size.
I love every single one!  I especially love that so many of the images coordinate with punches or dies that I already have!  Many of them are large images...the images on the flyer have been reduced by 50%.  Take note of the recommended Clear Mount block sizes to get an idea of just how big these stamps are.  They are going to be a wonderful, (affordable!!) addition to my stamp collection.  Yippee!!!

Now, since we're talking about new Holiday stamps, I might as well show you a Holiday card I designed.  Have a look:

Holiday card featuring the Wonderful Wreath (132748) stamp with sentiment from the Naughty and Nice This and That Rotary Stamp (132278)


So many of my favourite new products on this one card!  Here is a quick list for you:
  • The DSP is from the Season of Style DSP stack...48 card-sized sheets dirt cheap!
  • I stamped the wreath in Gumball Green and then fussy cut it.
  • I layered the wreath on a Silver Glimmer paper label cut with the Apothecary Accents Framelits.
  • The sentiment is one of several on the Naughty and Nice This and That Rotary Stamp.  This is one of the best-kept secrets in the Holiday catalogue...11 different images for just $7.95!!
  • I didn't cheat and use non-SU rhinestones.  I just coloured them with a red Sharpie to make my red blingy berries :)

Thursday, August 15, 2013

Time to Get Twisted!

It's the 15th, which means it is time for a new challenge over at The Technique Twist!  I have to say I am loving be part of the design team for this awesome challenge blog...it is pushing my creativity in all sorts of directions!
Today's technique is Emerging Colours (aka Joseph's Coat).  I've featured this technique before.  You can see that project HERE.  Here is one of my new Twisted projects:

Thank you card featuring the Everything Eleanor stamp set (124164) with sentiment from Lacy and Lovely (122887)
Now, if you've been following my blog for a while, you know this isn't exactly my style.  I'm not really a froo-froo, lace-and-pearls kinda gal, but this card sort of took on a life of it's own and this is what I ended up with.  It is pretty, I suppose, but not the type of card I'd generally design (or give to any of my friends, for that matter!).  It looks like something one would send their granny (if I had one!) :(


So, if you've been dying to create something to send to your granny, or you just love this style and want to recreate it for yourself, here are some tips...
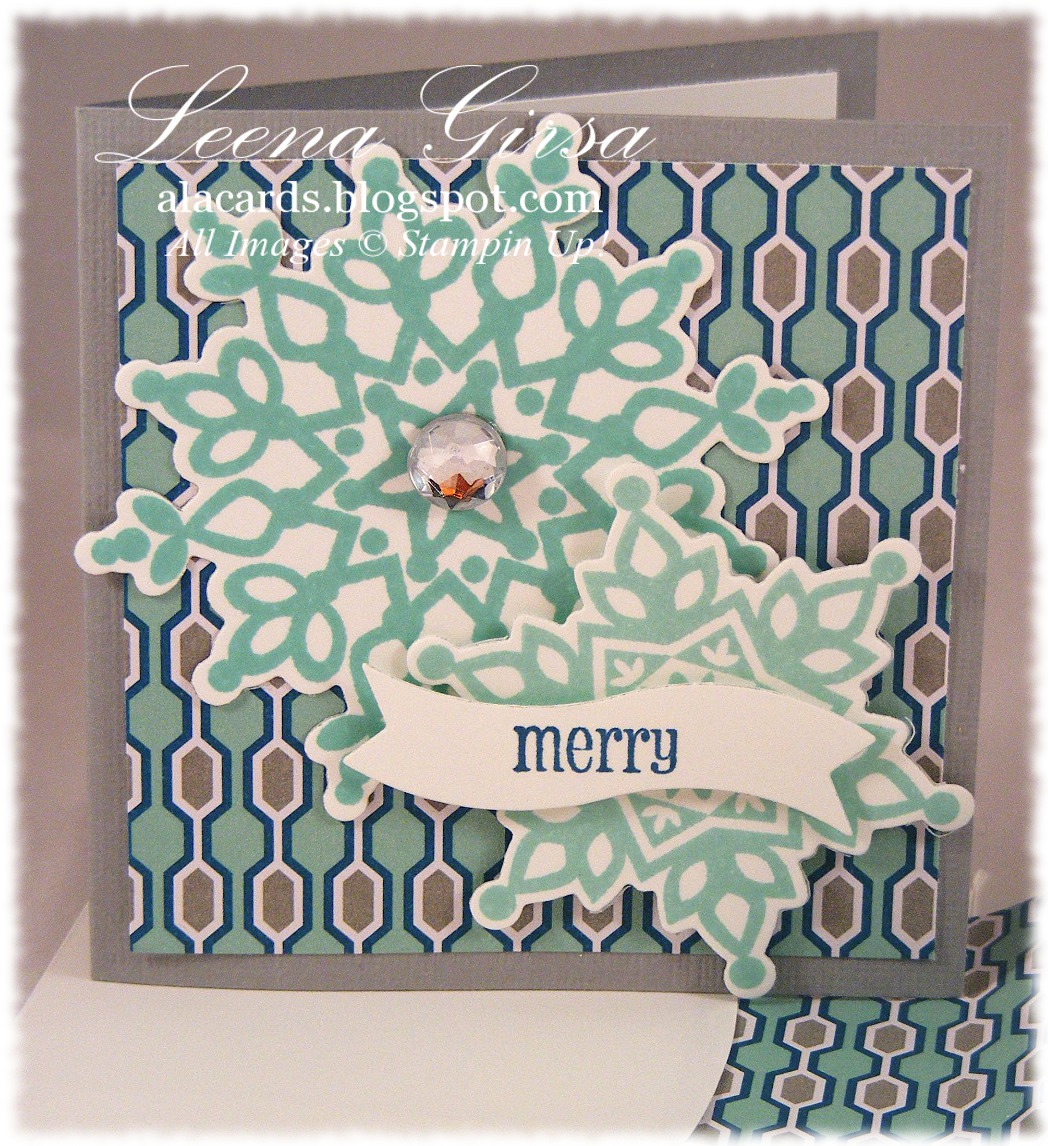
  • I started the stamped panel with a piece of Whisper White card stock.  I stamped the flourish from Everything Eleanor in Pear Pizzazz and the flower in Raspberry Ripple.
  • I stamped the label from Everything Eleanor over top of the stamped images using Versamark ink and then heat embossed with clear embossing powder.
  • I sponged (heavily!) all over with Always Artichoke ink.  The goal is to cover as much of the stamped images as possible.  The clear embossed label will resist the ink.  Be sure to wipe off the embossing to remove any excess ink when you're done sponging.
  • I used Raspberry Ripple Core'dinations card stock for the background panel and embossed it using the Fancy Fan TIEF.  I then sanded it lightly to expose the lighter-coloured core.
  • I added a Tea Lace Doily peeking out behind the focal point.
  • The sentiment is from the Lacy and Lovely stamp set and is stamped in Always Artichoke in on Sahara Sand card stock.  I punched it with the Large Oval punch and layered it on a Scallop Oval punch in Raspberry Ripple.
  • There is no short cut for the pearls...each one gets placed on each scallop.  Tedious?  Yep.
This technique has been around for a while, but it sure was fun to try to come up with something new.  Give it a whirl and be sure to link up at The Technique Twist this week!  We'd love to see what you come up with!!

Wednesday, August 14, 2013

Grateful Team Swap

I held my monthly team meeting this week and we held our first-ever team swap!  Some of my gals were envious of all the fabulous swaps I received at convention and decided they wanted in on the swapping fun too!  I decided to focus on new Holiday catalogue products because I knew many of my gals wouldn't have them yet.

Thank you card featuring the Truly Grateful stamp set (131733) and Sweater Weather DSP (132184)
Don't you just love Soft Sky?  It is the prettiest, softest blue ever and paired with Chocolate Chip and Crushed Curry it is just perfection.  I based my design on the sketch from a couple of weeks ago at Mojo Monday.  It worked perfectly because it allowed me to feature some of that gorgeous Sweater Weather DSP!  Here are a few more tips:
  • I embossed the Soft Sky background with the Woodgrain TIEF, placing the card stock horizontally so the pattern went across the middle of the panel.  I also used the multi-purpose platform on no tabs so that I got a softer, more subtle impression.
  • The sentiment is stamped in Chocolate Chip ink on Naturals White card stock.  I also stamped the wheat sheaf image in Crushed Curry that I stamped off once first.  I die cut the oval using the Ovals Collection Framelits.
  • The label behind the sentiment is die cut with the Apothecary Accents Framelits.
  • The bulky bit of twine is actually from the Build-a-Banner Simply Created Kit!  I had a bit left over from another project, so I pulled it apart (the twine actually has three strands twisted together) and used one strand to tie my bow.

Tuesday, August 13, 2013

Holly Jolly Birthday Basics

It's no secret how much  I love the Birthday Basics DSP pack, but now there is even MORE reason to love it!  Check this out:

Christmas Card featuring the Tags 4 You stamp set(131823) and Birthday Basics DSP (130145)


See that Raspberry Ripple and Gumball Green DSP?  It's from the Bithday Basics  pack!!  How perfectly festive is that?  I tell you, this stuff has it all...everything you need for every occasion...have you ordered yours yet?  When you do, here are some quick tips for recreating this card:

This is a quick and easy one...don't you wish they were all that way??

Monday, August 12, 2013

Monday Sketch Inspiration

Happy Monday!  I hope that where ever you are your weekend was as beautiful as ours was here!  Simply gorgeous! 
To start your week off I have another project I created using this month's inspiration sketch.


Fall-themed card featuring the Magnificent Maple stamp (131868) and Sweater Weather DSP (134184), both from the Holiday catalogue
In case you've forgotten, here is this month's sketch:


For some reason, this sketch has really inspired my creativity!  I have so many ideas for how to use it and so little time to make them happen!  Here are some tips for you, in case you want to recreate this card:
  • I heat embossed the Magnificent Maple image in pewter and then die cut it with the Deco Labels Framelits
  • I sponged the background over the embossed image using, in this order, the following inks:  Crushed Curry, Pumpkin Pie, Cajun Craze and Cherry Cobbler.
  • The faux wood panel behind the stamped image is from the Natural Composition specialty paper pack.  I sponged it with Early Espresso ink to bring out the wood grain.
  • I used torn strips of Sweater Weather DSP, sponged with Early Espresso ink, behind the focal image
  • The background panel in Crushed Curry is embossed using the Houndstooth TIEF
Give this sketch a try...it really is super versatile and such fun to play with.  When you do, be sure to leave a comment with a link to your project...I'd love to see what you come up with!

Have a great week!


Friday, August 9, 2013

More Magical Masking Tape

Happy Friday!  Where did this week go??  Today I have another design that uses the Magical Masking Tape technique.
Any-occasion card featuring the Gorgeous Grunge (130517) and Hello,Lovely (130243) stamp sets and using the Magical Masking Tape technique


Sentiment from the Yippee Skippee stamp set (131344)

Yesterday I showed you a very CAS design, so today I want to show you one that has much more going on.  We did this at my monthly techniques group last night and my gals loved it!  Here are some quick tips:
I hope this weekend holds some time to play with ink and paper for you!  Enjoy!!

Thursday, August 8, 2013

Magical Masking Tape Meets Magnificent Maple

How's that for a mouthful of a header??  If perfectly describes today's project though...

CAS Thank you card featuring the Magnificent Maple (131868) stamp and using the Magical Masking Tape Technique with sentiment from Simply Sketched (Hostess 129672)

This month my techniques group is learning the Magical Masking Tape technique.  I thought it would work perfectly with this month's inspiration sketch.  Here is the sketch...

August Sketch Inspiration
I actually had a ton of fun with this sketch...I have LOADS of samples to show you...all in good time ;)
Here is a closer look at this one...

In case you aren't familiar with this technique, here's a quick how-to:
  • Be sure to use painter's tape...not regular masking tape for this technique.  I like the blue stuff best.
  • Choose various widths of tape for visual interest.  I wanted to use some narrower tape but my husband used it all up when he painted our son's bedroom a couple of weeks ago (sheesh!!).  I settled for uniform widths on this project but it would be SO much better with different ones!
  • Use the old-style felt ink pads.  The new firm foam ones are WAY too juicy for this to work...you'll just end up with a mess...ask me how I know ;)
  • Use light colours.  Dark ink doesn't look good...again...ask me how I know ;)  On this card I used So Saffron, Pool Party and Calypso Coral.
  • To apply ink to the tape, tear a length of tape, lay it sticky-side-down on your ink pad and lightly burnish it (I used my bone folder so as not to get my fingers inky...the ink just wipes right off the bone folder!).  If your tape is longer than the ink pad you'll need to move it and burnish again to ink the entire piece.
  • Lay the tape on your card stock and burnish gently again (I just used my fingers for this).  Don't rub too hard or you'll have trouble peeling the tape off again.
  • Carefully peel the tape off...the ink will transfer to the card stock and you'll have a lovely, textured strip of colour.
  • Repeat as many times as you'd like to create the background you want.  Then stamp over top with a darker colour.  Here I actually heat embossed the Magnificent Maple image in Early Espresso.  The sentiment is stamped in Early Espresso ink.
We'll be doing this one for my techniques class this evening...hope my gals like it!

Related Posts Plugin for WordPress, Blogger...