Showing posts with label Delightful Dozen stamp set. Show all posts

Friday, March 20, 2015

Get Well Petals

Happy Friday!  Normally I'd be celebrating the end of another week, but today marks the end of my March Break, so forgive me if I'm a little less enthusiastic than normal ;)
Today I have another project that uses one of my new favourite sets...

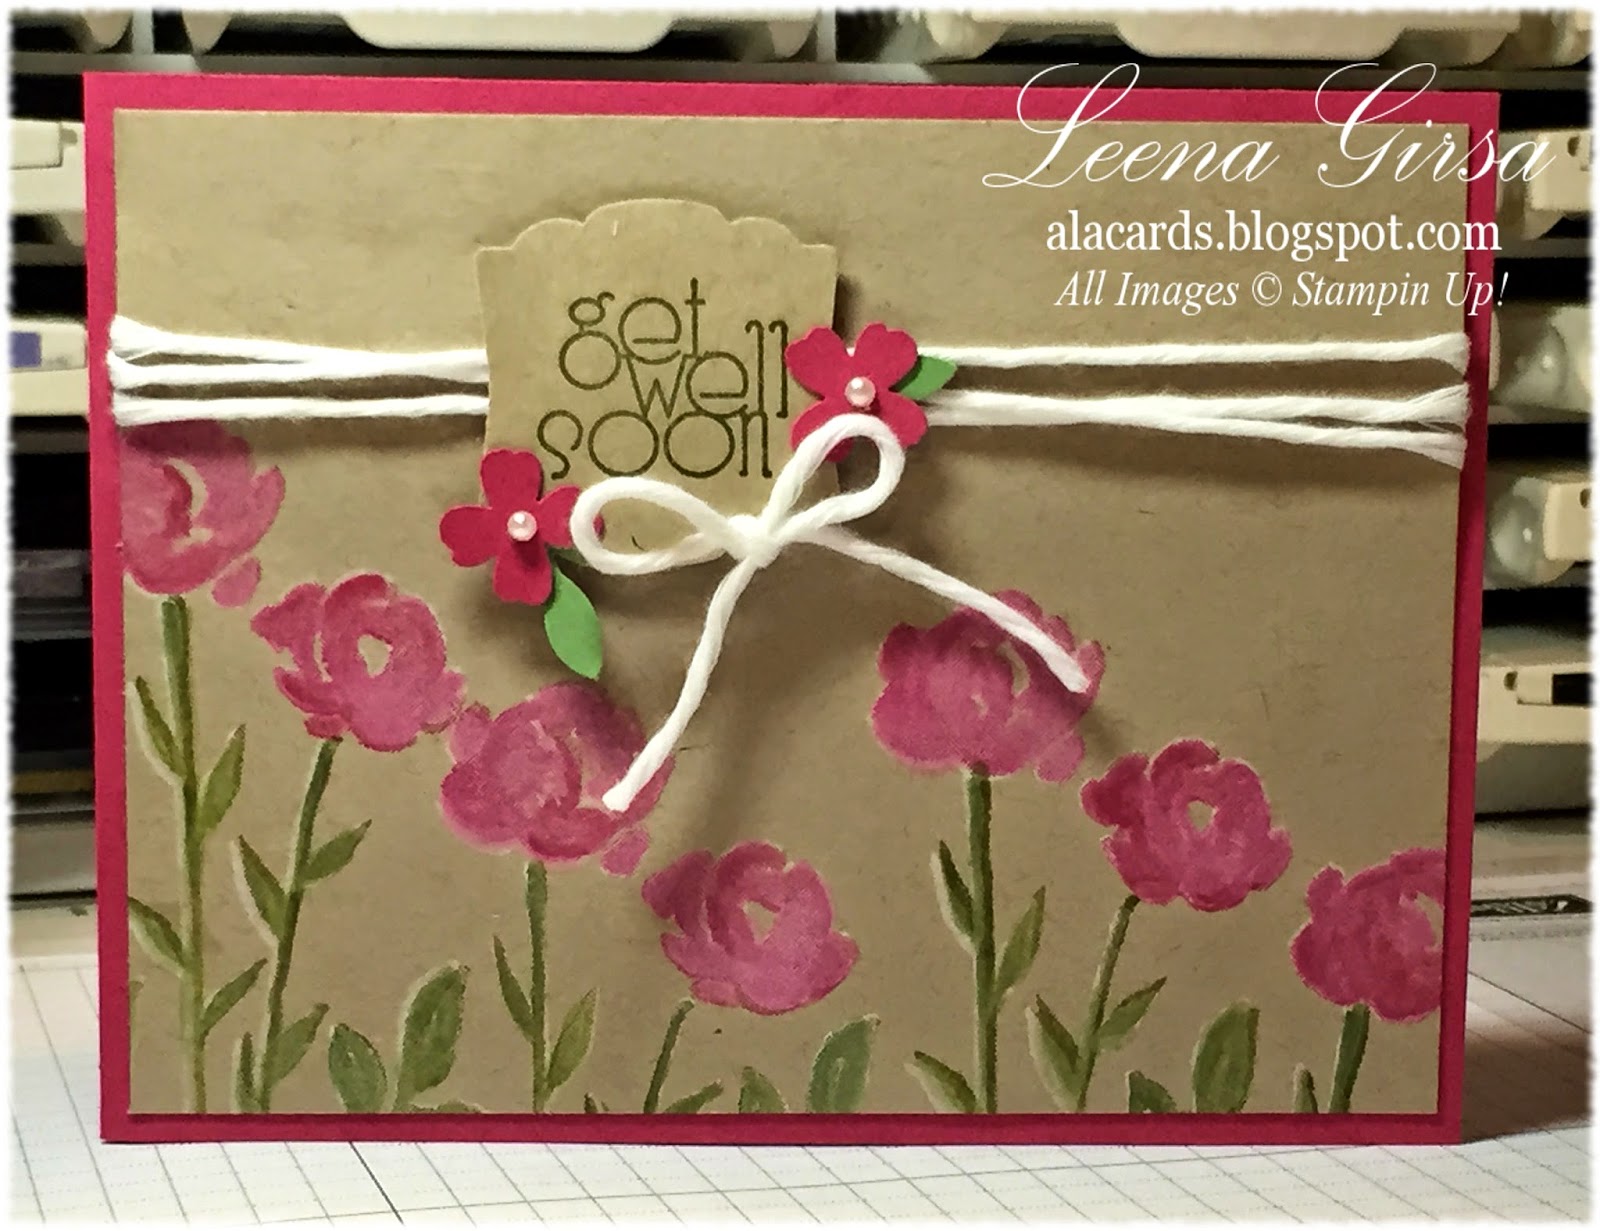
Get well card featuring the Painted Petals stamp set, with sentiment from Delightful Dozen (retired)
I hope you're not tired of the Painted Petals set yet...I am just starting to explore its possibilities!  For this card I first stamped the stems and blossoms using Whisper White craft ink on Crumb Cake card stock.  Once that had dried, I stamped right over top of the white images using Old Olive ink for the stems and Rose Red ink for the blossoms.  I then used a blender pen to soften the images and blended them a little with the white ink.  I added some shadows on the stems with a hint of Mossy Meadow ink.  I love the soft, almost pastel-like result!


The rest of the card is pretty straightforward.  I stamped the sentiment, from the long-retired Delightful Dozen stamp set, in Mossy Meadow ink and then punched it with the Artisan Label punch.  I added some white Painted Blooms cotton twine and some little flowers I punched with the Itty Bitty Accents punch pack and embellished with some pearls.  The leaves on the flowers are punched with the Bird Builder punch from Wild Wasabi card stock.  The card is built on a Rose Red card base.

Inside view with sentiment from Thoughts and Prayers.
On the inside of the card I stamped the sentiment from Thoughts and Prayers in Mossy Meadow ink and added another little punched flower.
I have so many friends who are unwell for various reasons...I'm sure this find its way to someone's hands soon!
Have a fabulous weekend!

Tuesday, February 10, 2015

In my Thoughts

Today I have another of the make-n-takes from my team meeting last night.  We were all about the Irresistibly Yours Specialty paper from the Sale-a-bration brochure last night.

Thinking of You card featuring the Irresistibly Yours Specialty DSP with sentiment from Delightful Dozen.
I used the Simply Scored to score the Coastal Cabana card base.  I like the subtle texture that simple score lines provide...without requiring a Big Shot!  The Irresistibly Yours Specialty paper is sponged with Coastal Cabana ink.  I used the Essentials Paper Piercing Pack to pierce the border around the Whisper White mat.  The ribbon is from the Best Year Ever Accessories pack.

The sentiment, from the Delightful Dozen stamp set, is heat embossed in white.  I added a wee vellum butterfly, punched with the Bitty Butterfly punch, that I sponged lightly with Coastal Cabana ink and a few rhinestones that I coloured with the lightest shade of Bermuda Bay Blendabilities.

On the inside I wanted lots of room to write an encouraging note, so I simply added a narrow strip of sponge Irresistibly Yours Specialty paper along the bottom edge.
Have you earned your free package of this awesome paper yet?  The possibilities for this stuff are endless!

Now here are this week's Weekly Deals...as always, prices are good until Monday at midnight.

Chalkboard Banner Simply Created Kit
Price: $24.95   
Sale: $18.71
Darling Doily Thinlits Die by Stampin' Up!
Darling Doily Thinlits Die
Price: $30.95  
Sale: $23.21
Floral Frames Framelits Die
Price: $32.95 
 Sale: $24.71
Flower Frenzy Bigz L Die by Stampin' Up!
Flower Frenzy Bigz L Die
Price: $46.95 
 Sale: $35.21
From the Garden Photopolymer Bundle by Stampin' Up!
From The Garden Photopolymer Bundle
Price: $41.50  
Sale: $37.35
Gold 1/8 Ribbon
Gold 1/8" Ribbon
Price: $6.95 
Sale:  $5.21
Label This Kitchen Designer Template -- Digital Download
Label This Kitchen Designer Template - Digital Download
Price: $8.95  
Sale: $5.37
Venetian Crochet Trim by Stampin' Up!
Venetian Crochet Trim
Price: $9.50 
Sale:  $7.13

Monday, April 21, 2014

Petals for Mom...Retiring Lists and FREE SHIPPING!!

http://www.stampinup.com/ECWeb/default.aspx?email=lgirsa%40gmail.com&phone=%28519%29+574-6059
Click the image above to place your online order NOW!  Your order will ship directly to you for FREE!  WOOHOO!!

Nope.  Your eyes are NOT deceiving you.  Stampin' Up! is offering FREE SHIPPING on everything beginning today until this Friday, April 25th!  Are you excited?  Can you handle even more great news?


The Retiring Lists are now available too, with great deals on products to which we'll soon be saying a fond farewell.  All items on the Retiring Lists (including stamps) are available only while supplies last .  Get them now and don't pay for shipping...can it get any better??

Click HERE to view the list of Retiring Stamp Sets
Click HERE to view the list of Retiring Accessories

I have a sweet little project that I designed for my Brides, Babies and Birthday Card Buffet this week.  It is the perfect way to let your Mom know how much you appreciate her this Mother's Day...

Mother's Day card featuring the Petite Petals stamp set with sentiment from Delightful Dozen
I just love this colour combo of Smokey Slate, Coastal Cabana and Crushed Curry.  I was inspired by the Eastern Elegance DSP pack, which just happens to be on the Retiring Accessories List!  I wanted to try doing an angled layout, as I've seen many lately that I just love.

Interestingly, this was another project I put together using odds and ends from the pile on my stamp desk!  I had the scrap of DSP, a bit of ruffled ribbon and half a doily laying around from other projects, so I put 'em all together and this is what I ended up with.  I liked it so much I decided to incorporate it into the line-up for this week's event.

Inside view with sentiment from the Something to Celebrate (retired) Hostess set.
Now, I'm off to browse the Retiring Lists and place my order before everything on my Wish List sells out...you should do the same!!

Friday, September 13, 2013

Sketched Blessings

Happy Friday everyone!  I hope your week has been better than mine!  I am so glad the weekend is here!!

Stampin' Up! gave us a little pre-weekend surprise by adding several new items to the Online Clearance Rack yesterday.  There are lots of great deals to be had...check it out, but hurry...these items are only while supplies last, which won't be long at these prices!

Today I want to share with you another take on a card I showed you a while back

Holiday card featuring the Simply Sketched Hostess set with sentiment from More Merry Messages.
I had originally designed this card for a stamp-a-stack I held last month, but when the registration jumped to nine, I decided I had to redesign the card for speed's sake!

The branch images were inked using Always Artichoke and Cherry Cobbler markers...not a difficult technique, but one that does take a bit of time and since I had one stamp and one set of markers and each guest at my event was doing four of this card...welll you can imagine why I felt it necessary to rethink my plans!

Inside view with sentiment from Delightful Dozen
The redesigned card was a hit, but I fully intend to use this design at other classes this fall! 
Now, I am dashing out the door to work, so I don't have time to give you the full rundown of what I used, so you'll have to forgive me for that :)
Have a great weekend...and be sure to make time to stamp!!

Monday, August 26, 2013

More Sketch Inspiration

Well, I'm home from my week at the lake.  Summer is officially over as this week is all about school:  getting both Max and I ready to head back and getting my classroom and curricula in shape for my students' return.  While I am a bit sad to see summer end, we are heading into my favourite season.  Today I have a decidedly Fall card for you...

Halloween card featuring the Tags 4 You bundle (133294) and Witches Brew Designer Washi Tape (132156)
I based this design on this month's inspiration sketch which (in case you've  forgotten) looks like this:


I couldn't resist pulling out my (retired) Spider Web TIEF for this card...it was just too perfect!


This is the quickest, easiest card ever, thanks to the Witches Brew Designer Washi Tape.  It literally took me 10 minutes to put together.  Here are some tips for you:
  • I applied the Washi tape before I embossed the card stock so that the tape would take on the embossed pattern
  • I used Naturals White card stock and then sponged very lightly with Basic Gray ink
  • The label is heat embossed in black on Pumpkin Pie card stock and then  punched out with the Bracket Label punch.  
  • The inside sentiment is from the Delightful Dozen stamp set (122652) and is also heat embossed in black.  I die cut the label using the Chalk Talk Framelits, which I then trimmed.
If you haven't yet tried this sketch, what are you waiting for??  There is more inspiration HERE...and be sure to stop by tomorrow for another sample.

Friday, February 1, 2013

New month, new blog feature!

Happy February, everyone!  Can you believe we're already a month into 2013?!?  Today marks the start of a new feature I am adding to my blog.  I announced it in my newletter that went out this morning, so if you haven't read it yet, this will be news, otherwise, you'll already have heard all about it.

One of the most common comments I get from my stamping friends is that they love playing with ink and paper, but find it really difficult coming up with ideas for layouts and designs.  This new feature is meant to help address that problem!  At the beginning of each month I will post a sketch that I've designed.  They will usually be quite simple to allow lots of room for creativity.  I will also post projects that I have done using the sketch throughout the month.  You'll be amazed how much fun it is to design from a sketch...it will really get your creative Mojo working...I promise you!!  Each sketch will be featured in a blog post, as will all of the samples; however they will also reside on my new Monthly Sketch Inspiration page (check out the tab in the upper right of this page!) to make it easy to find them all in one place.  So, without further ado, here is February's sketch:


And, here is my first sample to get you inspired and into your stamping supplies

 
Simple Valentine's card featuring More Amore DSP and sentiment from Delightful Dozen.

So, are you ready to get creating?? Give it a shot...you might just surprise yourself!  Go stamp something...and have a great weekend!!

Monday, September 24, 2012

Froggy Birthday

This weekend I spent a bit of time prepping for an upcoming class I have next weekend.  The hostess asked to do birthday cards...particularly one for a young boy.  She said she always has trouble coming up with designs for that particular demographic.  She's not alone!  Cards for young boys can be a challenge, but, thankfully, I have one (young boy, that is) and he thinks this card is kinda fun.  Check it out!


Birthday card for a young boy featuring the Perfectly Preserved and Moving Forward stamp sets with sentiments from Pennant Parade and Family Reunion.
Inside view with sentiment from the Delightful Dozen set.


Fun, eh?  I love that little froggy from the Moving Forward set...in fact, its the only stamp from that set that has actually seen ink so far!  I liked the idea of the frogs escaping from the jar...how many of us moms of little boys shudder to think about all the critters living in the various jars that find their way into our home over the summer months?   Thankfully, all of our "guests" have moved on the greener pastures and we are, for the moment, critter free.  Anyhow, my son thought it was pretty funny that the frogs were jumping out of the jar on this card.  In fact, he asked if he could give it to the one of this friends that has a birthday.  Nothing like the stamp of approval from a 5-year-old!  (Pardon the pun!!)  I stamped a border using the "happy birthday" stamp from the Family Reunion set and added a little tag from the Pennant Parade set.  The colour scheme is Lucky Limeade, Summer Starfruit and Basic Black.  The only embellishment is a bit of baker's twine to hold the tag on the jar. Simple and boy-friendly.   I hope my class attendees like it!

Saturday, April 14, 2012

There's something about Mary...

...Mary Fish that is!  She  is one talented lady and her blog is on my regular reading list.  A while back she featured a birthday card that I loved and it prompted me to create today's project.  Check this out...

Masculine birthday card featuring sentiment from the Delightful Dozen stamp set.
I kept all of the essentials of Mary's design, including the colour scheme and layout.  What I changed was the focal image.  To create it I cut several different colours of DSP and cardstock (including pool party, always artichoke, old olive and lucky limeade) using my Tasteful Trim die with my Big Shot.  I then glued the little strips of rick-rack onto an island indigo panel on a diagonal and then ran the whole thing through the Big Shot again with the lattice embossing folder.  The result is kinda funky, but perfect for a masculine birthday card. 

On another note...tomorrow is the day the retiring stamp sets list is published.  We will learn which of our treasured stamp sets will not carry over to the new Annual Catalogue...a bit of a sad day, but also exciting because it means Stampin' Up! has something new and even better in store!  Check back here tomorrow to view the retiring list...I'll have a link to the PDF for you right here!

Thursday, April 12, 2012

Doilies for Mom

Today's post is a quick and easy card I made for our monthly team meeting swap.  This month's challenge was to create a Mother's Day card using at least one of the many doily products in the Stampin' Up catalogue.  My thoughts immediately turned to the beautiful Flirtatious DSP and this card practically designed itself!  Have a look...

Mother's Day card for HSS113 featuring Flirtatious DSP with sentiment from the Delightful Dozen stamp set.
Super simple, eh?  Clearly the DSP is the star of the show on this card, but there were a  few little details you might have missed.  Firstly, I cut and then embossed the scalloped edge on the bottom of the melon mambo mat behind the pink focal piece.  LOVE  those Edgelits and coordinating Adorning Accents embossing folders!  The flower was created by layering two five-petal-flower punches one on top of the other.  Before doing so, I scored a line down the centre of each petal to add interest and texture.  The leaves are two petals from the same flower punch done in lucky limeade.  The white doily in the centre of the flower is cut from a strip that I had punched using the lace ribbon border punch...I just trimmed out the little flower in the pattern.  The final detail on the flower is one of the fabulous fabric covered brads from the Summer Smooches promotion...so fun!  Its hard to believe the only stamping on this card is the sentiment from the Delightful Dozen set...such a great set!  Now, as it turns out, this card works for this week's challenge over at Hand Stamped Sentiments.  Head on over and check it out and then play along!

On another note, in case you missed the news on Tuesday, Stampin' Up has added several new items to the online Clearance Rack...including the 5-petal-flower punch (among MANY others)!  You can get it now for just $13.79 (CDN)...what a deal!  Click HERE to check it out and see the other bargoons to be had!

Friday, March 30, 2012

Last Hurrah for Saleabration...

...yep...its almost over.  Sale-a-bration ends tomorrow at midnight *sigh*.  The good news is that you still have time to get in on the fabulous freebies available exclusively through this promotion.  Just visit my online store HERE and place your order...for every $60 you spend you'll get to choose a free item...but hurry.  The magic disappears tomorrow at midnight.
That brings me to today's post...one last card featuring Sale-a-bration product that celebrates the upcoming Easter season.  Actually, its two cards...same layout and design with two different colour schemes.  Have a look...
SAB Easter card #1 featuring the Fresh Vintage stamp set, Everyday Elegance DSP and cute butterfly brads, all of which I earned for FREE!  Sentiment is from the Delightful Dozen set.

SAB Easter card #2...same DSP...just the reverse side of the paper!  This one also uses the 1/8" organza ribbon.
So, I made the top card first and, not being entirely crazy about the peach parfait-pool party combo, decided to try the same card using the pattern on the reverse side of the DSP.  Now, I can't decide which one I like better...what do you think?  Leave me a comment indicating your preference and I'll add your name to a draw for a special SAB freebie of your own.  Comments must be received by midnight on Sunday, April 1st to be entered in the draw.  Then check back here to see if you've won.
In the meantime, I've got to get busy preparing for Max's big Angry Birds birthday bash next weekend...have a great weekend everyone!

Sunday, March 18, 2012

Easter Elegance

Today is the day my band is performing with a community youth band in Austria.  It was lots of work to get ready for this performance but it will be worth it for the memories the kids will take away from it.  Today I have a pretty Easter card that I CASE'd from fellow demonstrator Karen Barber.  Have a look...
Pretty Easter card featuring sentiment from the Delightful Dozen set.
Nice, huh?  Karen is one talented lady!  The leaves were punched in wild wasabi with the bird builder punch.  The flowers are in pink pirouette and pretty in pink and are punched with the Itty Bitty punch pack flower.  The little scalloped border at the bottom is the dotted scalloped ribbon in pretty in pink.  The sentiment is stamped in wisteria wonder.  The embossing on the card base was done with the finial press folder. 
A simple yet pretty card for spring!

Friday, March 16, 2012

More Cuteness!

We're still in Austria but today I have an oh-so-adorable Easter project for you.  This is another design that I CASE'd from  fellow Canadian demonstrator Mariejosee Gagnon...it was just too sweet to pass up!
Chubby bunny easel card with sentiment from the Delightful Dozen set
Isn't she just so sweet?!?  Such a chubby little thing.  Here's a quick rundown of the punches used to create her:
Body - scalloped circle die - Big Shot
Feet - XL oval (white), small (retired) oval in pink, Itty Bitty circles for toes
Ears - XL oval (white), large oval (pink)
Paws - 1 1/4" circle (white) small (current) oval in pink
Cheeks - 1" circle
Nose - small heart
Eyes - owl builder - largest circle in white, med. circle in black

As with yesterday's card, all punched shapes need to be sponged before assembly.  Use crumb cake on the white pieces and pretty in pink on the pink ones.  I drew on the teeth with a basic grey marker and added freckles with a crumb cake maker.  The highlights in the eyes were added with a white gel pen.

Sunday, March 4, 2012

Loving my new Diagonal Plate!

I had a chance this afternoon to break open my brand new Simply Scored diagonal plate (SSDP).  This nifty addition to the Simply Scored line makes it SO easy to make diagonal score lines on just about any project.  I plan to feature it at my team meeting this month and so I spent some time creating the make-n-takes using the SSDP.  Here is what I came up with...

Centre-step Easter card and matching envelope made easy with my Simply Scored Diagonal Plate.  I used the Mixed Bunch and Delightful Dozen stamp sets.
Ok, so I went a little nuts with the scoring!  The centre panel on this card was scored every 1/4" in both directions...but isn't the result fabulous?!?  I added a little sponging to bring out the score lines even more...it reminds me a little of wicker...not sure why.  I also created an envelope for this card using the same DSP from the Sale-a-bration catalogue.  The SSDP comes with instructions for making standard envelope sizes; however my finished card measures 5 1/2" square, so it took a bit of experimenting to figure out the envelope.  I'm happy to say I made it work...if you want to replicate an envelope this size you'll need a 10" square piece of patterned paper and then score all four sides at 4 1/8".  Follow the rest of the instructions on the insert provided with the SSDP and you're on your way to creating beautiful coordinating envelopes for your creations.  Because I wanted to have a spot to address the envelope, I added a little label to the front  and another on the back for the return address.  I hope my team enjoys playing with this new tool as much as I did...guess I'll find out tomorrow night!

Monday, January 2, 2012

Time to start thinking about Valentines...

Now that Christmas and New Year's are behind us it is time to get busy designing Valentines projects!  Today's card is one I designed a while back for a class on watercolouring I am teaching at an upcoming weekend retreat run by my upline.  Check it out...
Sweet Valentine's card using the Greeting Card Kids stamp set with sentiment from Delightful Dozen.
I kept the layout for this card fairly simple because the focus of the class is on watercolouring using different media.  I did add a bit of bling with the silver glimmer paper to highlight the sentiment (have I mentioned how happy I was to see that it is carrying over when the Holiday Mini ends tomorrow??).  I used rose red ink to stamp the sentiment, which is the same shade I used to colour the little girl's dress.  The DSP I used is from the Flirtatious pack.  I layered it on a piece of whisper white cardstock that I embossed using my perfect polka dots folder.  The whole thing is layered on a pretty in pink card base.  Easy and straightforward, leaving lots of time to watercolour!

Sunday, August 28, 2011

What a party...and still more to come!

Well, my nephew celebrated his birthday in fine style last night with a big (17 kids!) bash at Chuck E Cheese.  Max had a great time because his aunt and uncle kept handing him game tokens...he never ran out!  He'd still be there if we hadn't dragged him out!  Now we're gearing up for yet another birthday party tomorrow!  This is for my friend's daughter who is turning 7;  Max sure does get around!  Tomorrow's event is supposed to be a pool party, though the weather may be a wee bit cool for swimming.  I know Max's mommy isn't going anywhere near the water, which likely means Max won't be either!  In any case, I sat down this evening to make a card for Katelyn.  Since I don't have any little girls in my life, I'm not really up on what a 7 year old might like so this was a challenge!  Last year she was VERY into Hannah Montana so I kept with a "pop star" theme and came up with something I hope she'll like.  Since it is so sparkly it also works for this week's challenge over at Stampin' Royalty.  I was actually inspired by one of the guest designer's cards.  Anyhow, here is my card for a 7-year old:

Blingy Birthday card for a 7-year old girl using the Best Friends Forever and Grunge Rock sets.

Inside of card using sentiment from Delightful Dozen set.
So, whaddya think?  Do you think she'll like it?  Do me a favour...if you have a 7'ish-year-old girl around can you get her opinion for me? 

This card was a wee bit of work.  The glitter stripes were fairly easy as I used sticky strip, peeling the backing off one at a time to apply the various colours of glitter.  Kind of a cool look, but mighty messy to create...my house will be glittery for weeks...and so will I!!  My Circle Scissors Plus got a workout cutting all those circles...how I love that little contraption!  Makes layering circles SO easy!!  No need for a ton of different sizes dies!  The guitar is embossed using the new tempting turquoise embossing powder. I think my favourite thing about this card is the colour combo:  melon mambo, tempting turquoise, lucky limeade and basic black.  So bright and fun...and not entirely girlie.  Here's hoping this is a hit with the recipient...and that the party is a huge success!

Sunday, August 7, 2011

16-year-old Boy birthday for PPA105

Today's card is one I designed for this weeks colour challenge over at Pals Paper Arts.  The challenge is to create a card using daffodil delight, island indigo and lucky limeade.  I started out to design a masculine card, but then as I went started thinking it would be perfect for a 16-year-old boy's birthday.  You'll see why in a second...

Masculine birthday card for PPA105 using the Need for Speed stamp set and sentiment from Pennant parade.

Inside of card with sentiment from the new Delightful Dozen set.
Now what 16 year old boy doesn't wish for a shiny new sports car for his birthday??  I remember turning 16 (about a century ago!) and dreaming of getting a car for MY birthday!  (Didn't happen, but a girl can dream, right?)  Anyhow, this card was really fun to make because I got to use a bunch of new product as well as some retired stuff too.  Here is how I put it together:
 Starting with an island indigo card base, I stamped the textured background on both the front and inside the card using the retired Sanded background stamp and island indigo ink. ( I can't, for the life of me figure out why that one retired!  It is perfect for adding just a bit of texture...).  I also sponged the edges of the front of the card using the same coloured ink.  Setting that aside, I took a scrap of black cardstock and ran it through my Big Shot using the new houndstooth embossing folder.  LOVE that one!!  I tore the long edges and distressed the short ones and then sanded the raised areas with my sanding block.  The result, I think, looks like a tire tread (I actually asked my husband and HE agreed, so it must be good!).  Then, taking another scrap of lucky limeade cardstock, I randomly stamped the Good Grid mini background stamp (one I got FREE at convention!) all over.  I distressed and then sponged the edges in the same colour.  Then I spritzed both lucky limeade and basic black for even more textural interest.  I glued this piece to the back of the "tire tread".  Then I wrapped some retired black twine around the lucky limeade piece. securing it with glue dots.  Using my matpack and piercer, I pierced holes for five mini brads in the lower right corner of the lucky limeade piece and then adhered it to my cardfront.  Setting this aside, I stamped the car image in black Staz-On ink on a piece of whisper white cardstock.  Using my aquapainter and watercolour wonder crayons, I coloured the car.  I then adhered the stamped piece to a slightly larger piece of daffodil delight cardstock and adhered it to the cardfront using dimensionals.  The final touch on the front was to stamp the sentiment from the Pennant Parade set in island indigo ink on whisper white cardstock and punch it out with my jewelry tag punch.  I punched two more tags, layered them together with glue dots and added them to the knot in the twine.  On the inside of the card I stamped the sentiment in black Staz-on again on whisper white cardstock.  I coloured in some of the letters in lucky limeade.  I then stamped the image again in island indigo and daffodil delight, cutting out parts of the sentiment I wanted to highlight, and adhering them where appropriate.  I sponged the edges of the sentiment piece using lucky limeade and adhered it to the inside of the card. 
Now...I just need to find a 16-year-old boy to give this to...though I suppose a 40-year-old man would likely enjoy it too!
Related Posts Plugin for WordPress, Blogger...