Showing posts with label Mixed Bunch stamp set. Show all posts

Friday, August 15, 2014

Something Worth Celebrating

Today is the final day of my week-long Blog-a-versary celebration.  I hope you've enjoyed the series of birthday cards I've shown you as much as I enjoyed making them :)
Don't forget to leave a comment on Monday's post to be entered in my draw for some sweet loot.  I'll announce the winner tomorrow, so be sure to leave your comment by midnight tonight.
Now today's card is one I designed for my Dog Daze of Summer Card Buffet that is happening tonight; though I really should have called it the "How-can-it-be-this-cold-in-August Card Buffet"...it is FREEZING here this week!  Anyhow...I digress.  Here is my project...

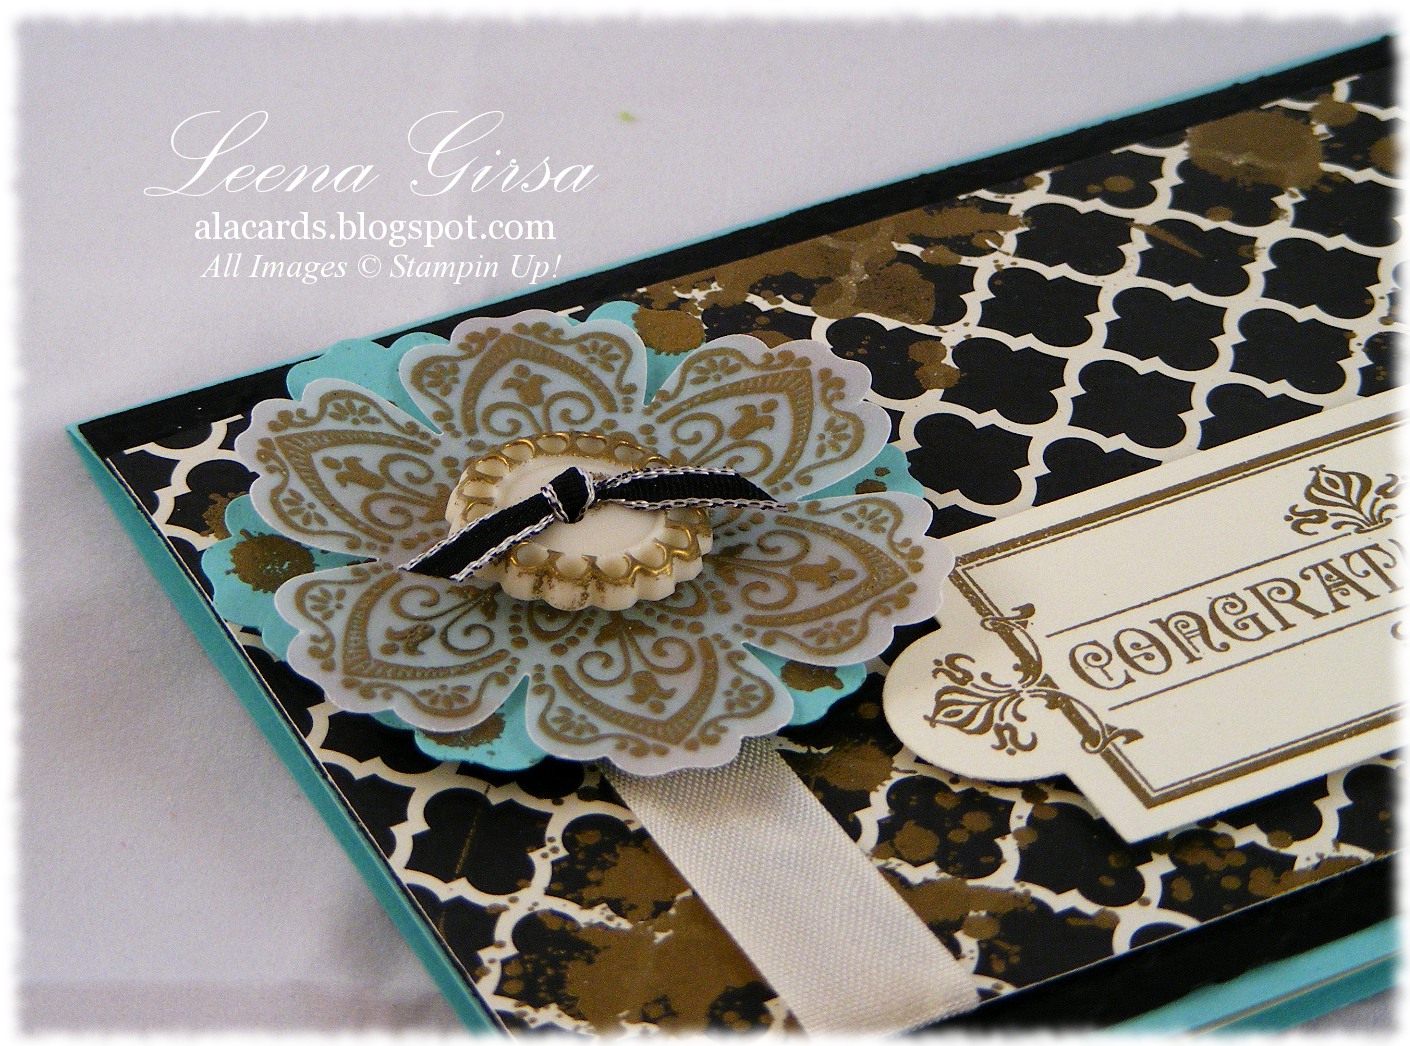
Birthday card featuring the Mixed Bunch stamp set with sentiment from Remembering Your Birthday.
I pulled out my long-neglected Mixed Bunch stamp set for this one.  I really love this set but haven't used it in ages!  I started by stamping the larger blossom in Blushing Bride in and the smaller one in So Saffron and then ran the card stock through the Big Shot with the Honeycomb TIEF


The punched blossom is also stamped in Blushing Bride and punched with the Blossom punch.  The centre is stamped in So Saffron and punched with the 7/8" Scallop Circle punch.  I added some baker's twine and a few pearls that I coloured with the lightest shade in the Old Olive Blendabilities set...it is soooo close to the shade of the Pear Pizzazz card base!  The sentiment, from the Remembering Your Birthday set, was inked with Pear Pizzazz and Blushing Bride markers and die cut using the Ovals Collection framelits.

On the inside I stamped the floral images again and added the corresponding sentiment, also from the Remembering Your Birthday set.  A quick and easy card, perfect for a buffet!
Be sure to stop by tomorrow to see if you've won my give-away and to check out my new contribution for this week's challenge at the Technique Twist...you'll get a sneak peek at some new Holiday Catalogue products!

Sunday, July 28, 2013

More Convention Inspiration

During one of the Main Stage presentations, Stampin' Up! executive team member Pam Morgan showed us a project that featured gold embossing on the Black-andVanilla Modern Medley DSP.  There was a collective gasp at how gorgeous it looked and I knew I had to try it as soon as I got the chance.  So....here it is!

Congratulations card featuing the Layered Labels, Mixed Bunch and Gorgeous Grunge stamp sets with DSP from the Modern Medley pack.
Close up of flower and heat embossed button

Inside view

This is one of the busier cards I've made in quite a while...I just couldn't stop adding stuff to it!  I began by stamping the spatter images from the Gorgeous Grunge set all over the DSP and then heat embossed them in gold.  The flower is also heat embossed in gold on vellum card stock.  I also layered a Coastal Cabana flower behind the vellum one that I also stamped with the spatter images and heat embossed in gold.  The sentiment is heat embossed in gold on Very Vanilla card stock.  As if there weren't enough gold on this card already, I also added a bit of gold to the Very Vintage Designer Button!  The inside features a stamped blossom in Coastal Cabana and more Gorgeous Grunge heat embossing.  To complete the look, I lined the envelope using my new Envelope Liner Framelits...available August 1st in the new Holiday Catalogue!  So excited about those!! 
Just a reminder that if you haven't taken advantage of the Buy-three-get-one-free DSP promotion, time is running out!  Don't miss your chance to stock up on your favourite DSP packs before the end of the month.  This promotion expires on July 31st...call or email to place your order today!

Tuesday, May 22, 2012

Polka Dots and Flowers

That's the theme for today!  I designed this card as one of the make-n-takes for my New Catalogue launch event coming up on June 2nd.  I wanted something that would feature new products but also be quick and easy to make.  This card fits the bill perfectly!  It also fits this week's challenge over at The Paper Players, which is all about polka dots!  Have a look...

CAS Thank you card for PP96 featuring the Mixed Bunch stamp set with sentiment from Fabulous Phrases
Cute, eh?  This was SO quick and easy to make!  It uses some of my favourite new products:  the Mixed Bunch stamp set and coordinating Blossom punch and the new Floral district DSP.  LOVE the patterns and bright colours in that pack!  I've almost used up the entire pack and I've only had if for two weeks!  Can't wait till June 1st so I can order more!!

Wednesday, April 18, 2012

Acrylic Distress for Mom

This month's issue of Stampin' Success, our demonstrator magazine, featured an article on the Acrylic Distress technique.  This is one that  I have often thought "Oh, I should try that" and then never actually did.  Well, that changed last week when I decided to do the technique with one of my monthly groups.  Check out the card we made...

Soft and pretty Mother's Day card featuring the Acrylic Distress technique and the Mixed Bunch stamp set.  Sentiment is from the Family Reunion set.

Pretty, eh?  I love how soft the colours are on this card...a huge change from all the brights I've been using with all the Summer Smooches products of late!  I especially love this technique!  So easy to do!!  Simply paint a piece of card stock with acrylic paint.  I used some white that I had bought at our local dollar store and then tinted it using my baja breeze reinker.  Allow the paint to dry completely and then run the card stock through the Big Shot with an embossing folder.  Using a sanding block, sand the paint off the raised pattern, revealing the original cardstock colour beneath.  For this card I used crumb cake card stock, which shows through the blue where I sanded off the paint.  So cool and such a neat look.  I foresee more of this technique in my future!


Saturday, March 10, 2012

Gettin' Funky

The fifth option for my upcoming Card Buffet is kinda funky.  I really like this card...its my favourite in the bunch!  I love the colour combo, drawn from the Cheerful Treat hostess DSP, and the layout, inspired by an old Mojo Monday sketch.  Have a look...
Bold and funky card suitable for Mother's Day, a birthday or just a thinking of you.
Gotta love that blossom punch!  Can you tell I'm in love with it?  I love the shape...it makes creating beautiful flowers so quick and easy.
Just a reminder that registration for my Card Buffet closes on Friday, March 16th.  Be sure to email to reserve your spot and let me know which designs you'd like to create, as well as how many of each. 
Enjoy your weekend!

Monday, March 5, 2012

Spring Card Buffet Preview

All this week I am going to feature the projects I've designed for my Spring Card Buffet coming up at the end of the month.  I am really excited about this new class format and want to show you the fun and versatile designs I've come up with.  The first is a pretty card featuring one of my favourite new stamp sets...

Pretty, feminine card suitable for a birthday, Mother's Day or just a simple Hello
I think what I like most about this card is the colour scheme.  The soft suede provides such a strong contrast to the rich, poppy parade.  I also really like the way the DSP works so well with the images from two different stamp sets.  The antique brad, as always, provides the perfect finishing touch and the filigree design works well with the stamped images.  Gotta love the antique brads...I think I've gone through at least 3 dozen packages of them!

Sunday, March 4, 2012

Loving my new Diagonal Plate!

I had a chance this afternoon to break open my brand new Simply Scored diagonal plate (SSDP).  This nifty addition to the Simply Scored line makes it SO easy to make diagonal score lines on just about any project.  I plan to feature it at my team meeting this month and so I spent some time creating the make-n-takes using the SSDP.  Here is what I came up with...

Centre-step Easter card and matching envelope made easy with my Simply Scored Diagonal Plate.  I used the Mixed Bunch and Delightful Dozen stamp sets.
Ok, so I went a little nuts with the scoring!  The centre panel on this card was scored every 1/4" in both directions...but isn't the result fabulous?!?  I added a little sponging to bring out the score lines even more...it reminds me a little of wicker...not sure why.  I also created an envelope for this card using the same DSP from the Sale-a-bration catalogue.  The SSDP comes with instructions for making standard envelope sizes; however my finished card measures 5 1/2" square, so it took a bit of experimenting to figure out the envelope.  I'm happy to say I made it work...if you want to replicate an envelope this size you'll need a 10" square piece of patterned paper and then score all four sides at 4 1/8".  Follow the rest of the instructions on the insert provided with the SSDP and you're on your way to creating beautiful coordinating envelopes for your creations.  Because I wanted to have a spot to address the envelope, I added a little label to the front  and another on the back for the return address.  I hope my team enjoys playing with this new tool as much as I did...guess I'll find out tomorrow night!

Monday, February 27, 2012

Ready for spring

Happy Monday, everyone!  I hope you had a great weekend.  Inspired by a sunny afternoon yesterday, today's card holds the promise of warmer weather and the colours of summer.  I designed it for one of my monthly groups in the hope that they would be as ready for a hit of summer colour as I am.  Have a look...

Bright and cheerful card featuring the Mixed Bunch stamp set with sentiment from Tiny Tags.

Inside view
Isn't this just a happy card?  It reminds me a little of a vinyl picnic tablecloth or a beach towel.  I love those daisies and the colours just make me smile.  After the drabness of winter I am so ready for some colour and the combination of melon mambo, tempting turquoise and lucky limeade fit the bill!  This is one of those cards that is really easy to put together...it really just uses stamps, ink and paper and then I added a glimmer brad and some baker's twine to finish it off.  The highlight of this card, though is that blossom...made super simple with the Mixed Bunch stamp set and coordinating blossom punch...I SO love that duo!  I foresee many more blossom-filled cards in my future!

Monday, February 20, 2012

Mixed Bunch Birthday

Even though this winter hasn't really been typical for this part of Southern Ontario (little snow and more  above zero days than below) I am done with it.  I am ready for spring; for green grass and new leaves and soft spring flowers.  Today's card is one that embraces everything I love about my favourite season...bright, cheerful colours and, of course, blossoms!
Cheerful birthday card featuring the Mixed Bunch stamp set and coordinating blossom punch.

Inside view
I have to say that one of my favourite new products from the current Occasions Mini is the Mixed punch stamp set and coordinating blossom punch.  I love the shape of the blossom and the way it layers so beautifully.  For this card I pulled DSP from two different packs:  Flirtatious and Twitterpated.  I wanted two different patterns featuring daffodil delight...after all, what says spring like daffodils?!?  I cut the DSP into narrow strips and layered them on a mat of pool party cardstock.  I then cut a strip of whisper white cardstock on both long sides with my new Edgelit die.  I then ran each side through the Big Shot with the scalloped Adorning Accents embossing folder, being sure to offset the scallops.  I stamped the sentiment (from the Bring on the Cake set) using island indigo ink and then layered the whole thing on top of the DSP panel.  To stamp the flower, I first inked my stamp using daffodil delight ink and then rolled the edges in pool party (Rock and Roll technique).  I stamped the image on whisper white and then punched it out using my blossom punch.  I punched two more blossom shapes from daffodil delight and pool party cardstock and layered them behind the stamped flower.  To get the petals to curl I simply used the end of my bone folder to curl them up.  The button in the middle is threaded with a bit of pool party baker's twine.  It is one of the big designer buttons that retired last year.  I bought a bunch when they were on the Clearance Rack a while back because I love them!!  Just one adds such a statement to any project. 
For the inside of the card I stamped the flower image again and added the label (from the P.S. I Love You set) and sentiment from Bring on the Cake. 
Such a bright and cheerful card...can't wait to see my garden filled with the same bright cheerfulness!
Related Posts Plugin for WordPress, Blogger...