Thursday, December 5, 2013

Festive Flurry Ornament Kit

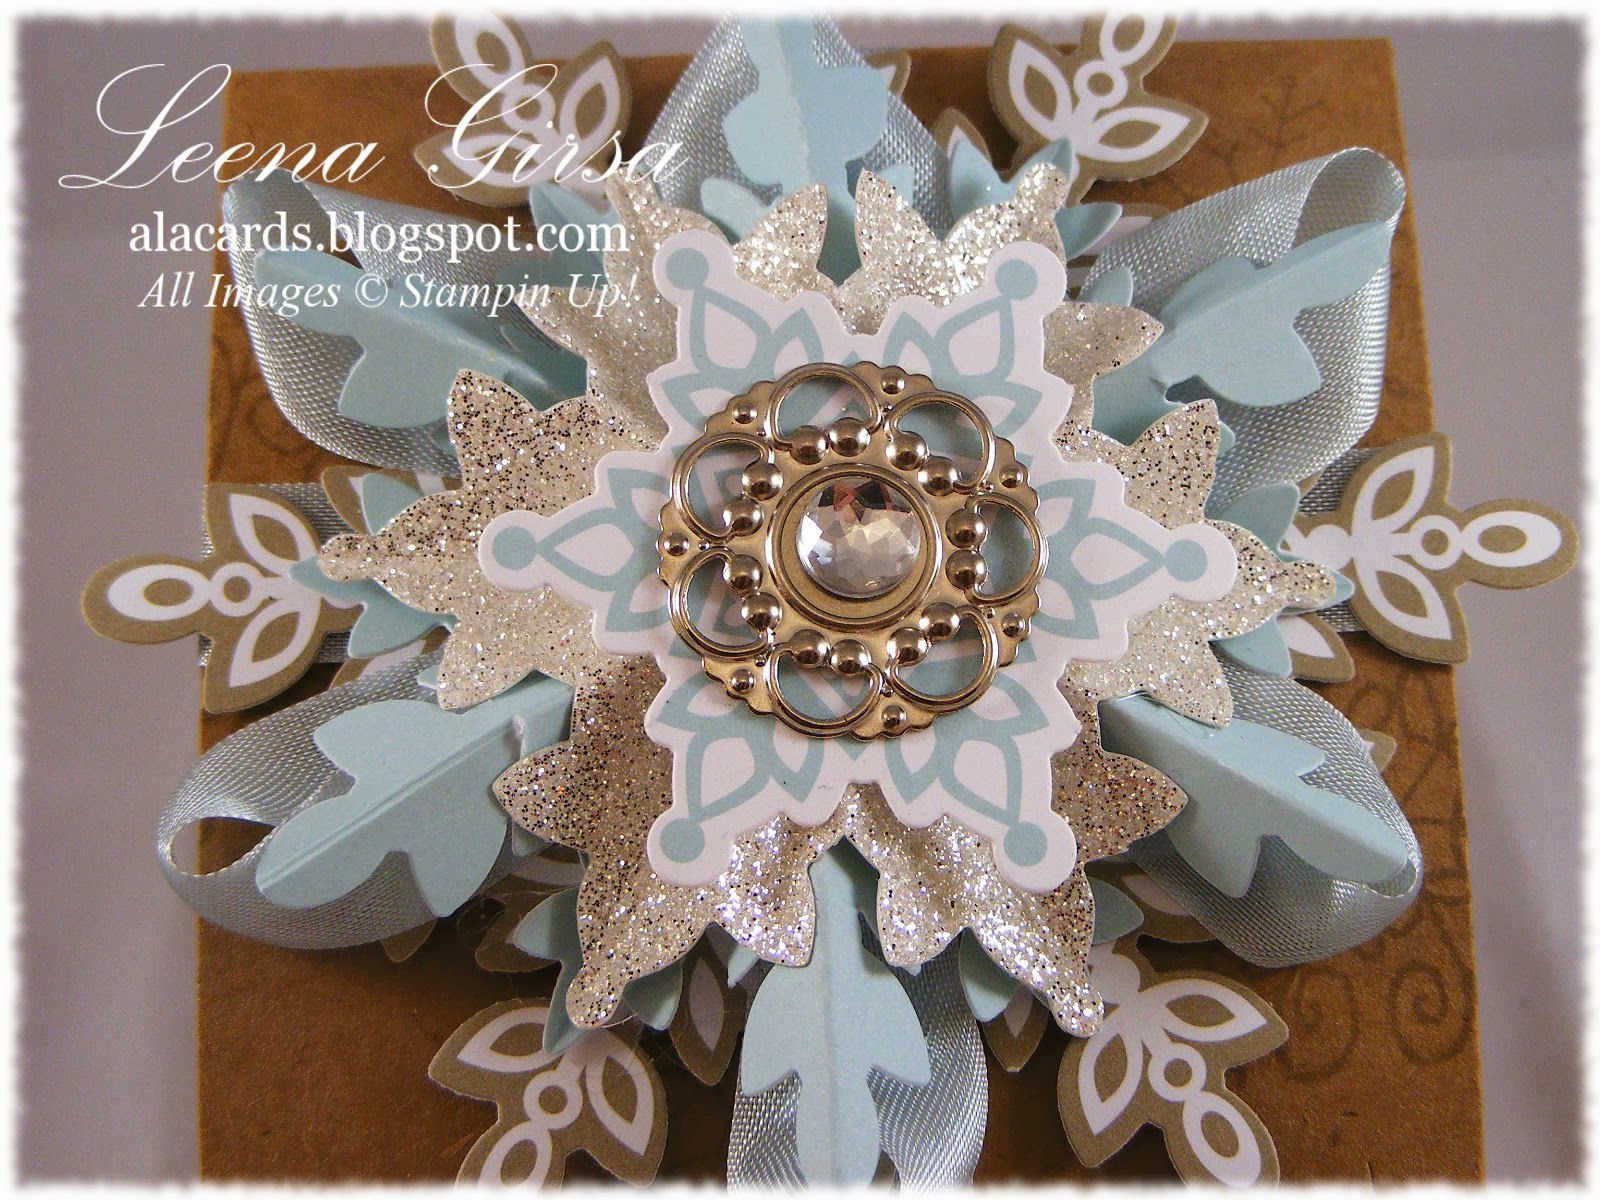
I am seriously loving the Festive Flurry Ornament Kit!  The finished ornaments are so darned pretty and really easy to make.  I used the kit as one of my Make-n-Takes at my Customer Appreciation Open House last weekend and everyone really enjoyed it.  Here is what the finished ornament looks like:

Holiday ornament made with the Festive Flurry Ornament Kit (135813)
Now, I have no intention of using these as tree ornaments because my tree is a traditional red and green one; but I do intend to use them as beautiful gift toppers for just about everyone.  I'm going to add a little tag with the recipient's name on it which can be removed afterwards if they want to use it on their own tree.  Here are a few more shots showing the dimension to the ornament:


I couldn't just stop at doing the ornament as shown in the how-to video, so I took it up a step...


...and made a pretty little gift box!  I added extra ribbon and a leftover Designer Build-a-Brad from last spring's Occasions catalogue.


I stamped the box using the Endless Wishes photopolymer set (which is sadly no longer available) and Crumb Cake ink.  I added the ribbon in such a way that the box could be opened and closed without having to remove the ribbon, so the box can be reused over and over again!


I think I'm going to use these boxes to package my famous Empire Biscuits that I make every Christmas and give them as gifts to my colleagues at school.  I think they'll like them.  Now to find the time to bake!!

Tuesday, December 3, 2013

Team Treats and Weekly Deals

Last night I held my last team meeting before Christmas.  I wanted to give each of my gals something special to let them know just how much I appreciate them.  So, I whipped up these little boxes of chocolatey goodness:

Gift Box using the Tag a Bag gift Boxes (130927) and the Festive Flurry bundle (133285) and Snowflake Soiree stamp set.
I love how quickly and easily I created these pretty boxes to hold some yummy Lindt chocolate.


Here is how I did it:
  • I started by embossing the plastic sleeve using the Northern Frost TIEF
  • I stamped the large snowflake on Island Indigo card stock and then heat embossed it using white embossing powder.  I die cut it with the Festive Flurry framelits.
  • I stamped the medium snowflake in Pool Party ink on Whisper White card stock and die cut it.
  • I die cut the small snowflake from silver Glimmer Paper.  
  • I layered each snowflake using dimensionals.
  • The tag is stamped with the sentiment from the Snowflake Soiree stamp set in Island Indigo and punched with the Decorative Label punch
Such a quick way to add so much to a simple package!  Try it when you're stuck for a way to wrap a small gift!

Now, here are this week's weekly deals...remember, these prices are only good until next Monday at midnight!


Fun Flowers Bigz Die Item # 121812
Regular Price: $40.95 Discounted Price: $30.71

Hearts Collection Framelits Die
Item # 125599

Regular Price: $32.95  Discounted Price: $24.71

Paper Doily Sizzlits Die Item # 125592
Regular Price: $26.95  Discounted Price: $20.21

Merry Minis Punch Pack Item # 126882
Regular Price: $22.95 Discounted Price: $17.21

1-1/4" Scallop Circle Punch Item # 127811
Regular Price: $21.95  Discounted Price: $16.46

Think Back Photobook Template
Item # 133021

Regular Price: $21.95  Discounted Price: $13.17

Wisteria Wonder 3/4" Chevron Ribbon
Item # 130017

Regular Price: $12.50  Discounted Price: $9.38

Monday, December 2, 2013

Cyber Monday Deals!

Happy Cyber Monday!  I hope you had a wonderful weekend!  Today I have lots to share with you...the most exciting news being some fabulous today-only deals from Stampin' Up!  Check them out:


Reg. $32.95  Sale Price:  $23.07


Reg. $30.95  Sale Price:  $21.67


Reg. $18.95  Sale Price:  $13.27


Reg. $18.50  Sale Price:  $12.95

 
Reg. $6.50  Sale Price:  $4.55


Reg. $4.95  Sale Price:  $3.47


Don't forget that these deals are good today only...and the rest of the Holiday Sale items expire at midnight tonight too!  

As if all these great deals weren't enough, I have a fun little project to share with you.  This past weekend I held my Customer Appreciation Open House and I wanted to make little favours for everyone to take home with them as a little thank you for attending.  Here is what I made:

Upcycled Embellishment containers turned into sweet treat holders.
I have a TON of empty embellishment containers and needed to find a use for them, so this was the perfect project.  I Washi'd the sides, added punched 2-1/2" circles on the top and bottom and decorated them with some bling and a label made with the Gift for You single stamp.  You'd never know what they were in their previous lives...my customers didn't until I told them!  (They were too distracted by the yummy chocolate inside.)


These really were quick and easy...so much so that I am making more to give my students as last-day-before Christmas-Holidays treats!  Time to order more Washi tape ;)

Sunday, December 1, 2013

I'm Baaack!

Did you miss me?  Wondering where I've been for the past week?  I wish I had an exciting tale of exotic travels to share with you, but alas, I've just been uber busy!  It is Concert Season for us band directors, which means extra rehearsals, performances and lots and lots of schlepping equipment.  This week promises to be just as nutty, but I have some projects done that I've pre-posted, so hopefully I won't leave you hanging again!

Today is the first day of a brand-new month, which means it is time for a brand-new challenge over at The Technique Twist.  This time we are Double Stamping.  Now I have only ever heard of this technique referred to as masking, but now I've learned a new name for it!  Here is my card:

Wintery card featuring the Double Stamping technique using the Best of Snow and Festive Flurry stamp sets.
I have to admit, I had some trouble getting this to work...I've been away from stamping so long it took me several tries to get my creative Mojo working again!

 Here is a quick how-to for this card:
  • starting with a 4" x 5-1/4" piece of Whisper White card stock, I stamped the Let It Snow label using Bermuda Bay ink.
  • I punched a bracket label (the same shape as the stamped image) out of a post-it note and stuck it over the stamped label to mask it.
  • I stamped the larger snowflake in Pool Party ink randomly over the card stock.
  • I stamped the smaller snowflake in Coastal Cabana randomly all over the card stock
  • I stamped the larger snowflake again using Versamark ink and then heat embossed with Irridescent Ice embossing powder.
  • At this point I remove the post-it note mask.
  • I sponged along the edges of the stamped card stock using Pool Party ink.
  • I layered the stamped card stock on a piece of 4-1/8" x 5-3/8" Bermuda Bay card stock and then adhered the whole thing to a Smokey Slate card base.
  • I die cut a snowflake frame from Silver Glimmer Paper using the Festive Flurry framelits and adhered it over the label using Dimensionals.
  • I added a little red bow made from 1/8" Taffeta ribbon in Real Red.
  • I added a little extra bling with some strategically-placed rhinestones.
Here is a shot of the inside of the card...it is pretty self-explanatory:

Inside view with sentiment from the Endless Wishes Photopolymer stamp set (sadly no longer available!)
 Give this technique a try this week and link up over at The Technique Twist...we'd love to see what you come up with!

Now I need to take care of some business!  Yesterday I held my annual Customer Appreciation Open House.  I had a wonderful afternoon visiting with some of my favourite people.  It give me great pleasure to annouce the winners of my door prizes (drawn by my expert impartial judge, Max!)...

Winner of the Pop 'n' Place Tags Kit:  Pam Radtke

Winner of the Build a Banner and Accessories Kit:  Connie Renna

Winner of the Big Shot Magnetic Platform:  Chris Light

Congratulations to all!!

One more bit of news...be sure to check back tomorrow for some 24-only Cyber Monday deals from Stampin' Up!  There are some fantastic items on sale for tomorrow only.  Also, don't forget that tomorrow is also the final day of the Holiday Sale.  Don't miss out on the great sale prices!

Tuesday, November 26, 2013

New Weekly Deals!

If you read my post yesterday you know how busy life is right now.  I don't have a project for you today but I do have fabulous new Weekly Deals to tell you about!  Check them out:


Floral Frames Framelits Dies
Item # 127012 

Regular Price: $32.95 Discounted Price: $24.71


Peekaboo Frames Bigz Large Die
Item # 124587

Regular Price: $40.95  Discounted Price: $30.71


Soft Sky Classic Stampin' Pad
Item # 131181

Regular Price: $7.25 Discounted Price: $5.44


Regals Stampin' Write Markers
Item # 131262

Regular Price: $37.95 Discounted Price: $28.46


1" Square Punch Item # 124094
Regular Price: $21.95 Discounted Price: $16.46


Cherry Cobbler 3/4" Chevron Ribbon
Item # 130012

Regular Price: $12.50 Discounted Price: $9.38


Beautifully  Baroque Textured Impressions Embossing Folder Item # 130917
Regular Price: $9.95  Discounted Price: $7.46


Compilation of Recipes Designer Template
Item # 127755

Regular Price: $16.50  Discounted Price: $9.90

Monday, November 25, 2013

Busy, busy, busy!

Wow...I can't believe its Monday already!  Where did the weekend go??  I spent most of Saturday prepping for a Stamp-A-Stack class and decorating my home for Christmas in preparation for my Open House next weekend.  Sunday was church in the morning and then a fun Stamp-A-Stack with Mary and her friends.  It is amazing how quickly two days can pass when one doesn't have time to take a breath!
No stamping this weekend, but I do have a project to show you that I CASE'd from Teneale Williams on Pinterest a while back.  Have a look:

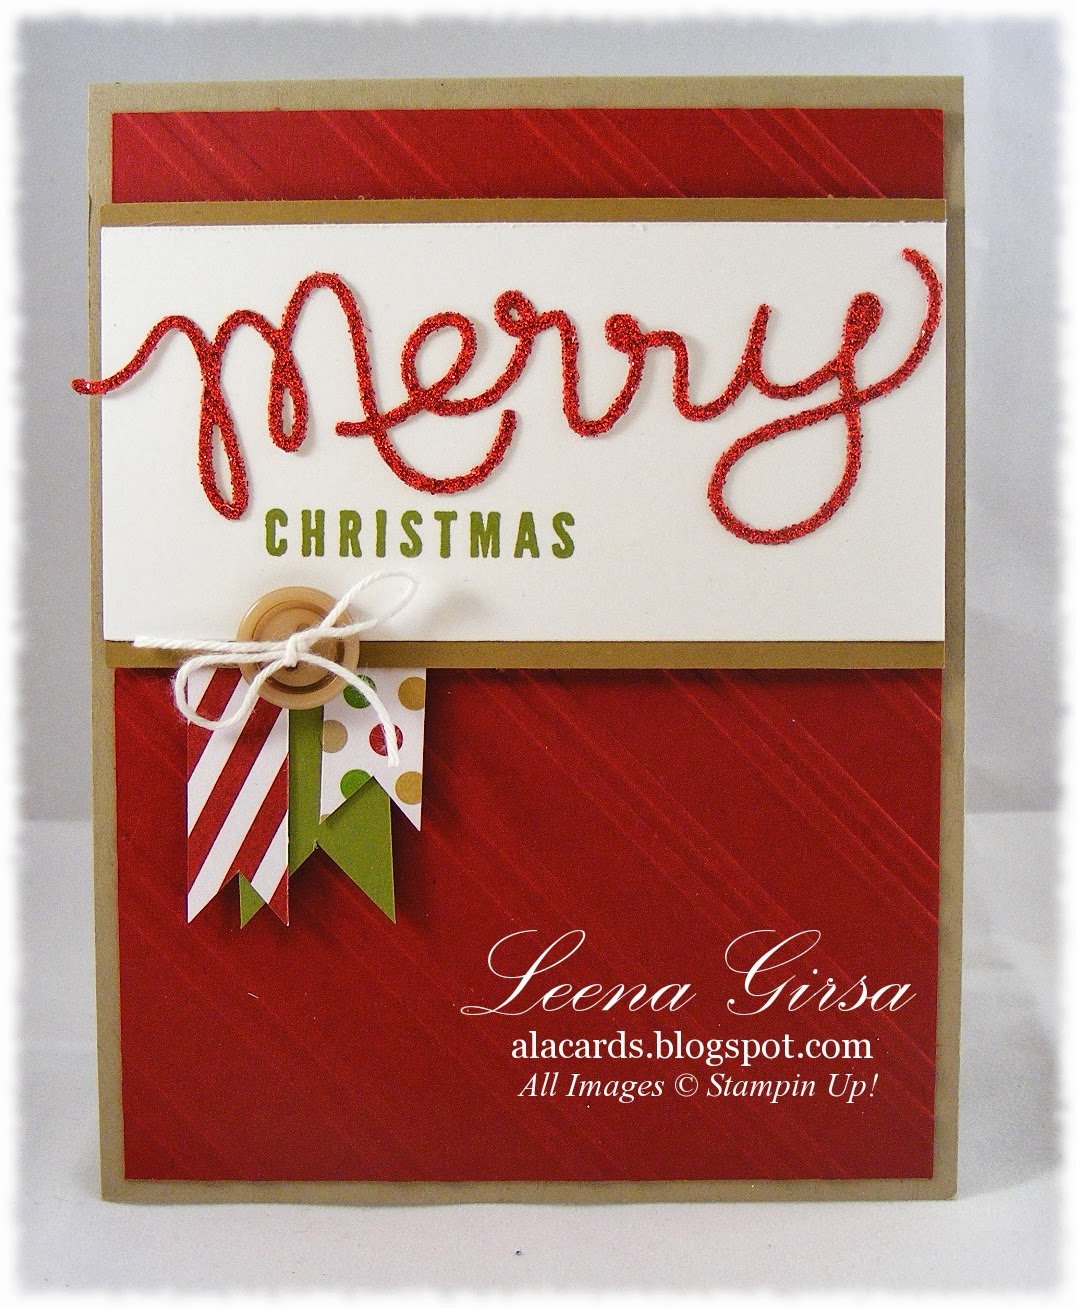
Simple Christmas card featuring the Expressions Thinlits and Banner Christmas stamp set.
I really love the Expressions Thinlits.  Yes, they're a bit fussy and require some patience to remove the diecut word from the die, but the effort is SO worth it!  Here are some quick tips to recreate this one:
  • I embossed the Cherry Cobbler card front using the Stylish Striped TIEF.  The card stock is cut to 4" x 5-1/4".
  • The card base is Crumb Cake.
  • I die cut the Merry from Red Glimmer Paper using the Expressions Thinlits and adhered it using Multipurpose Liquid Glue.
  • I stamped Christmas from the Banner Christmas stamp set in Old Olive ink.
  • The DSP is from the Season of Style DSP stack.
  • The panel behind the stamped panel is Baked Brown Sugar card stock.
As I mentioned earlier, I had absolutely NO time to stamp this weekend, but I do have a few projects to show you this week that I made a while back.
Don't forget the Holiday Sale is still going strong this week until December 3rd.  Tons of great deals to be had...click the image below to view all of the sale items.

http://www.stampinup.com/ECWeb/CategoryPage.aspx?categoryid=1665

By the way...did you realize that one month from today is Christmas Day????  Yikes!  I have work to do!!
Thursday, November 21, 2013

http://su-media.s3.amazonaws.com/media/docs/holiday_sale/Holiday_Sale_Flyer_CA.pdf

The Stampin' Up! Holiday Sale is here!!  Click the image above to view the full list of discounted products...just in time for Christmas crafting!  Visit my website to place your order and be sure to use Hostess Code:  QB6S3SGA...you could find yourself the recipient of $35 in FREE Hostess Dollars to spend on even MORE great stuff!

 Now for a little stamping inspiration!  I had a bit of time last weekend to play with some of my stamps from the Holiday Collection Single Stamps.  Here is a project I made using the Christmas Star stamp:

Simple Holiday card featuring the Christmas Star single stamp and the Greetings of the Season stamp set.
 Lots of bling happening here!  The design itself is very simple but the addition of the rhinestones make the stamped stars look like they're set against a starry sky.  I used Soft Suede ink, which looks almost golden against the Very Vanilla background.  Super simple and quick...just the thing when you've got to get your Christmas cards in the mail!
Related Posts Plugin for WordPress, Blogger...