Yes, I know it's been a while...life just gets in the way sometimes, you know? I did want to take the time to let you all know about an amazing sale happening RIGHT NOW over in my online store. Stampin' Up! has put some great, current product on sale at never-before-seen prices but only until November 30th. You NEED to click HERE to enter my online store and check out the deals. My Digital Studio at 50% off! Bigz XL dies for your Big Shot at 30-40% off plus FREE SHIPPING on orders over $200.00.
Don't wait...these deals go away at midnight on Nov. 30th. GET SHOPPING!

Sharing my love of all things paper.
Thursday, November 25, 2010

Wednesday, November 17, 2010
Playing with the Bag with Scallops die
Last month during the Clearance Rack Blitz I bought the Bag with Scallops die for a steal of a deal. I finally pulled it out and tried a project with it on the weekend. It sure makes doing little gift bags easy!
 This little bag is perfectly sized to fill with sweet treats for Christmas! It was a snap to put together....here's what I did:
I started by running the die through my Big Shot with Baja Breeze cardstock. Be sure to use the crease pad so that your score lines show. I then assembled the bag using sticky strip to adhere it. I then cut a small piece of the striped Candy Cane DSP, layered it on a larger piece of Real Red cardstock and adhered it to the front of the bag. I stamped the Dec. 25th image in real red and baja breeze on whisper white cardstock. I punched out the red image using my decorative label punch and then punched the Dec. 25 using my large oval punch. I also punched out extra decorative labels in baja breeze and layered them behind the red image. I adhered the whole thing to the front of the bag using dimensionals.
For the front flap, I stamped the snowman image in baja breeze on whisper white cardstock. I punched it out using my 1 3/4" circle punch. I then punched a 2" circle from baja breeze cardstock and a large 2 3/8" scalloped circle in whisper white. I layered the baja breeze behind the snowman image and then mounted that to the large white scalloped circle using dimensionals. I adhered it all to the front flap using sticky strip. I punch two holes in the flap using my crop-a-dile and threaded 1/8" taffeta ribbon in Real Red through and tied it in a bow. Once again, this was faster to make than to write about! I can see myself doing LOTS of these as the holidays approach!
 |
| This cute little bag uses the Bag with Scallops die, the Tags till Christmas set and some Candy Cane DSP |

I started by running the die through my Big Shot with Baja Breeze cardstock. Be sure to use the crease pad so that your score lines show. I then assembled the bag using sticky strip to adhere it. I then cut a small piece of the striped Candy Cane DSP, layered it on a larger piece of Real Red cardstock and adhered it to the front of the bag. I stamped the Dec. 25th image in real red and baja breeze on whisper white cardstock. I punched out the red image using my decorative label punch and then punched the Dec. 25 using my large oval punch. I also punched out extra decorative labels in baja breeze and layered them behind the red image. I adhered the whole thing to the front of the bag using dimensionals.
For the front flap, I stamped the snowman image in baja breeze on whisper white cardstock. I punched it out using my 1 3/4" circle punch. I then punched a 2" circle from baja breeze cardstock and a large 2 3/8" scalloped circle in whisper white. I layered the baja breeze behind the snowman image and then mounted that to the large white scalloped circle using dimensionals. I adhered it all to the front flap using sticky strip. I punch two holes in the flap using my crop-a-dile and threaded 1/8" taffeta ribbon in Real Red through and tied it in a bow. Once again, this was faster to make than to write about! I can see myself doing LOTS of these as the holidays approach!
Saturday, November 13, 2010
Yes...TWO Posts in One Day!
This post isn't to share some amazing project with you. It IS to share an amazing DEAL with you though!
Starting on Monday, Stampin' Up! is offering the Demonstrator Starter Kit at 50% off. The starter kit is already a great deal at the regular price of $215.00; at the promotional price of $107.50 it is an absolute STEAL! I did some math and to purchase all of the items in the starter kit at regular retail prices would cost $383.00, including shipping and HST. During the next 2 weeks you can get it all for $121.48, including HST (there is no shipping charge on starter kits!). Sound too good to be true? It IS true! The best part is that you do not have to sell a dime of SU product once you receive your starter kit. No one will hassle you and after 6 months your demonstrator-ship will just lapse. You get to keep your starter kit with no obligation whatsoever.
Here is a chart showing the starter kit breakdown:
All of the items highlighted in green can be substituted for other product of equal or lesser value, so the kit is completely customizable.
Call or email me for more information or to get your password to order your kit. Don't delay as this offer is only available until November 30th.
Starting on Monday, Stampin' Up! is offering the Demonstrator Starter Kit at 50% off. The starter kit is already a great deal at the regular price of $215.00; at the promotional price of $107.50 it is an absolute STEAL! I did some math and to purchase all of the items in the starter kit at regular retail prices would cost $383.00, including shipping and HST. During the next 2 weeks you can get it all for $121.48, including HST (there is no shipping charge on starter kits!). Sound too good to be true? It IS true! The best part is that you do not have to sell a dime of SU product once you receive your starter kit. No one will hassle you and after 6 months your demonstrator-ship will just lapse. You get to keep your starter kit with no obligation whatsoever.
Here is a chart showing the starter kit breakdown:
| Item | Retail Price (incl. shipping & HST) |
| Stamp set: Fun & Fast Notes | $52.14 |
| Stamp Set: I {Heart} Hearts | $28.53 |
| Stamp Set: For All You Do | $44.69 |
| A La Cart Stamp: Many Thanks | $14.85 |
| Std. Wheel: Fast Flowers | $9.88 |
| Clear Block C | $11.12 |
| Patterns DSP Stack | $31.01 |
| Asst’d Smooth Card Stock | $10.57 |
| Whisper White Card Stock | $11.50 |
| 5/8” Satin Ribbon | $15.23 |
| Versamark Pad | $12.37 |
| 4 Classic Ink Pads | $36.05 |
| 2 Stampin’ Write Markers | $11.19 |
| 1 Classic Ink Refill | $6.53 |
| 1 Snail Adhesive | $12.12 |
| Stampin’ Mist Cleaner | $6.84 |
| Std. Stampin’ Around Wheel Handle | $6.15 |
| Std Uninked Stampin’ Around Cartridge | $8.08 |
| Blender Pen | $5.37 |
| Stampin’ Sponge | $1.77 |
| Stampin’ Scrub | $26.04 |
| Dimensionals | $6.53 |
| Décor Elements & applicator tool | $15.16 |
| Total Retail Cost: | $383.72 |
| Regular Price of Starter Kit |(incl. tax): | $242.95 |
| Promo Price incl. tax (till Nov. 30th): | $121.48 |
| YOU SAVE: | $262.24 |
Call or email me for more information or to get your password to order your kit. Don't delay as this offer is only available until November 30th.
Long time, no post!
I always have the best of intentions...I wake up each day with a plan for everything I have to get done in the 24 hours I have till the next morning and part of that daily plan is always to create and post something for this blog. Unfortunately, my plans this week haven't done me much good! I just haven't had time to stamp between parent meetings at school and workshops for Stampin' Up!, my poor stamping corner has been sadly empty. I did manage to get down there last night for a bit but was struggling to come up with something worthy of a post. I think I was just too tired to be creative! Here is the card I did, though I'm not thrilled with it...I just couldn't seem to get it right! See what you think...
So...not the greatest thing I've ever done, but its ok. I started by sponging the entire card front using Marina Mist, Not Quite Navy and Night of Navy ink. Then I did direct to paper with my Versmark pad over the entire thing. I sprinkled Iridescent Ice embossing powder over it all and heat embossed it. I was going for a glistening-snow-Milky-Way-kinda thing. Then, on a separate piece of white cardstock I stamped the Santa and his reindeer image in Versamark and heat embossed it using silver embossing powder. I cut it out and then sponged it using Night of Navy ink. Then I sponged it again with champagne shimmer paint, so that it would blend against the sky a bit better. I adhered it to the background using dimensionals. For the snowflake, I ran the merry details sizzlet through my Big Shot with whisper white cardstock. I sponged the snowflake with champagne shimmer paint to give it some life and added a rhinestone in the centre. I adhered it in the upper left corner using a dimensional. The sentiment is stamped using Night of Navy ink. I then embossed the word "believed" in silver. I punched it out using my decorative label punch and matted it with another decorative label in brushed silver. I added some rhinestones to highlight the sentiment. Before adhering it, I wrapped a piece of silver tinsel (yes, its back!) around the card front and adhered it using sticky strip and glue dots. Then I attached the sentiment using dimensionals. The whole card front is adhered to a Night of Navy card base the edges of which I sponged with champagne shimmer paint. Because of the weight of the embossing, I adhered the cardfront to the base using sticky strip to ensure it stayed in place.
The inside of the card is straightforward and simple. I sponged the edges of a piece of whisper white cardstock using marina mist ink. I stamped the sentiment in night of navy on a separate piece of white cardstock and punched it out using the decorative label punch. I matted it on another marina mist decorative label and adhered it inside the card using dimensionals. I stamped the Santa image in versamark along the bottom edge.
As I said, its not my favourite card ever, but it was the best I could do after a long and busy week. I'm looking forward to the weekend and some time to recharge my batteries!
 |
| The image on this card is from a retired set called "Wandering Words". The sentiment is from the current Just Believe set. |
 |
| I've had the idea to use this sentiment with a Santa image for a while...I think it is very appropriate! |
 |
| The snowflake is from the Merry Details sizzlet. |
 |
| Clean and simple inside of card. The sentiment is from the Christmas Greeting set. |
The inside of the card is straightforward and simple. I sponged the edges of a piece of whisper white cardstock using marina mist ink. I stamped the sentiment in night of navy on a separate piece of white cardstock and punched it out using the decorative label punch. I matted it on another marina mist decorative label and adhered it inside the card using dimensionals. I stamped the Santa image in versamark along the bottom edge.
As I said, its not my favourite card ever, but it was the best I could do after a long and busy week. I'm looking forward to the weekend and some time to recharge my batteries!
Tuesday, November 9, 2010
Workshop Make 'n' Takes
November is a busy month in so many ways...report cards at school, lots of rehearsals in preparation for lots of Christmas concerts (I am a music teacher...have I mentioned that before?) and tons of holiday card and project classes and lots of workshops! I have another workshop this week on Thursday and I spent this evening prepping for it. We are going to do 2 make 'n' take projects:
Both of these projects come together quickly and easily...just perfect for a workshop make 'n' take! The little bag of tags uses the Noel stamp from the Gifted set. I stamped it in Real red on Whisper White cardstock and punched it out with my 1 3/4" circle punch. I layered it over a 2" circle punched from Candy Cane DSP. The other two tags, not visible in the photo (sorry...I had sealed the bag before I remembered to take a picture!) use the snowman and the pine bough stamps from the Tags til Christmas set. They are stamped in Baja Breeze and Wild Wasabi respectively and are also punched out and layered on coordinating patterns of Candy Cane DSP.
The second project is a little gift card holder I made using the table setting die and my Big Shot. I folded the die cut and wrapped some brushed silver card stock around the fold to hold the pocket together. I stamped the Dasher image in versamark and embossed it using silver embossing powder. I then punched it out using a 2" circle punch and layered it on a large scalloped circle punched from brushed silver. Prior to adhering the image I wrapped a piece of Marina Mist satin ribbon around the pocket and secured it with SNAIL adhesive. I then adhered the Dasher image using dimensionals. I added a single little rhinestone jewel to the antlers for some sparkle. To add a little more sparkle and to facilitate hanging it on the tree I created a loop with the wired silver tinsel and adhered it to the top of the tag using another piece from the table setting die and a shimmer brad. The back of the gift card holder has a little tag to address to the recipient. This is another example of a project that took much longer to explain than it did to make! I'm hoping my guests at my workshop will like these fun projects!
 |
| The package of tags on the left contains 15 simple tags. The project on the right is a gift card holder. |
 |
| Gift card holder made using the table setting die and the Dasher A La Carte stamp. |
 |
| Back of the gift card holder. |
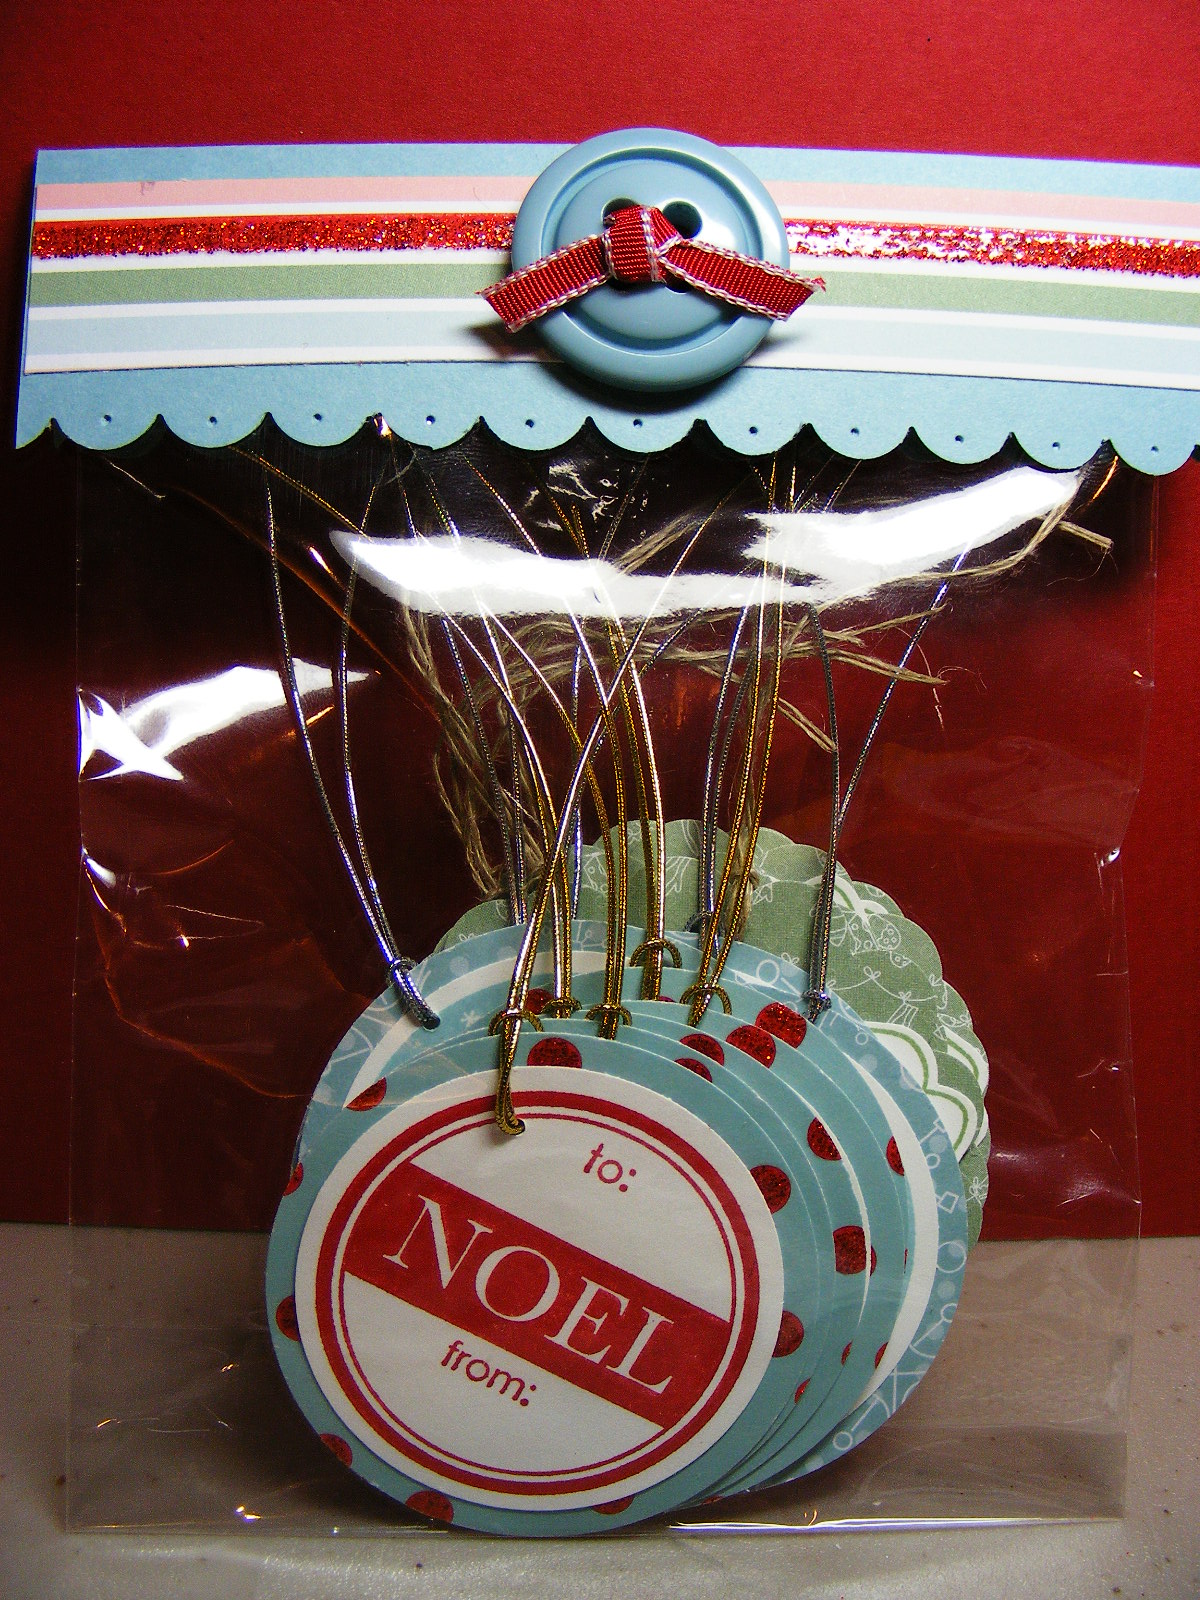 |
| Tags using the Gifted and Tags Til Christmas sets. |
The second project is a little gift card holder I made using the table setting die and my Big Shot. I folded the die cut and wrapped some brushed silver card stock around the fold to hold the pocket together. I stamped the Dasher image in versamark and embossed it using silver embossing powder. I then punched it out using a 2" circle punch and layered it on a large scalloped circle punched from brushed silver. Prior to adhering the image I wrapped a piece of Marina Mist satin ribbon around the pocket and secured it with SNAIL adhesive. I then adhered the Dasher image using dimensionals. I added a single little rhinestone jewel to the antlers for some sparkle. To add a little more sparkle and to facilitate hanging it on the tree I created a loop with the wired silver tinsel and adhered it to the top of the tag using another piece from the table setting die and a shimmer brad. The back of the gift card holder has a little tag to address to the recipient. This is another example of a project that took much longer to explain than it did to make! I'm hoping my guests at my workshop will like these fun projects!
Monday, November 8, 2010
My baby bro's Birthday
My baby brother turned 35 on Saturday...I was shocked to realize he is that old...and then realized I'm gonna be 40 next June! How the heck did we get so darned old?!?
Anyhow, he has his own exterior home renovation business called Aluminate and he drives a black pick-up truck. Here is the card made for him...
I had fun with this card. It involved lots of colouring, cutting and using my Stamp-a-ma-jig and took over an hour to make, but it was worth it. My brother loved it! I wish I had the energy to give you a step by step guide to making it, but it is now 10:22 pm and I have to be up at 5:00 am for a band practice. I NEED to sleep. I just wanted to get this posted because I said I would! I'll check in tomorrow with a more informative post!
Anyhow, he has his own exterior home renovation business called Aluminate and he drives a black pick-up truck. Here is the card made for him...
 |
| I used the Loads of Love stamp set and the Welcome Neighbour set from last year's Sale-a-bration. |
 |
| This is a slider card...when you pull the tab, the sentiment appears and the truck drives down the road. |
 |
| Here's a close-up of my brother in the truck (except he doesn' t really have that much hair!!) |
Sunday, November 7, 2010
MIA
I've been MIA for the past few days...sorry about that! Sometimes having a full-time teaching job, plus 2 part-time jobs, plus the responsibilities of being a mom and wife get the better of me! I have to prioritize my family and there are days when I just can't get down to my stamping corner to create something to post. I did manage to find a few minutes last night before I started prepping for this week's workshop and, as seems to be the case when I am pressed for time, I reached for my vintage Christmas supplies again. Here is what I came up with...
So, last week I mentioned I cleaned up my stamping table and found some goodies buried beneath the mound of scraps. The red DSP circle with the distressed music notes was one of those little goodies. I had started to create something with it but gave up when it wasn't going so well. I decided to try again...and managed to come up with a design that used that earlier element. Here's what I did:
I started with a 5"x5" Always Artichoke card base. I cut a 4 7/8"x4 7/8" piece of Cherry cobbler cardstock and then a 4 3/4" x 4 3/4" piece of DSP. I trimmed the corners with my tag corner punch (retired), added a metallice brad in each corner and layered them onto the card base. For the focal point, I cut the circle using my clear circle die and my Big Shot. Then I cut a 1" wide strip of Newsprint DSP (the music notes pattern), which I promptly distressed and crumpled. I sponged some soft suede and cherry cobbler ink on it to soften the brightness of the paper. I also distressed the edges of the circle piece and sponged it with soft suede to age it. I adhered the music note strip to the circle. I then gathered some always artichoke seam binding ribbon and adhered it above and below the music note strip using SNAIL adhesive. I tied a bow with another piece of ribbon and attached an antique brad at the centre. I punched a hole with my 1/16" hole punch and put the brad through the DSP to secure the bow in place. Then I took 3/4" strips of Waffle Paper and adhered it around the back edge of the circle using SNAIL, gathering and scrunching as I went. (I have to say this stuff was pretty darned easy to work with! I think I'm gonna use it more!) I then trimmed the waffle paper to a uniform width all the way around the circle. I adhered the whole focal element to the cardfront using sticky strip...it was a little heavy and I wanted to make sure it stayed put! The sentiment is from the Bells and Boughs set and I stamped it in Early Espresso ink on Crumb Cake cardstock (hmmm...this is making me hungry!), punched it out with my scalloped oval punch and sponged the edges. I adhered it to the card using dimensionals. For the inside, I stamped the holly image from the Bells and Boughs set in early espresso again on crumb cake. I trimmed the corners with my tag corner punch and sponged the edges. I decided not to include an inside sentiment because there are times I have a lot to write and I wanted to leave lots of space for that! This afternoon we are off to celebrate my brother's 35th birthday. I have a card for him that I will post tomorrow! Have a happy Sunday!
 |
| Another Vintage Christmas card using Deck the Halls DSP |
 |
| This is my first attempt at using Waffle Paper for a project...I like the way it highlights the focal point. |
 |
| Still loving the seam binding ribbon and those Antique Brads! |
 |
| Inside of card...sentiment free! |
I started with a 5"x5" Always Artichoke card base. I cut a 4 7/8"x4 7/8" piece of Cherry cobbler cardstock and then a 4 3/4" x 4 3/4" piece of DSP. I trimmed the corners with my tag corner punch (retired), added a metallice brad in each corner and layered them onto the card base. For the focal point, I cut the circle using my clear circle die and my Big Shot. Then I cut a 1" wide strip of Newsprint DSP (the music notes pattern), which I promptly distressed and crumpled. I sponged some soft suede and cherry cobbler ink on it to soften the brightness of the paper. I also distressed the edges of the circle piece and sponged it with soft suede to age it. I adhered the music note strip to the circle. I then gathered some always artichoke seam binding ribbon and adhered it above and below the music note strip using SNAIL adhesive. I tied a bow with another piece of ribbon and attached an antique brad at the centre. I punched a hole with my 1/16" hole punch and put the brad through the DSP to secure the bow in place. Then I took 3/4" strips of Waffle Paper and adhered it around the back edge of the circle using SNAIL, gathering and scrunching as I went. (I have to say this stuff was pretty darned easy to work with! I think I'm gonna use it more!) I then trimmed the waffle paper to a uniform width all the way around the circle. I adhered the whole focal element to the cardfront using sticky strip...it was a little heavy and I wanted to make sure it stayed put! The sentiment is from the Bells and Boughs set and I stamped it in Early Espresso ink on Crumb Cake cardstock (hmmm...this is making me hungry!), punched it out with my scalloped oval punch and sponged the edges. I adhered it to the card using dimensionals. For the inside, I stamped the holly image from the Bells and Boughs set in early espresso again on crumb cake. I trimmed the corners with my tag corner punch and sponged the edges. I decided not to include an inside sentiment because there are times I have a lot to write and I wanted to leave lots of space for that! This afternoon we are off to celebrate my brother's 35th birthday. I have a card for him that I will post tomorrow! Have a happy Sunday!
Subscribe to:
Posts (Atom)
