Sunday, July 31, 2011

Playing with new toys...

...and getting rid of old ones!  You may have noticed the new tab at the top of this page that says "Retired Stamp Yard Sale".  I need to get rid of more of my retired stamps, so I've posted them for sale on my blog.  Check out the list and if there is something you're interested in, make me an offer.  A paypal account is needed to complete the sale.

Now on to today's post!  I've been playing with the new Established Elegance set and came up with this card...see what you think.  It is based on this week's sketch at Stamping 411.  Here is the sketch:


...and here is my card:
Card for SSC214 using Established Elegance stamp set.
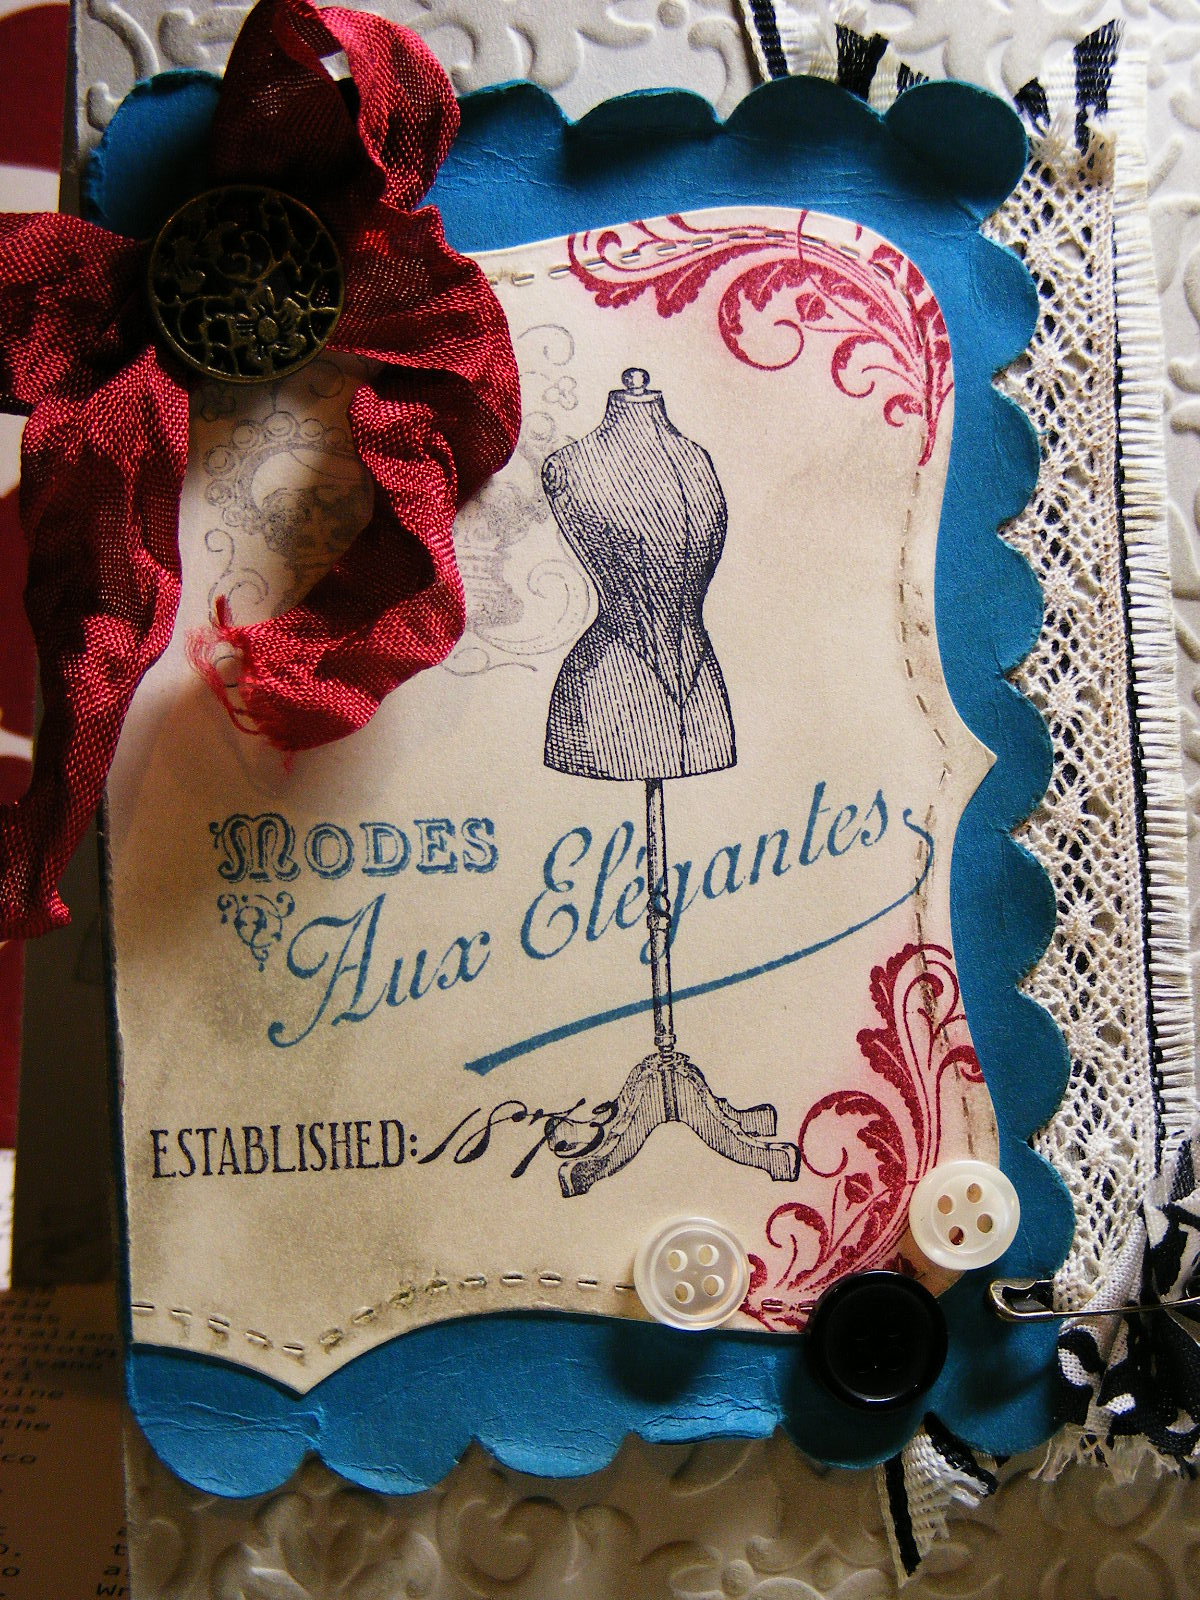
Close up of images
I took a few liberties with the sketch, rotating it and moving the three buttons from the edge and onto the focal image. The colour scheme was inspired by the Timeless Portrait Suite.  I just substituted the river rock for sahara sand on this card.  I really love the way the island indigo just makes everything pop.  Here is how I put this together:
Starting with a piece of very vanilla cardstock, I ran it through my Big Shot with the Top Note die.  I also took a piece of island indigo cardstock and ran it through with the scalloped square die and I ran a sahara sand cardbase through with my Vintage Wallpaper embossing folder.  Now that the Big Shot work was done, I set to stamping!  Laying the scalloped square on my card, I decided how much I wanted to offset it and trimmed it accordingly.  I then layered the top note diecut on top of the square and trimmed it to size as well.  Taking the trimmed top note, I stamped the various images in basic black, cherry cobbler and island indigo ink, stamping off some images to give depth and interest to my collage.  Then I sponged the whole thing using the tea stain ink from my distressing kit.  Setting this aside, I took my scalloped square and distressed it using my bone folder to break down the cardstock.  I adhered my stamped top note to the scalloped square, ensuring the left edges were aligned.  I then took scraps of black striped ribbon and Chantilly lace trim, layered them and adhered them to the right edge of my focal piece.  I took a piece of cherry cobbler seam binding, crumpled it and then tied it into a bow using an antique brad and adhered it to the upper left corner of my focal piece.  Taking my embossed card base, I sponged the edges in sahara sand ink and then adhered the focal image along the left edge.  The final touches were a bit of Timeless portrait fabric gathered on a safety pin from the vintage trinkets and three little buttons that I had sitting around the house.
Gotta love vintage...so easy to put a bunch of elements together and make them work!

Saturday, July 30, 2011

Where does the time go?

How is it the end of July already?!?  I feel like summer just got started and here it is half over!  The month of August spells an end to my care-free days and the beginning of ramping up for another school year.  Somehow my brain knows all this and the back-to-school dreams start, like clock-work, on August first...ugh!  Good thing I have my Holiday Mini pre-order to distract me!  I get to place my order for new goodies starting on Monday and boy, do I have a wishlist!!  I'm going to have to pace myself!  In anticipation of all my new Holiday goodies arriving in the next week or so, I've been working on planning my classes and workshops for August and September.  It's been fun to pull out some sets that haven't seen ink in a while and give them a workout.
Today's card is one that uses a brand NEW set...one that I've fallen in love with:  Field Flowers.  It is a two-step-stampin' set that allows you to get multi-coloured images with amazing depth without watercolouring or using markers.  Gotta love something that gets gorgeous results this quickly and easily!  Check it out:

Card using the new Field Flowers and Clearly For You sets with sentiment from Nature's Pace set.
Aren't those flowers pretty???  And SO easy to do...anyone with a couple of colours of ink can do it!   Here is how I put it all together:
Starting with a 4 1/4" x 5 1/2" piece of First Edition DSP, I stamped the stems twice using always artichoke ink.  Then, using perfect plum, I stamped the solid flower image three times and a fourth time on a piece of scrap DSP.  Following that, I stamped the outline flower image in elegant eggplant right over top of the solid images, not worrying about exact alignment (no Stamp-a-ma-jig for me!).  Finally, I stamped the solid centre image using more mustard.  I then cut out the flower that was stamped on the scrap and adhered it to the larger stamped piece using dimensionals. Then I tore the edges of the stamped piece all the way around, trying to ensure I tore an even amount from each side.  Using the mahogany ink from the distressing kit, I sponged the torn edges.  I then took a 4" x 5 1/4" piece of elegant eggplant cardstock and crumpled and distressed it.  I ran my distressing tool from the cutter kit around the edges and then applied mahogany distressing ink using the rubber applicator to highlight the wrinkles in the paper and the rough edges.  I then adhered the stamped DSP piece, folding down the top left corner and securing it with an antique brad that I had threaded with a little Victoria Lace trim.  I adhered the entire thing to an always artichoke card base that I had also roughed up with my cutter kit tool.  On a piece of scrap very vanilla cardstock I stamped the sentiment from the Nature's Pace set in always artichoke ink.  I punched it out using my large oval punch and then stamped the butterfly and ladybug from the Clearly for You set in elegant eggplant and more mustard respectively.  I sponged the entire oval using the tea stain ink from the distressing kit, added a little library clip and adhered it to my card using dimensionals.
I really like this card!  It may be one that never gets given away...but then again, I have A LOT of cards that I say that about...I only have so much storage space!


Thursday, July 28, 2011

Mojo with a Flourish

Today's card is another one I designed for a couple of online challenges:  this week's Mojo Monday sketch and the Flourish challenge at Hand Stamped Sentiments.  First of all, here is the Mojo sketch:
...and here is my card:


Card for Mojo201 and HSS77 using the Creative Elements stamp set as well as a sentiment from Pursuit of Happiness


Close up of layering detail.
I have to say that as soon as I saw the challenge at Hand Stamped Sentiments I thought of the new Creative Elements stamp set.  I just love the flourish image in that set; especially because it lends itself to colouring!  That is exactly what I did on this card.  I stamped the flourish and then coloured it using my markers.  I pulled my colour scheme from the Paisley Petals DSP:  cherry cobbler, always artichoke, marina mist and cajun craze.  That certainly isn't a colour combo I would generally choose, but it works so well in the paper I had to give it a go!  I do like the way the stamped image complements the pattern in the DSP behind it and the butterflies just add a touch of whimsy.  The sentiment is from the new Pursuit of Happiness set from the new catalogue...lots of great quotes and sentiments in that set! 
On a completely different note, I have been working on my class line-up for August!  Yes, summer freedom is nearly over and I have to get back to a more regular schedule.  In the next day or so I will post samples and details about two upcoming classes:  my monthly card class (featuring the new Easy Events set) and an introduction to watercolouring class.  Click on the Upcoming Events tab at the top of the page for more information.

Starter Kit Promo Ends Sunday!

Now is the perfect time to join (or come back to) Stampin' Up!  Until Sunday, you can get a mini starter kit for only $119!!!  That's half the regular price!  This kit is designed for those who already have a good  selection of stamping supplies and are ready to receive all of the benefits of being a demonstrator.  In addition to the kit, you will receive a specially designed Christmas keepsake box kit (a $50) value FREE!  I saw this box on display at convention and it is gorgeous!  Here is what comes in this mini kit:
  • Easy Events Clear-Mount Set*
  • Pennant Parade Wood-Mount Set*
  • Basic Black Classic Stampin' Pad
  • Old Olive Classic Stampin' Pad
  • Pumpkin Pie Classic Stampin' Pad
  • Real Red Classic Stampin' Pad
  • Brights 8-1/2" x 11" Assorted Card Stock
  • Just Add Cake Designer Series Paper*
  • Chocolate Chip 1/2" Scallop Dots Ribbon*
  • Note Cards (20)
  • Clear-Mount Block C
  • Blender Pen (1)
  • SNAIL Adhesive
  • Business supplies
REMEMBER:   the items in the kit are completely customizable, so you can tailor it to suit your own stamping style. 

Shelli Gardiner, our co-founder and CEO created this video about this promotion.  Check it out and see why you NEED to get in on this promotion before it ends on Sunday!


Signing up is easy!  Details are available by clicking the promotion graphic in the upper right corner of this page.  Then head over to my Stampin' Up website and click the "Join the Fun" tab at the top right of the home page.  If you have any questions along the way, give me a call and I'd be happy to answer them for you.
 Once you get signed up I will help you build your business every step of the way.  If you would rather just enjoy the discounted products and other perks of being a demonstrator without holding workshops and selling to others that's ok too!  I am here to help you get the most out of your demonstratorship...what ever you want it to be.

Wednesday, July 27, 2011

On a roll...

Hold on to your seats...two posts in one day!!  It seems the creative block I was suffering after I returned from convention was just a temporary case of inspiration-overload.  I am happy to say my mojo is back and working just fine, thank you very much!  Since I'm back in the stamping saddle again, I thought I'd try another couple of online challenges today.  The card I created actually works for two challenges this week:  The Paper Players and SU Only.  The challenge over at SU Only is to create a Get Well card...something we all need from time to time.  I chose to create mine using the this week's Paper Players sketch:


Here is my happy, CAS card:
Get Well Card for PP56 and SUO24 using the Ain't Love Grand hostess set.

Inside of card with sentiment from the Word Play set
I am really happy with the way this turned out...though it was a lot more involved than it looks!  First of all, I paper-pieced the umbrella...that is always tedious and takes time.  I also added Crystal Effects to the rain drops and puddles to give them watery dimension...you likely can't tell that from the photo!  Then I had the brainwave to simulate the background from the front of the card behind the sentiment on the inside...that took some figuring, but was worth the math frustration!  So this supposedly CAS card took me over an hour to make!  It was certainly worth the effort, though.  Now I just need someone I know to get sick so I can send them this cheery little pick-me-up (is it wrong to wish illness on my friends?!?)  If you're wondering, here are the colours I used:  poppy parade, calypso coral, daffodil delight, lucky limeade, island indigo and pool party.  Can you tell I love the new in-colours?!  I'll be back tomorrow with another card I did for a different challenge...like I said...I'm on a roll...

Forever Young

Last night I sat down to make a birthday card for a colleague and friend who is turning 40 in a couple of weeks.  I wanted to use the Timeless Portrait DSP from the new catty.  I just love the rich colours and bold patterns in that paper!  I also wanted to create something for this week's challenge at Friday Mashup because I haven't played along in a while and I miss it!  The challenge is to create a birthday card using the following colours:  cherry cobbler, not quite navy, always artichoke and sahara sand.  Well, the birthday card part wasn't a problem, but because I was using the DSP, I had to substitue some colours:  not quite navy became island indigo, always artichoke became river rock and sahara sand became very vanilla.  I also added black to make everything pop.  So, here is my card...
Birthday card for FM16 using the Forever Young, Word Play and Perfectly Penned stamp sets and featuring Timeless Portrait DSP.

This is an easel card that folds flat and fits in a standard envelope!
The Forever Young set is another one that I knew I just HAD to have when I first saw the new catty.  I love that image of the tree with the swing.  So calm and peaceful...I remember being that little girl, swinging away without a card in the world...Sorry!  I got a little nostalgic there for a second!  That's what I'm hoping happens when my friend opens this card on her 40th birthday:  a little nostalgia and happy memories.  I'm not going to go into detail about how to create this card (it took a while!), but I will list all the  new products I used:
Timeless Portrait DSP, lace ribbon  border punch, stripes embossing folder, island indigo in-colour cardstock, Forever Young and Perfectly Penned stamp sets.  Whew...that's a lot of new product on one card!  Can you tell I'm loving all the new goodies???
On a completely different note, don't forget to take my survey (link is at the top of the left-hand column on this page) for a chance to win a $40 gift certificate.  The survey closes this Sunday, so don't miss out!

Tuesday, July 26, 2011

Another Christmas card...in July!

Yes, I know...here we are in the middle of a heat wave and I'm making Chirstmas cards!  I have to get planning for my fall classes and, since Christmas is a big part of my fall crafting, I decided I had better get to designing some holiday cards.  This card was inspired by a swap card I got at convention.  I got so many amazing swaps...there are MANY talented demonstrators out there!  I plan to use this card in my Stamp-A-Stack line-up at some point:

Christmas card using the Perfect Punches stamp set and featuring the Petals A-Plenty embossing folder.
I love this embossing folder (actually, I don't think there is one I DON'T love!).  It adds so much to a card for such little effort (and expense!).  Here is how I put this one together:
Starting with a whisper white card base, I ran it through my Big Shot with the embossing folder.  I then cut a 2 1/2" x 4 1/4" strip of whisper white and punched one of the long edges using my scallop border punch.  I ran that piece through the Big Shot as well, ensuring the punched edge remained OUT of the embossing folder so that it would stay smooth.  I cut a 2 3/4" x 4 1/4"  piece of cherry cobbler cardstock, punched one of the long edges and glued the embossed white strip to it.  I then wrapped a piece of cherry cobbler polka dotted scalloped ribbon around and tied it in a knot.  I glued that piece to the lower edge of the cardfront.  For the focal image, I began by die cutting a cherry cobbler medallion using my new perfect pennants die.  I then cut a 2" circle from brushed silver cardstock.  On a scrap of whisper white, I stamped the focal image using Versamark ink and then heat embossed it using the new (and SOOOO exciting!) cherry cobbler embossing powder.  I punched the embossed image out using my small scalloped circle punch and adhered it to the medallion.  I then adhered the whole focal image to the card using dimensionals.  So fast and easy!  I could mass produce this card in a snap, which makes it a perfect SAS card!
Last night I managed to get the last of my convention Make-n-Takes done.  They are FABULOUS!  I need to get them photographed and I'll post them for you soon!

Monday, July 25, 2011

411 Birthday

Today's card is one I did for this week's Saturday Sketch challenge over at Stamping 411.  It is the second card in my series using the new Easy Events set.  I want to show my beginning stampers what a great investment this set is because of it's versatility.  So, here is the sketch:


And here is my birthday card version:
Birthday card for SSC213 using the Easy Events stamp set
Now, don't get all perturbed thinking I used a non-SU embossing folder for this card.  Fact is, I created my own texture plate using Stampin' Up's build-a-cupcake punch!  I did a tutorial for these a while back...check the Tutorials link at the top of the page and scroll down till you hit "DIY Embossing plates".  This card really was easy to put together.  The trickiest part was the watercolouring...and that's no trick!  Its easy using watercolour crayons and my aquapainter.  I just got the crayons and really love them!  There are so many great options for watercolouring I'm not sure which one I like best.  I'm going to have to play some more to come up with a clear preference.  In the meantime, I'm having lots of fun!  To get the shading on the icing I used melon mambo and pretty in pink.  You can't see it in this photo, but I also brushed on a little frost white shimmer paint to make it extra pretty!  The rest is pretty self-explanatory...though if you have questions leave me a comment and I'll get back to you. 
On a completely different note, yesterday I spent the day rearranging and reorganizing my stamping corner.  My DH put up some shelves and we moved some things around and voila...a whole new set-up!  Well, its not really new, but it sure feels spacious and organized!  I can't wait to get down there today and create something!  I'll share what I come up with tomorrow...TTFN!

Sunday, July 24, 2011

MOJO200...take two!

I mentioned yesterday that I had a second card that I did based on this week's Mojo Monday sketch.  In case you missed it, here is the sketch I am referring to:
The second card I did  is COMPLETELY different from the first.  See what I mean...

Christmas card for MOJO 200 using Easy Events and Many Merry Messages stamp sets

Inside of card
One of the things I like most about working from a sketch is that most of the design work is done for you.   I just have to plug in my elements and voila...quick and easy card-making!  This is the first of several cards I am working on using all of the stamps in the new Easy Events set.  It is the perfect set for beginning stampers because it has images and sentiments for just about every occasion.  The best part is that the images are line art, so they are perfect for colouring...one of my favourite things to do!  Over the next few weeks I'll be posting more cards using images from this great set.  For now, enjoy your Sunday!

Saturday, July 23, 2011

A Burst of Creativity!

Today was a perfect day:  lots of quality time with my little guy and some time to play with my new stamping goodies!  It was another HOT one here today...still no rain.  We spent time in the pool this afternoon...about the only place it was comfortable being outside!  I sure hope it rains soon...
Now...on to today's project.  It has been several weeks since I've been able to participate in any online challenges so I decided it was high time I got back to it.  Today's card is  based on this week's Mojo Monday sketch.  Here is the sketch:
And here is my card:

Card for MOJO200 using the new Creative Elements stamp set and sentiment from Field Flowers.

Close up of my popped-up flower

LOVE the new Designer Frames embossing folders!

Inside of card featuring Mocha Morning DSP...so rich and yummy!
This card is really a study in texture.  There are so many different textures going on you just have to touch it!  For starters, I stamped the flourish from Creative Elements in soft suede on a card base of the same colour.  I then ran it through my Big Shot using my Vintage Wallpaper embossing folder.  I wrapped a piece of black striped 1 1/4" grosgrain ribbon around the card base and added a bow tied with an antique brad.  I then cut a strip of the flocked Mocha Morning specialty paper and added a scalloped edge in basic black textured cardstock, adhering it to the cardfront.  Next I stamped the flower three times on watercolour paper using black Staz-on ink.  I watercoloured all three flowers using crumb cake and soft suede inks and my aquapainter.  I then fussy-cut out the full flower for the bottom layer, as well as the middle and top layers from the other stamped images.  I layered the flower using dimensionals to give it depth.  I then brushed it lightly with champagne mist shimmer paint using my aquapainter to give it some sparkle and richness.  On a separate scrap of very vanilla cardstock I stamped the butterfly in crumb cake ink and the sentiment in basic black.  I then ran the scrap through the Big Shot using the rectangular designer frame embossing folder.  I fussy cut out the frame and sponged the edges using soft suede ink.  I adhered both the frame and the flower to the card.  Voila...a gorgeous-so-rich-you-want-to-touch-it card!  I am SO in love with these new products!  I can't wait to show them to my customers...they're going to love them as much as I do!
I really liked working with this sketch, so tomorrow I'll have another card using the same sketch for you!

Friday, July 22, 2011

Babies and more babies!

Today's card is another baby-themed one.  I received word today that a colleague from work just gave birth to twins!  She had a boy and a girl, so my card needed to be gender neutral (or at least a bit of both!).  I chose my colour scheme from the Nursery Nest DSP...it is another one of those new goodies that I've been dying to try out!  Check this out...
Card for twins using the Baby Bundle stamp set and Nursery Nest DSP.  The sentiment is from a retired set called By Ones and By Twos.
Inside of card...sentiments are again from the By Ones and By Twos set (retired)
Close up of the sentiment layering.
So...I REALLY struggled with this!  I had something completely different in mind that involved a whole lot of masking and watercolouring and in the end I just couldn't get it to work.  I decided to abandon my original idea and go with something much simpler.  I'm still not crazy about it but honestly, it was the best I could come up with tonight!  I've really noticed that when I am away from stamping for a while...it affects my creativity in a not-so-good way!  When I get to create everyday, the ideas just flow and it is so easy.  When I don't everything seems so much more difficult.  Here's hoping this is just a blip and not a sign of things to come!  Now on to how I put this card together:
Starting with a 4" x 5 1/4" piece of polka dot patterned DSP, I adhered a narrow strip of the rick-rack patterned paper along the left edge.  I then tied a piece of pear pizzazz seam binding ribbon around the length of it, again along the left side.  On a piece of 3" x 3" whisper white cardstock, I randomly stamped some of the images from the Baby Bundle stamp set in blushing bride and marina mist classic ink.  I then sponged the edges in marina mist and layered it on a mat of blushing bride and another of marina mist cardstock.  I adhered that to the DSP cardfront.  I then cut a banner out of pear pizzazz, using my modern label punch to shape the ends.  I scored each end twice, folding the scores in opposite directions so that it popped up.  I stamped the sentiment on a scrap of whisper white using pear pizzazz ink and then punched it out using my word window punch.  I adhered that to the banner and then adhered the whole thing to the cardfront.  I added two marina mist brads to either end of the banner and then adhered the entire cardfront to a pear pizzazz card base using Tombow liquid glue.
For the inside, I inked the "hurray for twins" sentiment using my pear pizzazz and marina mist markers on a scrap of whisper white cardstock.  I punched it out using my decorative label punch.  I layered that on marina mist and I then punched two scallop ovals from the polka dot patterned DSP and layered them behind the label (this is a trick I learned at convention...I likey!).  I adhered it to the card using dimensionals.  The rest is pretty straightforward...I'm sure you can figure it out.
Here's hoping the weekend brings some stamping time and some much-needed rain (we haven't had a drop in over a month!) as well as relief from this oppressive heat!

Thursday, July 21, 2011

Time for something new...

Don't you just hate it when you have all kinds of new stampin' goodies sitting waiting to be unpacked and used and you just can't seem to find the time to get to them?  That's how this week has felt!  I have so many wonderful new products sitting in my stamping corner but I just have so much to catch up on from being away at convention last week, there aren't enough hours left in the day for stamping!  Today was supposed to be my day to FINALLY get to play but alas, our nanny is sick and I was on full-time mommy duty all day.  (I know, most of you are saying "Suck it up, buttercup!  Welcome to reality!").  Don't get me wrong, I LOVE spending time with my son...I just SOOOOO wanted to get some stamping done!  The sense of urgency is even greater as we are away all day tomorrow and our nanny starts two weeks of holidays on Monday.  That means NO stamping time for mommy!  Its like needing a drink of water, being able to see a nice frosty glass, but not being able to take a sip...torture!  I think I see some late-night stamping in my future!
This evening I got started on designing the Save-The-Date cards for my SIL's baby shower.  She is due in early September (feel sorry for her in this heat without A/C!) and folks have been asking about a shower.  We (she) decided she would rather wait until after the baby is born so that they know whether it is a boy or girl and can register for gender-appropriate items.  I decided to do Save-the-date cards to just let everybody know we haven't dropped the baby shower ball.  See what you think...
Baby shower Save-the-date cards and coordinating envelopes using the Bringing Baby a la carte stamp


Close-up of the adorable stamped image

Envelope faux-seal
I have to say that the minute I saw the Bringing Baby stamp in the new catty, I knew I wanted to use it for my SIL's shower.  I just LOVE that image...it is SO retro!  I actually had similar images all over my bedroom walls as a child.  The colour scheme I chose was based on the bedding my SIL has chosen for the nursery.  Here is a photo:
Given that we don't know whether she is having a boy or girl we needed to keep it fairly gender-neutral.  I chose the combination of Pool Party and Calypso Coral with just a hint of Island Indigo as an accent.  I did the text in Microsoft Publisher and using the RGB codes from My Digital Studio to ensure the colours of the text matched the inks I used exactly.  The base is one of the Note Cards from the catty...a great, economical option for smaller-sized cards and envelopes (just $7.50 for 20 cards & envelopes!).  Since my sister-in-law is a clean-and-simple kinda gal, I kept the embellishments to a minimum...just a little pool party ruffled ribbon and a calypso coral polka dotted brad.  I coloured the image using my aquapainter and ink pads...so easy to do!
I really hope my SIL likes these...she hasn't seem them yet and I've already got 10 done!

Tuesday, July 19, 2011

Time to hear from you!

Convention has left me on a huge high and I am excited to get started on planning my event and class offerings for the fall.  Since the fall is a SUPER busy time for me as a teacher, I want to make sure I am making the most of my stampin' time by offering classes that you, my customers and readers, will want to attend.  I have designed a brief survey to get a feel for what you would like to see me offer.  There is nothing worse than designing projects and planning for classes that no one signs up for!   So save me the disappointment and give me some feedback!  There is a link to the survey on this page, at the top of the left column, right above the "About Me"graphic.  The survey is brief and will only take a couple of minutes to complete...and I will make it worth your while!  Everyone who completes the survey gets their name entered in a draw for a $40 gift card!  Not bad for 2 minutes worth of effort, eh?!?
If you don't have time today, no worries!  The link will stay at the top of my blog's home page until July 31st, when the survey (and chance to enter the draw) will close.  Come on back when you have a few spare minutes and let me know what you're thinking!

Monday, July 18, 2011

Home Again...

Well, I'm back home, safe and sound.  I had such smooth travels, unlike some of my other team members who spent a night in the Chicago airport or who had to come home to Toronto via Los Angeles!  Yikes!  Nothing dramatic for me...just smooth flights...and my luggage followed me too!
Today has been all about spending time with my son (he started swimming lessons today) and trying to get caught up around the house.  I came home to a BIG mess, which is never good!  Since I have had zero time to stamp today, I thought I'd show you some photos of some of the projects that were on display at convention.  I only photographed the ones I really liked and thought I might try to recreate at some point.  That said, there were a lot of photos!  Some turned out better than others, so I'm just posting a few of the highlights.  See what you think...
I love this litte 6 x6 scrapbook page.  So sweet!

This is a great colour combo


How I love this set from the new catty!


Love the simplicity of this card

Absolutley LOVED this card...actually the whole Beau Chateau suite display was gorgeous!

Sweet little 3 x 3 love notes

More great project ideas!

Are these not darling??

A lampshade made of die cut DSP flowers...beautiful!


Another project idea to use up all those empty embellishment containers!

LOVE that little owl!

Gor-geee-ous!!

Sorry this is blurry...there was a lot of jockeying for position going on!  I just love that embossed frame!

Another use for that same frame

And another...

Beautiful note board using Beau Chateau products
 Well, this is just a taste of the incredible projects on display at convention.  So many ideas...so little time!  I so can't wait to get down to my stamping corner and play...but I have to be Mommy this week.  Maybe when I recover from my trip I'll be able to do some late-night stamping...but then again, I first have to clean up and organize my space!  One of these days I'll have something new to show you...hang in with me...I'll get there!
Related Posts Plugin for WordPress, Blogger...