Sunday, November 30, 2014

A New Sketch Challenge!

Happy First Sunday of Advent!  Can you believe it is just over four weeks till Christmas Day?!?It is time for a new sketch challenge over at Sunday Stamps.  Check it out:


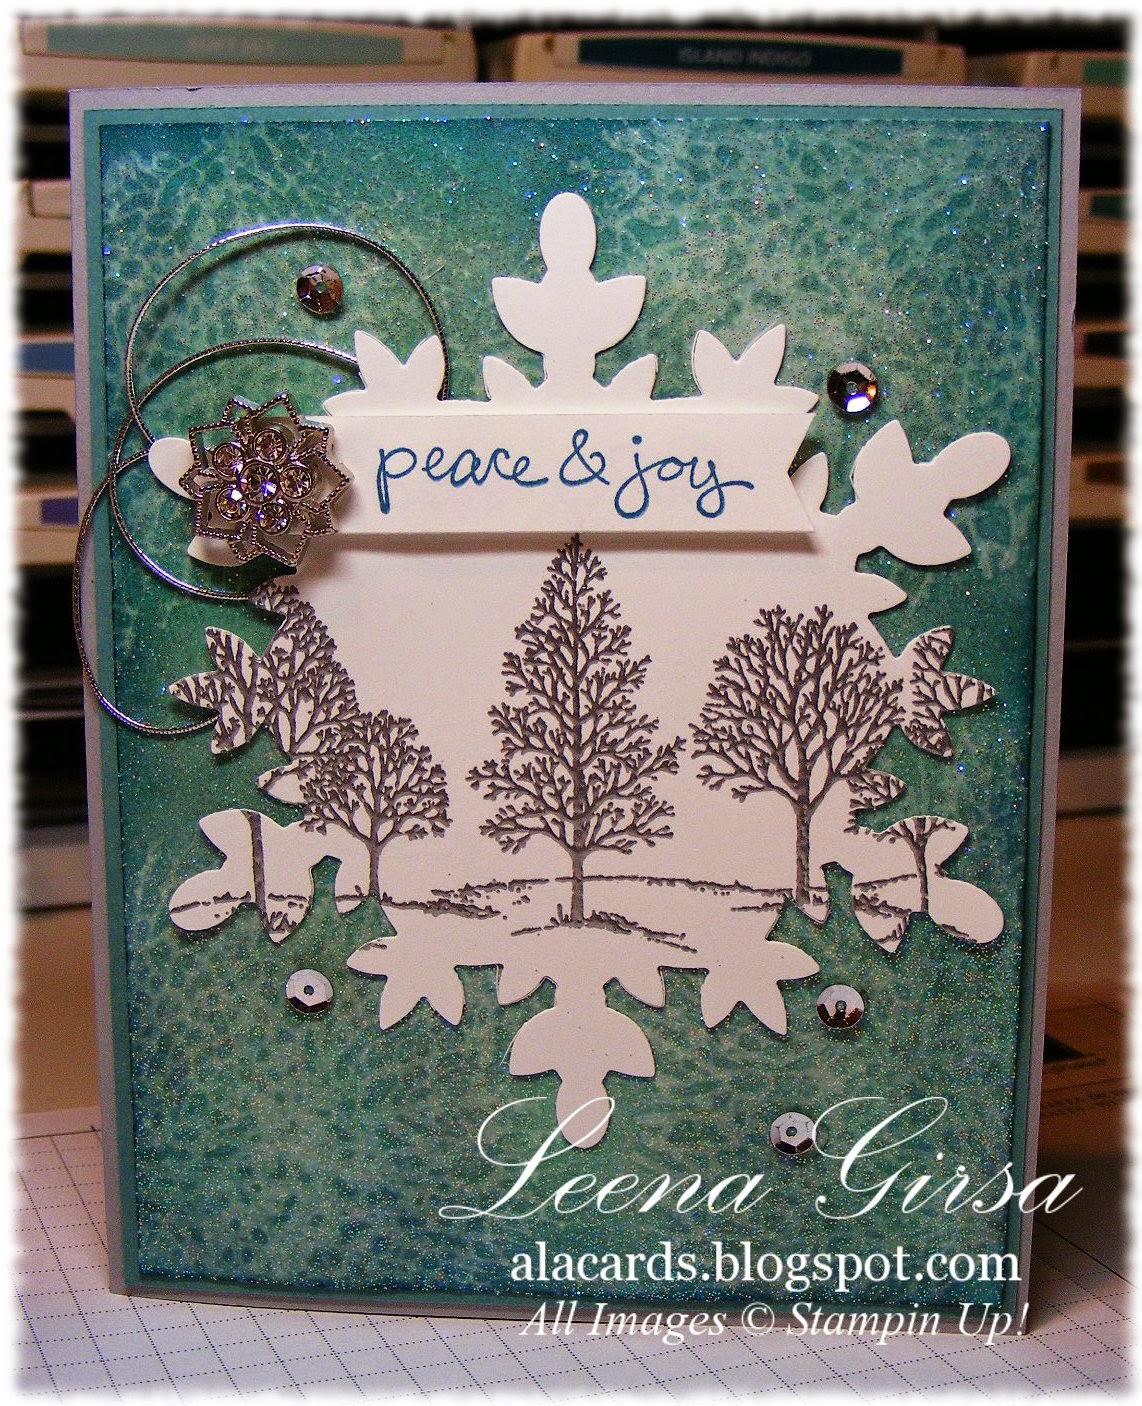
Here is the card I designed....

Christmas card featuring the Festival of Trees and Good Greetings stamp sets
As you can see, I flipped the sketch upside down!  I love playing with sketches to find alternate ways to incorporate them into my designs.  Here is how I put this one together:

This sketch is SO versatile!  Check out the projects by the rest of the Design Team and then give it a go.  We'd love to see your take on it!

Friday, November 28, 2014

Merry & Bright Wishes

Happy Black Friday!  Thanks for taking time out from shopping to stop by!  Be sure to check out the amazing deals Stampin' Up! is offering this week.  Click HERE to see what is on sale.
Today I have another sample from my Last Chance Christmas card buffet that is happening tonight.  It features the Endless Wishes stamp set and LOTS of stamping!

Christmas card featuring the Endless Wishes, Good Greetings (retired), and  Gorgeous Grunge stamp sets.
This one is really quick and easy to put together, but does have a lot of stamping on it.  I started by stamping the three sizes of snowflakes from the Endless Wishes set in Cherry Cobbler ink on the Cherry Cobbler card stock panel.  Then I sponged the edges of the panel all the way around in Cherry Cobbler ink.  I stamped the splatter image from Gorgeous Grunge in Metallic Silver Encore ink.  Once that was dry I heat embossed more snowflakes in white...love the way they pop against the red background!  The panel is then matted on Whisper White before being mounted on a Cherry Cobbler card base.

The sentiment, from the Good Greetings (retired) Hostess set, is stamped in Cherry Cobbler on Whisper White card stock.  I added a bit of bling with a silver metallic bow and some Frosted Sequins.

Inside view with sentiment from Endless Wishes.
On the inside I stamped the sentiment from Endless Wishes and then added a couple of small snowflakes in metallic silver.  The finishing touch was a few more Frosted Sequins.  Voila...quick and easy!  Have a wonderful weekend...and happy shopping...may the odds be always in your favour ;)

Thursday, November 27, 2014

Ho Ho Ho!

A very happy Thanksgiving to all my American friends!  I hope you have a wonderful day celebrating with family and friends!

Today I have another project for my upcoming Last Chance Holiday Card Buffet this weekend.  Check it out:

Christmas card featuring the Holiday Home, Many Merry Stars and Good Greetings stamp sets.
The inspiration for this card came from one I saw on Pinterest designed by Teneale Williams.  I began by embossing some Cherry Cobbler Core'dinations card stock using the Lucky Stars TIEF.  I sanded it lightly and adhered it to a Crumb Cake card base.  The star image, from the Many Merry Stars stamp set, is stamped in Cherry Cobbler ink on Crumb Cake card stock.  The Santa image, from the Holiday Home set,  is stamped in Early Espresso ink.  I die cut the star using the Stars framelits.

The focal image is layered on a piece of Under the Tree Specialty DSP that I layered on a slightly wider piece of Champagne glimmer paper.  I added some Champagne glimmer stars, a Vintage Faceted Button and some Cherry Cobbler baker's twine to pull it all together.

On the inside I stamped the sentiment from the Good Greetings (retired) set and added Santa's sleigh, stamped off in Early Espresso ink.
Another quick and easy one...hope my guests like it!

Wednesday, November 26, 2014

Silver and Navy for Christmas

Today I have a card I designed for my upcoming Last Chance Holiday Card buffet coming up this Friday night.  It is my last Christmas buffet this season and I wanted to create a few new designs to add to my other offerings.

Christmas Card featuring the Wonderful Wreath framelits dies and the Many Merry Stars stamp set.

This one doesn't feature much stamping!  The focal image is the wreath which I die cut from Silver Foil paper using the Wonderful Wreath framelits and then embossed using the Tiny Triangles TIEF.  I CASE'd this idea from a sample I saw on Pinterest by Deb Valder.  I layered the embossed wreath on a square of Night of Navy card stock that I embossed with the Perfect Polka Dots TIEF and then layered on a slightly larger square of Brushed Silver card stock.  I added some silver metallic ribbon and some rhinestones that I coloured with the Night of Navy Blendabilities.


The sentiment, from the Many Merry Stars stamp set, is heat embossed in silver and highlighted with a row of rhinestones.

The inside is very simple with a sentiment from Christmas Messages (retired) stamped in Night of Navy ink.
I love this colour combo for Christmas...so rich and elegant and non-traditional!

Now, amid all the excitement of the Online Extravaganza sale yesterday I forgot to post the Weekly Deals for this week.  Here they are...prices are good until Monday at midnight:

Alphabet Press Textured Impressions Embossing Folder
Price: $9.95  
Sale: $7.46
Argyle Textured Impressions Embossing Folder
Price: $9.95 
Sale:  $7.46
Fancy Fan Textured Impressions Embossing Folder
Price: $9.95  
Sale: $7.46
Label Petite Curly Punch
Price: $15.95  
Sale: $11.96
Merry Monogram Stamp Brush Set -- Digital Download
Merry Monogram Stamp Brush Set - Digital Download
Price: $10.95  
Sale: $6.57
Rosette Designer Bigz XL Die
Rosette Designer Bigz Xl Die
Price: $52.95  
Sale: $39.71
Silver Sparkle Dazzling Details
Price: $3.25  
Sale: $2.44

Tuesday, November 25, 2014

The Extravaganza Continues!

The big sale continues all this week!  To view all of the amazing deals click the flyer below!  Remember...sale pricing is only while current stock lasts.  Once it's gone, so are the deals!

http://www.stampinup.com/ECWeb/CategoryPage.aspx?categoryid=2014

Now for a new project!  I still have one of the projects from my November techniques class to share with you.  I saved my favourite for last!  It uses the Stampin' Mist Ghosting Technique as well as the very first stamp set I ever bought:  Lovely as a Tree...

Christmas card featuring the Lovely as a Tree stamp set, along with By the Tide and a sentiment from the (retired) Good Greetings set.
I love that the background on this one looks like frosted glass.  I had originally planned on going a whole different direction with this card, but when I saw the way that background turned out I had to make it a wintry Christmas card.  Here is how I got the look:
 I matted the card front on a piece of Lost Lagoon card stock before adhering it to a Smoky Slate card base.  
The trees, from the Lovely as a Tree set, were heat embossed in silver and then die cut using the largest of the Festive Flurry (retired) framelits.  The sentiment is stamped in Island Indigo ink.  The snowflake embellishment was the last of my stash from last year's Holiday Catalogue...loved those things!  I added some silver cord I have also been hoarding saving, as well as a few Frosted Sequins.

Inside view with sentiment from the Bright and Beautiful stamp set.
On the inside I heat embossed the sentiment from the Bright and Beautiful stamp set in silver and added the week pine branch from Lovely as a Tree, stamped in Smoky Slate ink.
I have to admit that this is one of my favourite cards I've designed in a while.  It is definitely going to someone very special this Christmas!

Saturday, November 22, 2014

BIG Deals are Coming!


Starting Monday, November 24th until Tuesday, December 2nd you can save BIG on some fabulous products!  There are special, limited-time, while-quantities-last door crasher deals on the first and last days of the sale, as well as discounts of up to 50% that run through the duration of the sale, while quantities last.  Monday's AMAZING deals are listed below:
  • All embossing folders (excluding Stylish Strips (132174), Chevron (127749), Beautifully Baroque (130947) and Woodgrain (127821)) are on sale for just $7.00 (reg. $9.95-$10.95)
  • Gift Box Punch Board (135863) Sale price: $17.47 (reg. $24.95)
  • Card Kit Bundle (includes the Hip Hip Hooray AND Everyday Occasions kits) Sale Price: $43.33 (reg. $61.90)
Keep in mind the above items are on sale Monday, November 24th only and only while supplies last.  There will be no back orders at these prices, so be sure to get your order in early.  I will be placing an order on Monday afternoon, so if you would like to take advantage of a slight savings on shipping you can email me your order by 4:00 pm.

To view all of the other great week-long deals, as well as the final day Door Crashers, click the flyer below or visit my webstore.

Click the flyer to view

Wednesday, November 19, 2014

More Gift Box ideas

Yesterday I showed you one of the projects I made using the Gift Box Punch Board.  Today I have a cute little ensemble to show you that I made using the Curvy Keepsake and Gift Card Envleope Thinlits.

Gift Box and Gift Card Holder featuring Under The Tree Specialty DSP and the Christmas Bliss and Letterpress Winter stamp sets.
I can't even begin to tell you how quick and easy these projects were!  The Curvy Keepsakes box goes together in under a minute.  I added a little something extra by punching a window with the Bracket Label punch and covering the opening with a piece of Window Sheet.  I used the Under the Tree Specialty DSP for the box, which is perfect because it is printed on both sides.  The outside is red and the inside of the box is patterned with white on the Kraft background.

To create the tag I used the label I punched out for the window and layered it with Champagne Glimmer paper punched with the 1-3/8" circle.  I layered that with the stamped image from the Letterpress Winter set, stamped in Garden Green and punched with the 1-1/4" circle.  I used a little gold baker's twine to affix the tag to the box.


The Gift Card holder is made from Kraft card stock using the Gift Envelope and Trims Thinlits die.  I used some leftover scrap from making the box above to punch my tree.  The sentiment, from the Christmas Bliss set,  is stamped in Garden Green ink and die cut using one of the pieces from the Gift Envelope and Trims Thinlits.  I added a little champagne glimmer star and a gold baker's twine bow to decorate the tree.

For the inside, I cut a scrap piece of leftover scrap to fit inside, also cutting a slit for the gift card to slide into.  I stamped the To and From, from the Cheerful Tags set, using Early Espresso ink.

Now for some really big news!  The Demonstrator Starter Kit is going on sale for 25% off!!  That's right!  From November 24th - December 2nd the starter kit is on sale for just $93.75!!  You get $155 worth of product for just $93.75.  PLUS you'll receive an added 5% commission on all orders you place in the month of December...that's in addition to the 30% you receive on your first order and 20% on all subsequent orders.  This kind of promotion has NEVER happened before!  A huge discount on the kit AND extra commission...there has never been a better time to join my Tri-City Stampers Team!  Click HERE to learn more about the many benefits of being a Stampin' Up! Associate!

Tuesday, November 18, 2014

Gift Box Punch Board Love

I can't believe it took me two months to order the Gift Box Punch Board.  I had it in my mind that boxes are easy to make and don't require a special tool.  While that is true, the Gift Box Punch Board makes mass-producing boxes so fast and easy I don't know how (or why!) I ever made boxes without it!  Today I have a project I CASE'd from my wonderful upline Jamilla Ivits for my Wrap Up the Holidays Event coming up this Friday evening.  Check it out:

Large gift box made using the Gift Box Punch Board and featuring the Cheerful Tags stamp set.
This box measures 4"x 4"x 3-1/4".  I began with a piece of 11" x 11" card stock and simply followed the instructions on the punch board to construct the box.  To decorate the plain Kraft card stock, I used the Hearts and Stars Decorative Mask to stencil stars in Crumb Cake ink all over the sides of the box.

The belly band is made from a 1-3/4" piece of Old Olive card stock that is fringed all the way around using the Fringe Scissors.  I added a piece of Cherry Cobbler 1" stitched edge grosgrain ribbon (available dirt cheap on the Clearance Rack right now!) and then some natural and Old Olive two-tone trim.

The tag is cut from Under the Tree Specialty DSP and punched with the Angled Tag Topper punch.  The sentiment, from the Cheerful Tags set, is stamped in Cherry Cobbler ink and then die cut using the Apothecary Accents Framelits.  I added a couple of champagne Glimmer stars for some bling.

Now, since it is Tuesday, I have the new Weekly Deals for you.  As always, prices are good until Monday at Midnight.  Email me directly with your order to save a little on shipping ;)

1 Square Punch
1" Square Punch
Price: $21.95  
Sale: $16.46
1/4 Handheld Punch by Stampin' Up!
1/4" Circle Handheld Punch
Price: $11.95 
Sale: $8.96
Autumn Spice Digital Kit -- Digital Download
Autumn Spice Digital Kit - Digital Download
Price: $10.95  
Sale: $6.57
Clear Oval Accent Bigz Die
Price: $26.95  
Sale: $20.21
Deco Labels Framelits Die
Price: $30.95  
Sale: $23.21
Early Espresso Cut & Ready Card Bases by Stampin' Up!
Early Espresso Cut & Ready Card Bases
Price: $5.95  
Sale: $4.46
Silver Basic Metal Buttons
Price: $8.95 
Sale: $6.71
Smoky Slate Stampin' Emboss Powder
Price: $6.25  
Sale: $4.69

Sunday, November 16, 2014

Purple Haze for Sunday Stamps!

Today's new colour challenge over at Sunday Stamps is all about the purple! 


Now, I will admit, these are not colours I use often...in fact my Perfect Plum ink pad is in almost pristine condition!  It was a true challenge for me to come up with a project featuring these colours.  Here it is:

Birthday card featuring the Everything Eleanor, Papillon Potpourri and Simply Sketched (retired) stamp sets, and using the Stampin' Mist ghosting technique.

 Since I had my monthly techniques class this past week, I decided to use one of the techniques we would be doing on my project.  We were learning the Stampin' Mist Ghosting technique, so I decided to try it with this colour scheme.  Here is how I did it...

  • I sponged Whisper White card stock with Wisteria Wonder, Perfect Plum and a touch of Elegant Eggplant ink.  
  • I spritzed the flourish image from the Everything Eleanor stamp set with Stampin' Mist until it was quite wet.  Then I stamped the image on the sponged card stock, allowing the stamp to sit on the card stock for a few seconds before removing it.  The flourish image begins to appear and gets more pronounced as the Stampin' Mist dries.
  • Once it was dry I stamped the flourish again using Versamark ink, offsetting it from the ghosted image, and then heat embossed in silver.


Inside view with sentiment from World of Dreams.
 On the inside I stamped the flourish again in Perfect Plum.  The sentiment is from the World of Dreams stamp set.
I would love to see your take on this colour challenge, so be sure to give it a try and then enter your project over at Sunday Stamps.  Have a great Sunday!!

Wednesday, November 12, 2014

Get Your Santa On

Yes, I know the calendar only says November 12th, but last night, driving down our street, I passed a house with a lit Christmas tree in the front window!  Christmas is a-coming!  Today I have a fun card to help get you in the mood...

Christmas card featuring the Get Your Santa on stamp set.
I designed this card at the request of a client who was holding a mini stamp-a-stack for her friends and family last weekend.  She really likes the Get Your Santa On set and wanted one of the projects for her event to use it.  It is a pretty quick and easy one to put together and it also gave everyone a chance to try out the Blendabilities. 

I embossed the Whisper White background panel with the Stylish Stripes TIEF and layered it on a Real Red card base.  The Real Red strip across the centre of the card is punched with the Confetti Stars punch and then layered over a strip of silver glimmer paper before being adhered to the card.  The glimmer stars are die cut with the Stars Framelits and punched with the Itty Bitty Accents Punch Pack. 


The tag is punched with the Angled Tag Topper punch.  I stamped the Santa suit in Memento Tuxedo Black ink and then coloured the image with the Cherry Cobbler and Smoky Slate Blendabilities.  The sentiment is also stamped in Memento Tuxedo Black.   I added a bit of gold baker's twine to the top of the tag.

On the inside I stamped the sentiment and the Santa hat in Memento Black ink and then coloured the hat with Cherry Cobbler Blenda's.  My client and her guests loved this project...and so did I!  So much so that I made it part of this month's kits for my Blendabilities Club!

Since yesterday was a solemn day I didn't publish the new Weekly Deals, so here they are today.  Remember that prices are good until Monday at midnight.

1/2 Circle Punch
1/2" Circle Punch
Price: $7.95 
Sale: $5.96
7/8 Circle Scallop Punch
7/8" Circle Scallop Punch
Price: $15.95  
Sale: $11.96
Blushing Bride 3/4 Chevron Ribbon
Blushing Bride 3/4" Chevron Ribbon
Price: $12.50 
Sale:  $9.38
Brights Designer Buttons
Price: $10.95  
Sale: $8.21
Daffodil Delight 1/2 Ribbon Seam Binding
Daffodil Delight 1/2" Ribbon Seam Binding
Price: $9.50  
Sale: $7.13
Window Frames Collection Framelits Die
Price: $32.95  
Sale: $24.71
Wonderfall Kit -- Digital Download
Wonderfall Kit - Digital Download
Price: $8.95 
Sale: $5.37

Related Posts Plugin for WordPress, Blogger...