The weather this week has been gorgeous! I was out on Thursday and Friday with no jacket and my almost-4-year-old son hopped on his bike and was flying around our court in only a light sweater. We still have a mountain of snow in the centre of the court, where the plows have been piling it all winter, but it is getting smaller and smaller every day. Inspired by all this nice weather and the fact I have three workshops and two monthly clubs in the next seven days, I worked on some Easter/spring-themed projects. For the ones I'm going to show you today, I pulled out one of my very favourite DSP's from the catalogue: Nursery Suite!! I love the colours and patterns in that paper and they are so perfect for springtime cards. They work especially well for Easter...check these out!
 |
| I just love those little bunnies!! So Cute ! (By the way, that's also the name of the stamp set that coordinates with this paper!) |
 |
| Inside of Nursery Suite Easter card...I looked at it and thought..."Gee, that's a cute cardfront", so... |
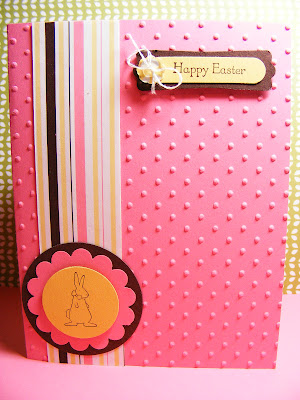 |
| Here it is! A quick and easy Easter card that will likely make it into my Spring Stamp-A-Stack line-up! |
Aren't those paper patterns just the sweetest?? Both of these cards went together pretty quickly and easily...here are the deets:
Card 1: Using the so saffron bunny patterned paper from the Nursery Suite pack, I cut a piece that included 4 complete bunnies (nothing like spare bunny parts to ruin your Easter fun!). I layered that on a slightly larger piece of regal rose cardstock and then layered that on a slightly larger piece of chocolate chip. Setting that aside, I cut a 5 1/4" x 4" piece of chocolate chip cardstock and a 5 1/8" x 3 7/8" piece of so saffron DSP and layered them. I took a piece of so saffron grosgrain ribbon (retired, from SAB a couple of years ago!), wrapped it around the layers and secured the ends using glue dots. I then took a so saffron flower brad, wrapped the prongs around the ribbon and stuck it through the cardstock layers, opening the prongs on the back to secure the brad. I then adhered the entire piece to a regal rose card base. I added my bunnies and then stamped the sentiment (from the Something to Celebrate level two hostess set in the mini), punched it out and adhered it below the brad.
For the inside of the card, I cut a strip of the striped patterned DSP and adhered it along the right side of the card. I stamped the little bunny from the So Cute set in chocolate chip cardstock, punched it out using my 1 1/4" circle punch and then layered it on a 1 3/8" circle in regal rose. I adhered it using dimensionals. I really liked the look of this, so I did a second card, making the inside of this one into the front of the new one!
Card 2: Starting with a regal rose card base, I ran it through my Big Shot using the perfect polka dots embossing folder. I cut a strip of the striped patterned DSP and adhered it along the left side of the cardfront. I then stamped the little bunny from the So Cute set in chocolate chip ink on so saffron cardstock. I punched him out using my 1 1/4" circle punch and layered it on a 1 3/4" scalloped circle in regal rose and then a 2" circle in chocolate chip. I adhered it using dimensionals. I stamped the sentiment, from the Teeny Tiny Wishes set, in chocolate chip ink on so saffron cardstock, punched it out using my word window punch and layered it on a modern label in chocolate chip. I threaded an itty bitty clear button with white embroidery floss, tied a bow and adhered it to the sentiment piece using a glue dot. I then adhere the sentiment using dimensionals. How fast and easy was that?!?


