Showing posts with label ornament. Show all posts

Monday, July 22, 2019

It's Christmas in July!

Happy Monday! I hope you had a good weekend. It has been terribly hot and humid here. Saturday was THE WORST, but then the storms came through and Sunday was simply perfect. I took a rare afternoon off, lounging on the deck and reading a novel...it was so nice to have some downtime!

As hot as it has been, it is hard to think about cold weather, snow and Christmas, but it will come sooner than we all might like. This week I am hosting my annual Christmas in July event and I thought I would make the whole week all about holiday cards. My featured product this week is the Lots of Cheer stamp set from the Annual Catalogue...
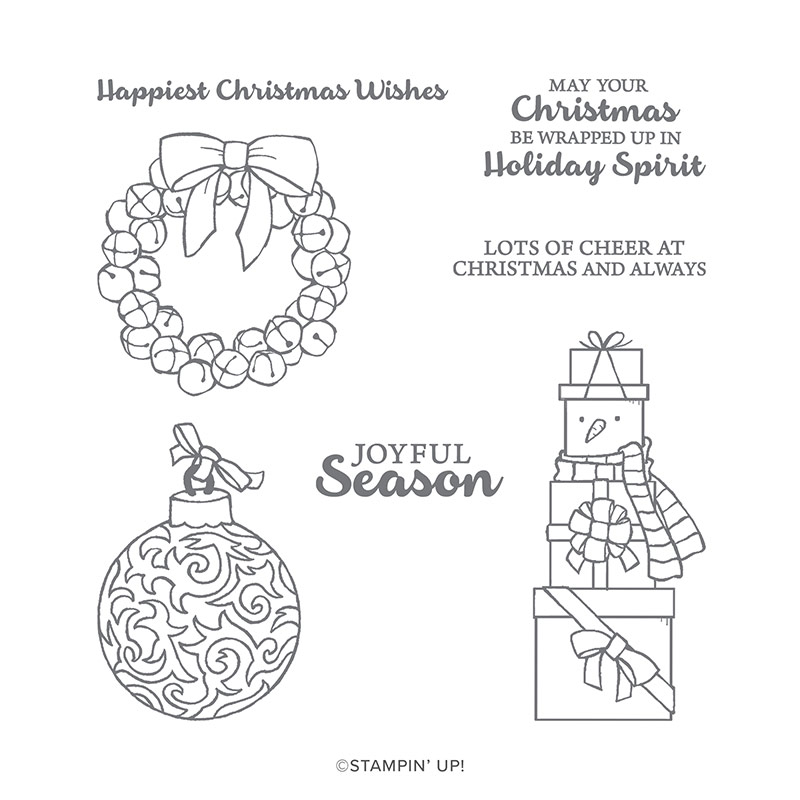
Lots of Cheer (Item #149503)
This set is new this year and is perfect if you're like me and love to colour!  Check out this simple fun-fold card I made...


For this card I pulled out my Noble Peacock Specialty DSP...it is so beautiful! The focal image is heat embossed in silver and then coloured using the Pretty Peacock Stampin' Blends combo, as well as Light Smokey Slate. I used the Stitched Shapes dies to die-cut the white oval and then the Layering Ovals dies to cut the scalloped silver foil oval mat.


The sentiment is stamped in Pretty Peacock ink. I added some gorgeous reversible ribbon and a couple Noble Peacock Rhinestones for extra shimmer and shine. I also added some clear Wink of Stella to the darker parts of the ornament, making it sooooo pretty!


On the inside I added a Whisper White layer, on which I stamped another sentiment from the Lots of Cheer set in Pretty Peacock ink and added a 1/2" strip of scrap DSP along the bottom edge.

I'll be demonstrating this card and two others using the Lots of Cheer stamp set in tomorrow's Tuesday Live @ Five video. I hope you'll join me, but if you can't, be sure to catch the replay on my YouTube channel or on the Video Tutorials tab above later in the week.

Thanks so much for stopping by today. Have a spectacular week...and merry Christmas (in July!)


Product List

Friday, September 1, 2017

Happy Holiday Catalogue!

 
The new 2017 Holiday Catalogue is here...wahoo! There is so much to love in this year's catalogue...truly something for everyone. I held my catalogue kick-off Bingo event last night and we had a blast! One lucky guest won TWO games and took home a ton of freebies! Each of my guests also received a cute little mini pizza box filled with various embellishments from the new catty. I topped each box with one of the ornaments from the new Be Merry project kit...they were super-cute and my guests loved them!


The ornaments in this kit are really quick and easy to put together and make perfect gift tags or toppers. They fit perfectly on the new Mini Pizza Boxes for easy treat packaging.

Now, as if the new catalogue weren't exciting enough, there is also a new host promotion starting as well! Can you say FREE EXCLUSIVE stamp set?? The Merry Patterns set is brand new and only available through this promotion. Check out this video to learn more:


Contact me today to book your card class or virtual stamping party. I would LOVE to help you earn this fabulous stamp set for free! Remember, this promotion is on for September and October, so book your event soon before my calendar fills up.

Now, are you ready for a project full of new products? Check this one out...

I have to say I actually gasped aloud when I first saw the new Year of Cheer Suite. I LOVE mixed metallics and the gorgeous papers and embellishments in that suite have my name all over them! To create this card I began with a piece of the Year of Cheer Specialty DSP. I used a stip of the new Champagne Foil Sheets for the vertical element, die-cutting the pattern along both edges with the Swirly Snowflakes Thinlits.

The sentiment is from the Watercolour Christmas stamp set and is heat embossed in copper. I used the Layering Ovals framelits to die-cut the sentiment as well as the copper foil scalloped oval behind it. Now, how about those little snowflake embellishments? I made them myself using the Dazzling Diamonds Glimmer Paper and Champagne Foil with the Swirly Snowflakes Thinlits. Aren't they fabulous?? The only other embellishment I used on this card were a couple of rhinestones in the centres of the snowflakes. I love being able to create DIY embellishments!

On the inside of the card, I heat embossed another sentiment from the Watercolour Christmas set and added a strip of Year of Cheer Specialty Washi Tape along the lower edge. Washi tape is a super-quick and easy way to show the inside of your cards some love!

Whew! This has been a long post...if you're still reading, thanks for sticking with me! Have a fabulous long weekend.


Product List
Heat Tool
[129053]
$40.00
Big Shot
[143263]
$136.00
Be Merry Kit
[144648]
$25.50

Tuesday, December 8, 2015

Peaceful Ornaments

So, are you ready for Christmas yet?  For the first time since...well, ever(!) I actually feel like I have a handle on things as we speed toward the big day. The house is decorated, the tree is up and I am almost done my shopping...I know...I can't believe it either!!
Last Saturday I held my team Christmas dinner as a small way of saying thank you to the amazing women with whom I have the privilege of sharing my Stampin' Up! journey. I wanted to give them a small keepsake, so I designed these ornaments for them to hang on their Christmas trees...

Christmas ornament featuring the Dove of Peace stamp set and the Christmas Greetings Thinlits.
I had several of these to make, so I needed to keep the design relatively simple. I found these little ornament frames at a local craft store and knew they would be perfect for what I wanted to do. I began by stamping the dove from the Dove of Peace set in Versamark ink and heat embossed it in gold. Then, because the opening in the frame was a 2" circle, I used my 2" Circle punch to punch out a portion of the embossed image. I removed the frame backing from the ornament, leaving only the plastic window. I used some of the long strips of dimensionals I had left over from the To You and Yours Shaker card kit to create a shaker frame for my ornament. I ended up having to cut the strips in half lengthwise so that they would be narrow enough not to show from the front of the ornament. I then added gold and silver sequins and stars from the Metallics Sequin Assortment before sealing my shaker with the punched 2" circles.

I added the die-cut sentiment, which I created using gold foil sheets and the Christmas Greetings Thinlit dies, by looping a piece of silver cording trim through the "p" in peace and then tying a bow. I removed the red ribbon that the ornament frame came with and added another length of silver cording trim with which to hang the ornament on the tree.
I have to say I am quite happy with the way these turned out...and my team were too.  I was so glad I could give them a small keepsake of the amazing year we have all had. Be sure to stop by tomorrow when I'll show you the cute little boxes I made to package and gift these ornaments in.  Till then, have a great day!

Here are the products I used to create this project:

Built for Free Using: My Stampin Blog
Related Posts Plugin for WordPress, Blogger...