 |
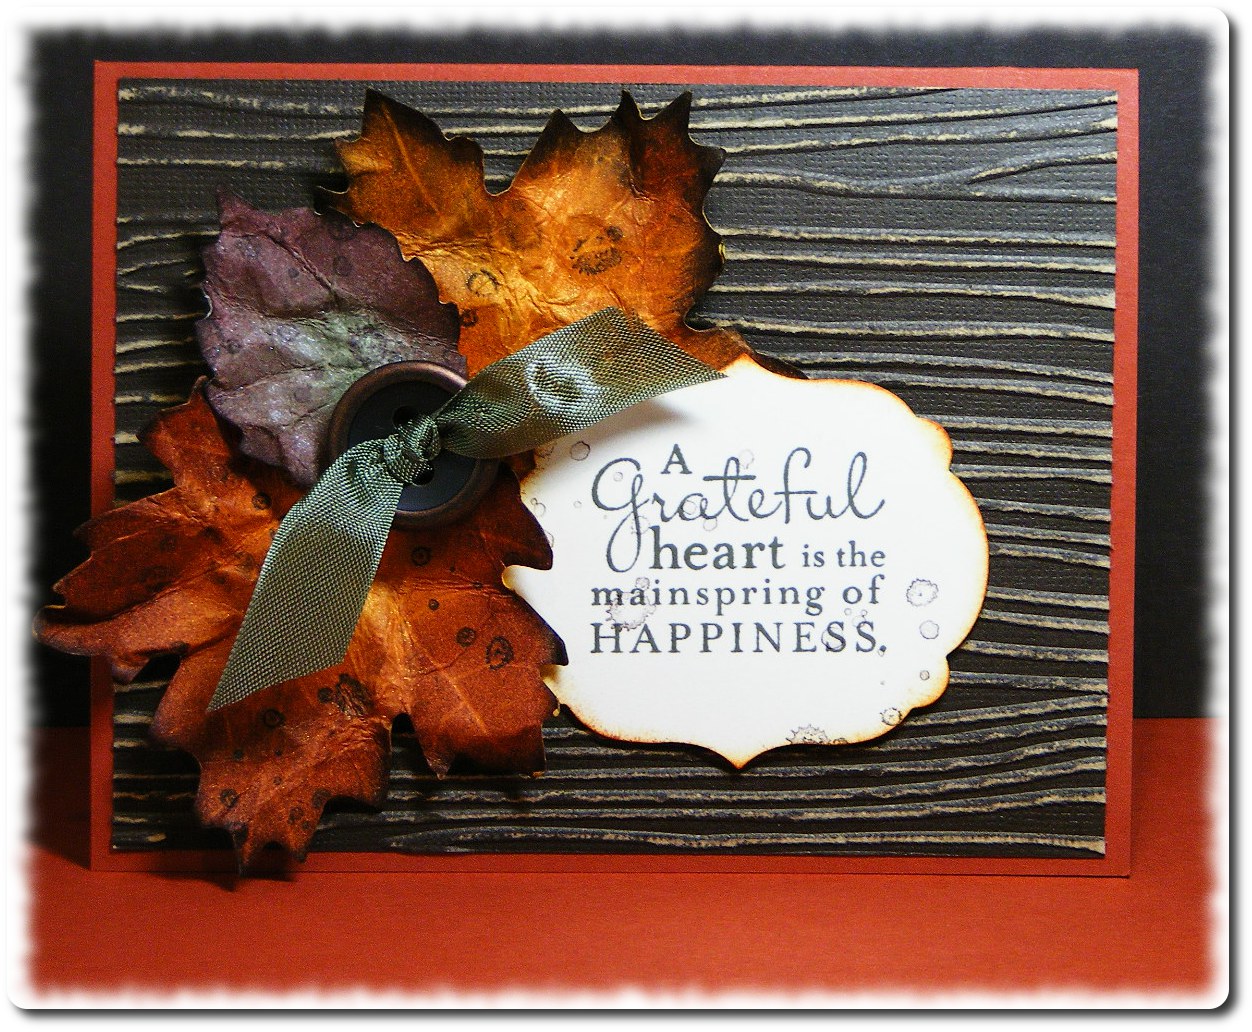
| Fall-inspired card featuring leaves made with the Autumn Accents die and sentiment from the Pursuit of Happiness set. |

Sharing my love of all things paper.
Showing posts with label Holiday Catalogue 2012. Show all posts
Showing posts with label Holiday Catalogue 2012. Show all posts
Wednesday, October 3, 2012
Still here!
I'm still here, in case you've been wondering! I'm just in crazy mode getting ready for my weekend at the Rockton Fair along with working, entertaining our Austrian visitors and holding my monthly Tri-City Stampers team meeting. I could use an extra 12 or so hours in every day this week! I do have something new to show you, though! This is a card I designed for one of the make-n-takes at our team meeting this week. Have a look:
Don't those leaves look real?!? They're not! They're just paper and ink and are really easy to make. Lots of sponging and some distressing and they're ready to go. I plan to do these with my monthly techniques group this month too...I just love them so much! If I get REALLY ambitious and can find a few free hours I'd love to make a wreath with theses leaves...we'll see...maybe I might get it done in time for NEXT fall! The rest of this card is pretty simple so that the leaves are the focal point. I did use the woodgrain TIEF and some Core'dinations cardstock for the bark effect on the background and I added a bit of seam binding ribbon in Always Artichoke that I threaded through one of the gorgeous brushed bronze buttons. Oh, how I love fall and the stunning colour...I'm so glad I was able to capture a little bit of if on this card!

Tuesday, September 18, 2012
Thanksgiving is Coming!
Are you ready? Here in Canada we celebrate Thanksgiving on the second Monday of October. This year, since October 1st is a Monday, our Thanksgiving Day is as early as it gets (October 8th)! Fellow Canuck, and Craft Project Central designer Tara Bourgoin has designed this lovely table setting sure to set the perfect backdrop for your holiday meal, whether in October or November!
Now wouldn't your turkey dinner look extra-yummy served on a table setting like this one? To access Tara's tutorial, visit Craft Project Central and subscribe to September. Better yet, book a class or party with me this month and I'll pay for your subscription for you! That's right, a free month's subscription is my way of saying thanks for hosting an event with me this month. Don't miss out...when September ends, so does this offer. Call or email to book your event today!
 |
| Thanksgiving Table Setting designed by Tara Bourgoin |
Sunday, September 16, 2012
Mummified Fun
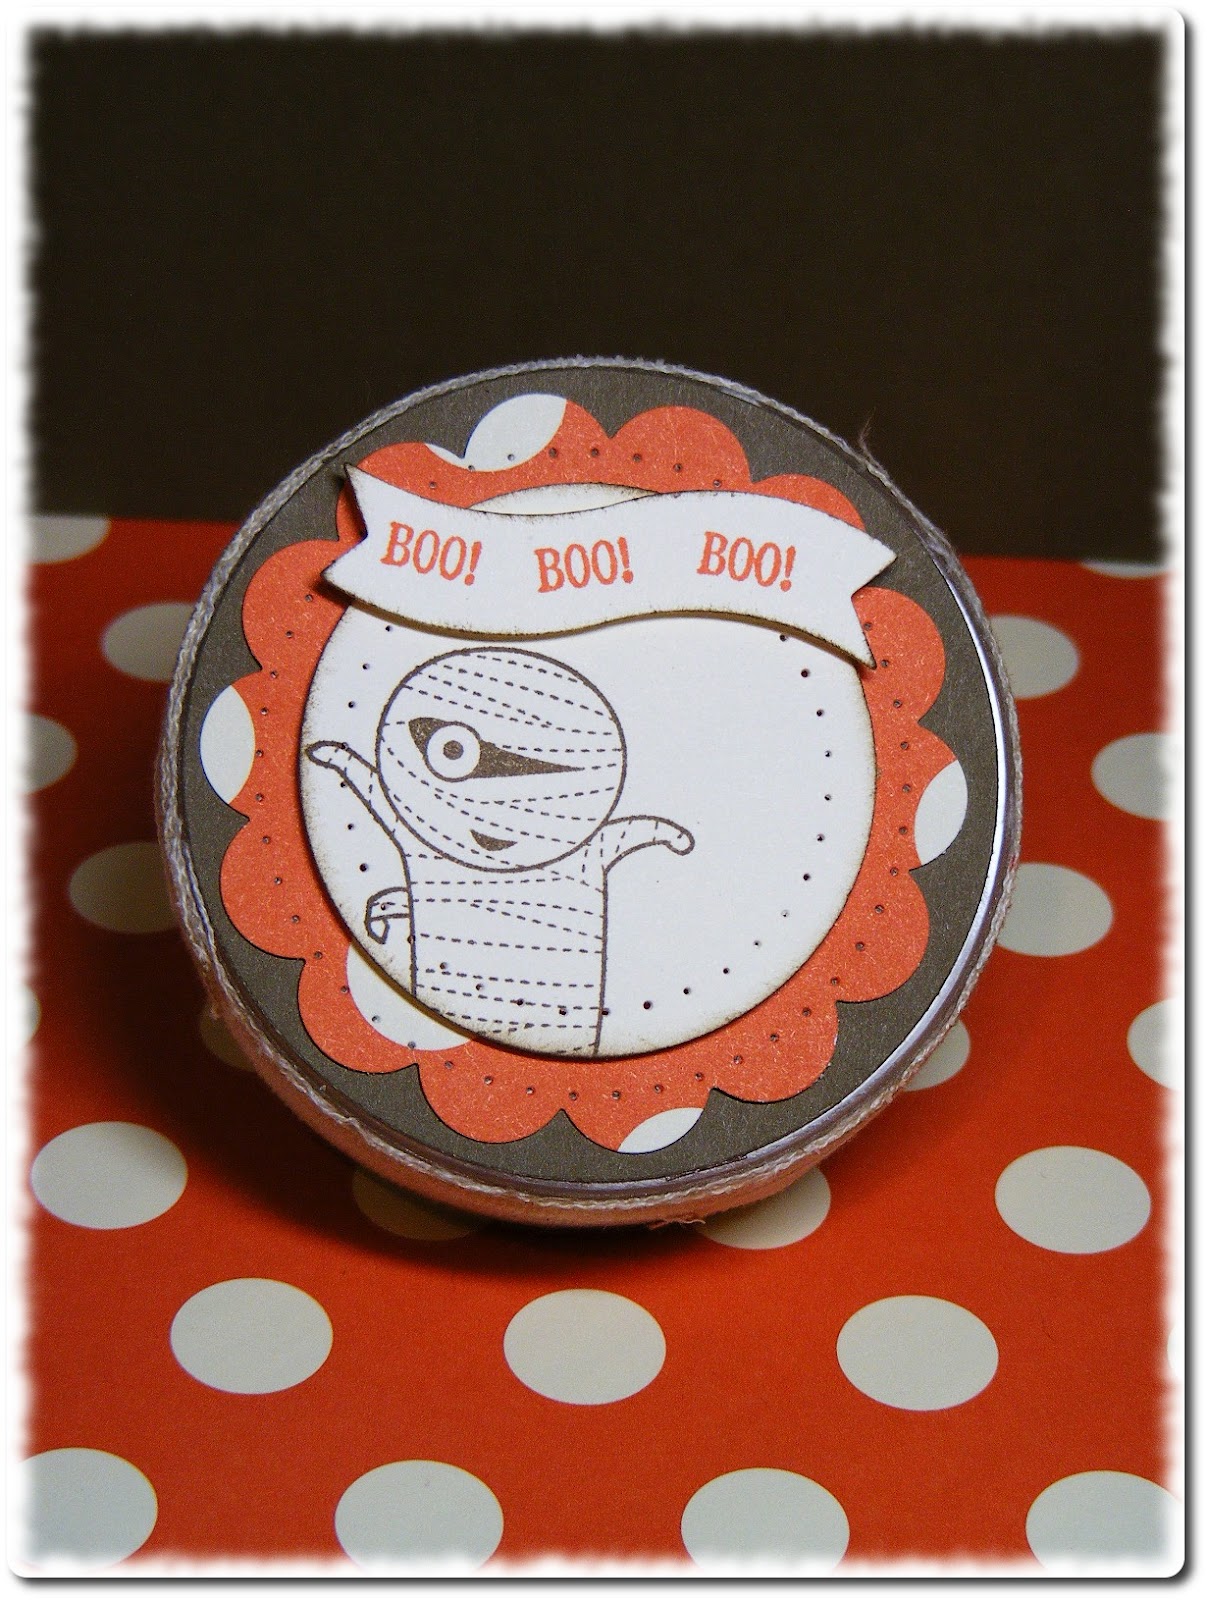
Happy Sunday morning everyone! I hope your weekend is going well. Our Austrian visitors arrived safe and sound yesterday and after a much-needed night's sleep last night we are preparing for my nephew's first birthday party. I can't believe he's already a year old...how time flies! I need to get busy this morning and make is birthday card, but first I want to show you this cute little Halloween ensemble I came up with a while back. Have a look:
I can't tell you how much I love that little mummy! He is just too cute and he inspired me to make this entire mummy-themed ensemble. I got extra mileage out of my 7/8" cotton ribbon by cutting it in half lengthwise. This made the edges more raw and frayed, perfect for the look I was going for, and allowed me to use far less of it than I would have if I'd used the full width. I had great fun with this project...why not give it a try? The little ghouls in your life will love it!
Now off to make a 1st birthday card! Stay tuned for photos!!
 | |
| Halloween Treat Ensemble featuring the Googly Ghouls stamp set. |
 |
| Card with faux stitching |
 |
| Inside View of Card |
 |
| Mini Treat Holder made with an up-cycled brad container |
 |
| Mummified Candy Box made using the Fancy Favour Box die and lots of 7/8" cotton ribbon! |
Now off to make a 1st birthday card! Stay tuned for photos!!
Friday, September 14, 2012
TGIF!
Happy Friday!! What a week this has been! Work has been so busy and I've had something on every night and am just so ready for the weekend. Unfortunately things aren't going to settle down much as we have family arriving from Austria tomorrow for a month-long visit and then my nephew's first birthday party on Sunday. Ah, it just never ends...I need more hours in the day...either that or the power to stop time!
Enough whining...on to the good stuff! Today I have a project to show you that I CASE'd from one of my fellow designers over at Craft Project Central to do as the make-n-take at my Tri-City Stampers team meeting this week. It is a fun-fold Halloween card....take a look:
Isn't that a fun fold? I love that little mummy peeking out the cut-out at the top of the card. The cool thing about this design is that it would be easy to tuck a little treat inside! Gotta love a card that doubles as a treat holder. The Googly Ghouls stamp set is just about the cutest thing ever! I am not a fan of the gory, blood-and-guts Halloween thing, but I do love fun, cute images and this set fits the bill. That little spider with the googly eyes is just adorable. I think I might have to find another use for him after Halloween is done...he's just too darned cute to only use at Halloween!
Have a great weekend...and check in tomorrow...I'll have another fun Halloween project for you!
Enough whining...on to the good stuff! Today I have a project to show you that I CASE'd from one of my fellow designers over at Craft Project Central to do as the make-n-take at my Tri-City Stampers team meeting this week. It is a fun-fold Halloween card....take a look:
 |
| Cute Halloween card featuring the Googly Ghouls stamp set and Howlstooth and Scarringbone DSP. |
 |
| Open the top flap... |
 |
| ...and then the bottom one to reveal the sentiment from Seasonal Sayings. |
Have a great weekend...and check in tomorrow...I'll have another fun Halloween project for you!
Thursday, August 30, 2012
Vintage Ornaments
Today's project is one I created just for the fun of it. How often do I get to do that??? It's pretty rare these days! I based the layout on this week's sketch challenge over at The Paper Players. Here's the sketch:
 And here is my just-for-fun card:
Pretty, huh? I have to say I haven't played with the Candlelight Christmas DSP much, but I really like the way it works on this card. I also simply adore the Core'dinations card stock...where has it been all my life?!? It adds such lovely, subtle texture to any project I use it on. To stamp the ornaments, I first inked the stamp with the base colour (Real Red for the large ornament and Lucky Limeade for the smaller ones) and then added Early Espresso around the edges with a sponge dauber. The result is dimension and the look of a soft, aged patina on each ornament. I popped up the large ornament with dimensionals and then doublde up the dimensionals for the two smaller ornaments. This really was a simple card to put together but I just love the result!
 |
| Vintage Christmas Card for PP110 featuring the Ornament Keepsakes stamp set with sentiment from More Merry Messages. |
 |
| Inside View |
Saturday, August 25, 2012
Step it Up
Today I want to show you a card that I based on one I showed you last week. I needed thank you cards to send to the ladies who participated in my recent swap so I took the basic design of this card and stepped it up a little.
Doesn't the change in the colour of the card base just take this to a whole new level?? I also love the added texture of the stamped leaves in the background. This card is the perfect example of what happens when you play with your designs. Don't be afraid to experiment with colour and texture...you may surprise yourself with the result!
Today I'll be heading home from the cottage and coming to grips with the reality that summer is nearly over. *sigh* The good news is that I've taken some stamping supplies with me and should have some fun projects to show you this week...stay tuned!
 |
| Fall Thank You card featuring the Friendship Preserves and Wonderfall stamp sets |
Today I'll be heading home from the cottage and coming to grips with the reality that summer is nearly over. *sigh* The good news is that I've taken some stamping supplies with me and should have some fun projects to show you this week...stay tuned!
Thursday, August 23, 2012
More Swap-spiration
While I am enjoying life by the lake for the week I have another couple of cards I received in a swap I recently hosted. I hope they inspire you as much as they have me...
Once again, I LOVE both of these cards! Steph's card is so creative in the way she used the Window Frames Framelits to create a window for her little ornaments to hang in...I also love that she used Core'dinations cardstock with the Vintage Wallpaper TIEF...gorgeous!
Tammie's card is just plain cute...but there's nothing plain about it! What you likely can't tell from the photo is that she used the Burnished Vellum technique to give the snowmen dimension and perfect snowy-white colour. I also love the little touches of Dazzling Details glitter she used for some subtle sparkle.
Sooooo....have you started thinking about your holiday crafting yet?? It's never too early to get started and finish before the chaos of the holiday season is upon us. Let's book your holiday card party today and get you started with some FREE stuff! I am now filling my fall calendar and it is getting busy already! Send me an email today to reserve your preferred date. I'll get back to you when I return from my northern sojourn this weekend.
 |
| Lovely Christmas card designed by Stephanie VanDorp and featuring the Merry Minis and Greetings of the Season stamp sets. |
 |
| Cute card designed by Tammie White and featuring the Frosty Friends A La Carte stamp with sentiment from Christmas Lodge |
Tammie's card is just plain cute...but there's nothing plain about it! What you likely can't tell from the photo is that she used the Burnished Vellum technique to give the snowmen dimension and perfect snowy-white colour. I also love the little touches of Dazzling Details glitter she used for some subtle sparkle.
Sooooo....have you started thinking about your holiday crafting yet?? It's never too early to get started and finish before the chaos of the holiday season is upon us. Let's book your holiday card party today and get you started with some FREE stuff! I am now filling my fall calendar and it is getting busy already! Send me an email today to reserve your preferred date. I'll get back to you when I return from my northern sojourn this weekend.
Wednesday, August 22, 2012
The best swap card...ever!
Today I want to show you an absolutely stunning card I received as part of a swap I recently hosted. This is, by far, the most beautiful swap card I have ever received...take a look and you'll see why!
Isn't that something?!? What is even more amazing is that this was Gail's first swap ever! All I can say is WOWZERS! All that fussy cutting and embossing...so elegant! I told Gail she was most welcome to join my swaps in the future!
 |
| Stunning Christmas card designed by Gail Lowe featuring the Watercolour Winter stamp set...note the beautifully stamped coordinating envelope! |
 |
| The inside is just as beautiful as the outside! |
Monday, August 13, 2012
A Winner and a Deer
Happy Monday everyone! I hope you had a wonderful weekend...we were busy as always around here. The To-Do list is gradually getting shorter in anticipation of our Austrian visitors next month. Today, as promised, I have the winner of the free month's subscription to Craft Project Central. So...without further ado...the winner is...
Congratulations! I'll be in touch about how to access your free subscription.
Now for some stamping! Today I have another Christmas card for you. It uses one of the new sets from the Annual Catalogue as well as some new products from the Holiday catty. Check it out:
Once again, I based the layout for this design on a sketch challenge but am too late to enter! I used last week's sketch over at Stamping 411. The sketch is pretty simple and so is this card. The background is the new Core'dinations card stock in Early Espresso, that I embossed with the new Lacy Brocade TIEF and then lightly sanded. I also used a bit of the new Candlelight Christmas DSP...so pretty! I added a bit of Cherry Cobbler seam binding ribbon and a glimmer brad for a bit of sparkle. Quick and easy...made even easier because the design work was already done...gotta love working from a sketch!
HOFKISSED
Congratulations! I'll be in touch about how to access your free subscription.
Now for some stamping! Today I have another Christmas card for you. It uses one of the new sets from the Annual Catalogue as well as some new products from the Holiday catty. Check it out:
 |
| Elegant Christmas card featuring the Christmas Deer stamp set with sentiment from Petite Pairs |
Sunday, August 12, 2012
Merry Minis
Ok...I think this is the most CAS card I have ever made. Ready for it? Here we go...
See what I mean? Couldn't be much more minimalist than this, right? I have to tell you I am still itching to stamp something on that naked background or add some DSP or ribbon or embossing or...something!?! But I am suppressing that urge and leaving it as-is. This layout was inspired by last week's sketch over at Retro Sketches, another challenge blog I recently discovered. I'm too late posting this to enter the challenge, but I wanted to be sure to give credit where it is due. So...whaddya think?? Not what you're used to seeing from me, right? I have to say, though, that I do rather like this cute little card. In fact, I'm considering using it for my swaps at Regionals next weekend. It does have all the requisite design elements: texture, dimension (the trees are popped up), and movement (the embossing carries the eye across the page to the focal images). I'm just having a really hard time looking at that expanse of naked Crumb Cake cardstock...breathe Leena, breathe. It will be ok...naked is good...well unless we're talking about ME naked...then its bad...very, very bad. Ahhh...the creative tension is killing me! I better end this post now and go make something with LOTS of layers...and ribbon...and DSP...and buttons...and brads...and...
Oh...before I go, I have to show you the latest project over at CPC. Check it out:
SO pretty! Love those flowers! Wouldn't this be lovely hanging on your front door this fall? I know it would look great on mine...and I could finally take down the Easter swags I've had up since April! I had better get busy...I need two for my double door! If you'd like the tutorial for this project, head over to Craft Project Central and subscribe to August. Then stop by Christy's blog and leave her some love. Then come back here and leave a comment on my insane ramblings so you're entered in my draw for a free month's subscription to CPC. I'm announcing the winner tomorrow. Got all that? Good...now have a great Sunday!
 |
| VERY CAS Christmas card featuring the Merry Minis stamp set with sentiment from Tiny Tags. |
Oh...before I go, I have to show you the latest project over at CPC. Check it out:
 |
| Comfort Cafe Wreath and Card designed by Christy Fulk |
Saturday, August 11, 2012
Freshly Made Fall
Happy Saturday everyone! I recently discovered another sketch challenge blog to add to my reading list. I know Freshly Made Sketches has been around for a while but I just discovered them! Here is this week's sketch followed by my take on it:

I really like this sketch...it is so versatile! I've already used it to create another thank you card design for a swap I am hosting. I can't post that one until I've sent out the swaps, but suffice to say this sketch made it easy! I took the liberty of adding the button element to my design, even though it isn't part of the sketch...you know how I feel about embellies! To stamp the focal image I inked up my stamp with More Mustard ink and then used a sponge dauber to add Cajun Craze around the edges. I love the way those two colours blend. Not sure it shows in the photo, but I used my new piercing template to add a pierced border on the Early Espresso mat behind the stamped image. A really easy way to add interest to any design. The background piece of DSP is embossed using the new Wood Grain TIEF...that one is fast-becoming a go-to design element for me. If you haven't purchased this one yet you NEED it!
On another note, there is just one more day left to enter my draw for a free month's subscription to Craft Project Central. Just leave a comment on any post dated August 5th -12th to enter. I will announce the winner on Monday. In the meantime, have a great weekend!!
 |
| Thank you card for FMS47 featuring the Friendship Preserves stamp set and Orchard Harvest DSP. |
On another note, there is just one more day left to enter my draw for a free month's subscription to Craft Project Central. Just leave a comment on any post dated August 5th -12th to enter. I will announce the winner on Monday. In the meantime, have a great weekend!!
Friday, August 10, 2012
A Bit Over the Top
Today's project is one that I most certainly wouldn't do in a class or workshop, but really like none-the-less. It is a wee bit too involved to do in a class setting but sometimes it's fun to just allow yourself to go a little embellishment happy. Have a look and you'll see what I mean...
Soooo...I kinda went a little crazy with the pearls. I just couldn't stop! Now, looking at it again, I probably should have...they are a bit much! There are a couple of things I do love about this card, though. Firstly, the music background. It is from the Natural Compositions specialty paper pack. The images come clear-embossed on a neutral brown background. I just sponged Cherry Cobbler ink all over to make the notes pop off the page...they almost look like they're embossed in gold! Very cool and so easy! The other element I love is the new scalloped tulle ribbon. Here I used the Crumb Cake version, but it is also available in Cherry Cobbler and Early Espresso. So soft and pretty...it adds a truly unique element to any design. Of course I also love the Evergreen stamp set. I just can't get enough of that set...you'll most definitely be seeing more of it in the coming months.
Now a couple of reminders...
Firstly, don't forget to enter my monthly draw for a free month's subscription to Craft Project Central. Just leave a comment on any post dated August 5th -12th. I will announce one lucky winner here on the 13th.
Secondly, there is just one more week to register for my Ornament Keepsakes Stamp Camp coming up at the end of the month. In case you missed it, here is a photo of the projects we'll be making:
All of the details for this event are listed HERE. Be sure to get in before the deadline...you won't want to miss this event!
 |
| Over-the-top Christmas card featuring the Evergreen stamp set. |
 |
| Inside View with sentiment from Greetings of the Season |
Now a couple of reminders...
Firstly, don't forget to enter my monthly draw for a free month's subscription to Craft Project Central. Just leave a comment on any post dated August 5th -12th. I will announce one lucky winner here on the 13th.
Secondly, there is just one more week to register for my Ornament Keepsakes Stamp Camp coming up at the end of the month. In case you missed it, here is a photo of the projects we'll be making:
 |
| Register by August 16th. Don't be disappointed! |
Tuesday, August 7, 2012
Cracked Ice for Christmas
What a crazy-busy weekend that was! We worked through our To-Do List in preparation for the arrival of two of my uncles and aunts from Austria in September. When you have family that live so far away a visit is a BIG deal, so we want our home in ship-shape. We're not quite there yet, but things certainly are looking better!
I spent a wee bit of time prepping for my monthly techniques class last week and came up with a look that I really like. I'm calling it Cracked Ice...check it out and you'll see why...
Isn't that a cool background?? Here is a quick explanation of how I did it:
Stamp the snowflakes on a 4"x 5-1/4" piece of clear acetate (I used Stampin' Up window sheets) using white Staz On. Once the ink has dried, flip the stamped acetate over and apply a thin coat of Crystal Effects all over the back side. Add several drops of Baja Breeze reinker and, using a paint brush, spread it out across the Crystal Effects, allowing it to swirl a little. Take a piece of white tissue paper, cut slightly larger than the acetate, and crumple it up. Uncrumple the tissue, leaving lots of wrinkles in it. Lay it over the inked Crystal Effects and lightly tap the tissue down into it. You want to make sure the tissue is pressed right into the glue and is even. Layer the whole thing on a 4-1/8" x 5-3/8" piece of Baja Breeze card stock and set it aside to dry. You can make up several background pieces at a time and allow them to dry so you have some ready to go for when inspiration strikes. I really love this technique...I hope my class participants do too!
Now for another project from this month's offerings at Craft Project Central. This adorable little ensemble comes to you from Monkia Davis. Check it out:
Isn't that too cute?!? Almost makes me wish I had a little girl to make this for, although I'm sure my son would love it too! To access the tutorial for this project subscribe to August over at Craft Project Central. You'll get 10 fabulous projects for just $10!!
This is also a quick reminder that I'm giving away a month's subscription to one of my lucky blog readers. To be entered in the draw simply leave a comment on any post dated between August 5th and 12th. I will post the winner on the 13th. It's that easy! Good luck!!
I spent a wee bit of time prepping for my monthly techniques class last week and came up with a look that I really like. I'm calling it Cracked Ice...check it out and you'll see why...
 |
| Frosty Christmas card featuring the Snowflake Serenad stamp set with sentiment from Sweet Essentials. |
 |
| A closer look |
Stamp the snowflakes on a 4"x 5-1/4" piece of clear acetate (I used Stampin' Up window sheets) using white Staz On. Once the ink has dried, flip the stamped acetate over and apply a thin coat of Crystal Effects all over the back side. Add several drops of Baja Breeze reinker and, using a paint brush, spread it out across the Crystal Effects, allowing it to swirl a little. Take a piece of white tissue paper, cut slightly larger than the acetate, and crumple it up. Uncrumple the tissue, leaving lots of wrinkles in it. Lay it over the inked Crystal Effects and lightly tap the tissue down into it. You want to make sure the tissue is pressed right into the glue and is even. Layer the whole thing on a 4-1/8" x 5-3/8" piece of Baja Breeze card stock and set it aside to dry. You can make up several background pieces at a time and allow them to dry so you have some ready to go for when inspiration strikes. I really love this technique...I hope my class participants do too!
Now for another project from this month's offerings at Craft Project Central. This adorable little ensemble comes to you from Monkia Davis. Check it out:
 |
| Ladybug Treat Box and Card designed by Monika Davis |
This is also a quick reminder that I'm giving away a month's subscription to one of my lucky blog readers. To be entered in the draw simply leave a comment on any post dated between August 5th and 12th. I will post the winner on the 13th. It's that easy! Good luck!!
Sunday, August 5, 2012
Perfect Fall Project and a Give-away!
Today I have another project for you from one of my fellow designers at Craft Project Central. This adorable little project is brought to you by Regina Andari. Check this out:
I simply adore this project! What a great little basket to present the note cards or even to hold a little gift. I love the use of the Core'dinations card stock...it adds so much interest to the basket. To access the tutorial for this project simply subscribe to August over at Craft Project Central. Be sure to also stop by Regina's blog to let her know how much you love her project!
Now, as happens every month I design a project for CPC, I get to give away a free month's subscription to all the creative goodness! So, beginning today until next Sunday, August 12th each comment left on any post dated from the 5th to the 12th will be entered into the drawing for the free subscription. I will announce the winner here on Monday, August 13th. Good luck!
 |
| Friendship Preserves Basket and Note Cards designed by Regina Andari. |
Now, as happens every month I design a project for CPC, I get to give away a free month's subscription to all the creative goodness! So, beginning today until next Sunday, August 12th each comment left on any post dated from the 5th to the 12th will be entered into the drawing for the free subscription. I will announce the winner here on Monday, August 13th. Good luck!
Saturday, August 4, 2012
One Layer for Fall
Today I have a SUPER simple card for you! I wanted to created something that used only the basics and I turned to the wonderful Wonderfall stamp set from the new Holiday Catty. Check it out:
So quick and easy! While I love adding layers and lots of embellies to my designs, sometimes it's fun to keep it CAS. I drew my color palette from the Orchard Harvest DSP in the Holiday Catty. I love the Wonderfall stamp set and all of the textured designs in the leaves. It makes it so easy to create visual interest. The sentiment is from the Day of Gratitude set and is cut out using the Apothecary Accents framelits. Now, I have had several questions about how to create the second layer, as I did with the Early Espresso mat behind the sentiment. I've done a couple of quick, free photo tutorials that show how I do it. Click the Tutorials tab and you'll find them. Have a terrific Saturday and if you're one of the lucky ones who have Monday off...enjoy the long weekend!
 |
| Single layer card featuring the Wonderfall stamp set with sentiment from Day of Gratitude. |
 |
| Inside view |
Friday, August 3, 2012
And now back to Christmas!
After a brief venture into Fall yesterday, today I'm back with another Christmas card. The moment I saw the new Lacy Brocade TIEF in the Holiday catty I was dying to see what it looked like used with the Faux Patina technique. I knew it would be gorgeous...and I was right! Check this out:
Isn't that stunning?!? I love the way the embossed pattern almost pops off the page with this technique! Faux Patina lovers, you MUST GET this folder! Now, to stamp the ornaments, I couldn't just do plain single-colour stamping with a background like that; so I inked the stamp with Marina Mist and then daubed Always Artichoke around the edges using a sponge dauber. By the way, both of those colours are ones I used for the Faux Patina technique. I cut the ornaments out with my Holiday Ornaments Framelits, added a bit of linen thread and some pearls and viola...easy, elegant Christmas card!
If you like this card and would like to get your hands on the Ornaments Keepsake stamp set, check out my Events page for details on my Ornament Keepsakes Stamp Camp coming up at the end of the month. You won't want to miss the FOUR beautiful 3D projects I have planned. Since seating is limited, you'll want to reserve your spot ASAP. Don't be disappointed!
Now for the REALLY big news! I'm an Auntie again! Check this little angel out:
My newest nephew was born just after 9:00 Thursday morning weighing in at a whopping 9lbs, 6oz! My SIL and little Matthew are doing great. We seem to make big boys in our family! We've got all boys and everyone of them was over 9lbs when he was born! That might explain why all the moms have C-section scars!! A HUGE congratulations to Donna, Rob and big brother Michael...Matthew truly is a miracle!
 |
| Faux Patina Christmas card featuring the Ornament Keepsakes and Greetings of the Season stamp sets. |
If you like this card and would like to get your hands on the Ornaments Keepsake stamp set, check out my Events page for details on my Ornament Keepsakes Stamp Camp coming up at the end of the month. You won't want to miss the FOUR beautiful 3D projects I have planned. Since seating is limited, you'll want to reserve your spot ASAP. Don't be disappointed!
Now for the REALLY big news! I'm an Auntie again! Check this little angel out:
 |
| Happy Birthday baby Matthew! |
Thursday, August 2, 2012
Let's not get ahead of ourselves...
While it has been great fun previewing all of the Christmas crafting options in the Holiday catty with you during my Twelve Days of Christmas (in July!) series, I want to make sure we don't get too far ahead of ourselves and forget about my favourite season of all: FALL! While Fall means back to school (and back to work for me!) it also means colourful leaves, crisp air and fresh apples. I love fall colours and actually got married in the fall just so I could take advantage of the beautiful backdrop Nature provides. Today I have a project that features some of the wonderful new Fall-themed products from the Holiday Catty...check it out:
This is a card I literally whipped up in 10 minutes. It took no time at all, thanks to the wonderful new products I used. The leaves were die-cut using the new Autumn Accents die, the background was embossed using the new Woodgrain TIEF and Early Espresso Core'dinations CS, and the focal image was stamped and die-cut using the Friendship Preserves bundle. Talk about quick and easy! All of these fantastic new products are now available in the Holiday Catalogue...some are even discounted when you purchase as a bundle! The Friendship Preserves bundle includes the stamp set and the new Window Frames Collection Framelits at 15% off the individual price! Gotta love that! If you still don't have a copy of the Holiday Catalogue, send me a quick email and I'll get one out to you absolutely free!
 |
| Simple Fall thank you card featuring the Friendship Preserves stamp set and Orchard Harvest DSP |
Wednesday, August 1, 2012
Twelve Days of Christmas Day 12
Merry Christmas everyone!! I always feel like the launch of the new Holiday Catalogue is like Christmas...so many new toys to play with! In honour of the big day I have a special project to show you. The very first thing that caught my attention when I first laid eyes on the new Holiday catty is the beautiful ornament on the front cover. It is simply stunning and I knew I just HAD to make one! So...here is my version:
I decided to try a neutral palette, thinking it might work with a variety of Holiday colour schemes. I also changed up the ornament shapes used, just to be different. I am quite pleased with the result. Now, before you all email me asking when I'm offering a class on these ornaments, let me warn you...they are A LOT of work! Each petal requires three stamped and die-cut ornaments for a total of 15 on each layer. That's a lot of stamping and cutting, but SO worth the effort. Given the amount of work involved I've designed a simpler version, similar to those on page 3 of the Holiday catalogue that we'll be making as part of my Ornament Keepsakes stamp camp event on August 26th. You can view photos and event details HERE. If you just aren't satisfied with the simpler version I will be writing a tutorial on how to create the deluxe version in the near future...stay tuned! Now, as always, here is the complete list of products used in the creation of this project...*Starred items are available TODAY from the Holiday Catalogue!
*Ornament Keepsakes Bundle (includes stamp set and coordinating Framelits) (CM129950, WM 129949) pg. 3
Very Vanilla CS (101650)
*Champagne Glimmer Paper (127885) pg. 18
Early Espresso ink pad (126974)
Crumb Cake ink pad (126975)
*Crumb Cake 3-1/2" Scalloped Tulle ribbon (127840) pg. 4
Big Shot (113439)
Vintage Faceted Designer buttons (127555)
Victoria 5/8" Crochet trim (118481)
Very Vanilla Seam Binding ribbon (120999)
Rhinestone Basic Jewels (119246)
Today is also the day I get to show you my project for this month over at Craft Project Central! I designed this for my son to take on his first day of Kindergarten. Check it out:
This set includes a note pad/pencil holder set and card for the teacher as well as cute pencil toppers for your child's new classmates. If you are local, check out my Upcoming Events tab for information about a Mommy-and-Me class I am offering that will include everything pictured in the photo. If you aren't in the Cambridge area, you can access the tutorial for this project by subscribing to August over at Craft Project Central.
Now for some more news. Later today I will be sending out my August Newsletter and in it there will be a special CODE WORD. When you see it, remember it! Next week I will be calling everyone on my mailing list to book holiday card parties and private classes in an effort to set my schedule for the fall and get everyone started early enough to actually send their cards this year! When I call I will be asking if you know the CODE WORD...if you do, you will WIN A FREE CATALOGUE ITEM valued at up to $10 when you book and hold a party or private class in the months of August, September, October or November. Remember, these events can be in your home or in mine with a minimum of 3 guests, in addition to yourself. Plus, if your guests place orders, you'll also receive more FREE PRODUCT as part of Stampin' Up's Hostess Benefit program. So, watch for my newsletter and start thinking about dates for your event and I'll talk to you next week!
Not on my mailing list? Click the EMAIL ME button in the right side-bar to request a copy of this month's Newsletter.
 | ||
| CASE of Holiday Catalogue cover featuring the Ornament Keepsakes stamp set |
*Ornament Keepsakes Bundle (includes stamp set and coordinating Framelits) (CM129950, WM 129949) pg. 3
Very Vanilla CS (101650)
*Champagne Glimmer Paper (127885) pg. 18
Early Espresso ink pad (126974)
Crumb Cake ink pad (126975)
*Crumb Cake 3-1/2" Scalloped Tulle ribbon (127840) pg. 4
Big Shot (113439)
Vintage Faceted Designer buttons (127555)
Victoria 5/8" Crochet trim (118481)
Very Vanilla Seam Binding ribbon (120999)
Rhinestone Basic Jewels (119246)
Today is also the day I get to show you my project for this month over at Craft Project Central! I designed this for my son to take on his first day of Kindergarten. Check it out:
 |
| First Day of School Gift set featuring Storytime DSP |
Now for some more news. Later today I will be sending out my August Newsletter and in it there will be a special CODE WORD. When you see it, remember it! Next week I will be calling everyone on my mailing list to book holiday card parties and private classes in an effort to set my schedule for the fall and get everyone started early enough to actually send their cards this year! When I call I will be asking if you know the CODE WORD...if you do, you will WIN A FREE CATALOGUE ITEM valued at up to $10 when you book and hold a party or private class in the months of August, September, October or November. Remember, these events can be in your home or in mine with a minimum of 3 guests, in addition to yourself. Plus, if your guests place orders, you'll also receive more FREE PRODUCT as part of Stampin' Up's Hostess Benefit program. So, watch for my newsletter and start thinking about dates for your event and I'll talk to you next week!
Not on my mailing list? Click the EMAIL ME button in the right side-bar to request a copy of this month's Newsletter.
Tuesday, July 31, 2012
Twelve Days of Christmas (in July!) Day 11
Can you feel the excitement?? Only one more sleep till the new Holiday Catalogue goes live!! Today I have something a little different for you. This card uses both new and old items, as well as something a little unexpected. Check it out!
Surprised? I used the globe image from the Open Sea set as the background for the sentiment. I think it works rather well and I am always thrilled when I find new uses for a stamp set I love. The other feature that helps make this card is the Holiday Frame TIEF. It really sets off the focal image so nicely. It is a gorgeous pattern and NOT just for the holidays! Here is the complete list of products used on this project. Starred items are available TOMORROW!!
The Open Sea (CM 123032, WM 123030)
*Greetings of the Season (CM 128033, WM 128030) pg. 8
Whisper White CS (100730)
Pool Party CS (122924)
Silver Glimmer Paper (124005)
Pool Party ink pad (126982)
Island Indigo ink pad (126986)
*Holiday Frame TIEF (127820) pg. 7
Big Shot (113439)
Pool Party Seam Binding ribbon (125582)
Vintage Faceted Designer buttons (127555)
If you've been enjoying this series, you're going to LOVE my Holiday kick-off event! Check out my Upcoming Events page for details about my Ornament Keepsakes Stamp Camp happening at the end of August. It will be SUPER fun (I sound like my 5-year-old there!) and will definitely get you going on your holiday crafting. Here is a photo of the projects we'll be making:
The best part is that in addition to leaving with 4 completed projects, you'll also get to keep your stamp set! Call or email for additional information or to register.
I'll be back tomorrow to celebrate the final day of the Twelve Days of Christmas and the launch of the new Holiday Catalogue...see you then!
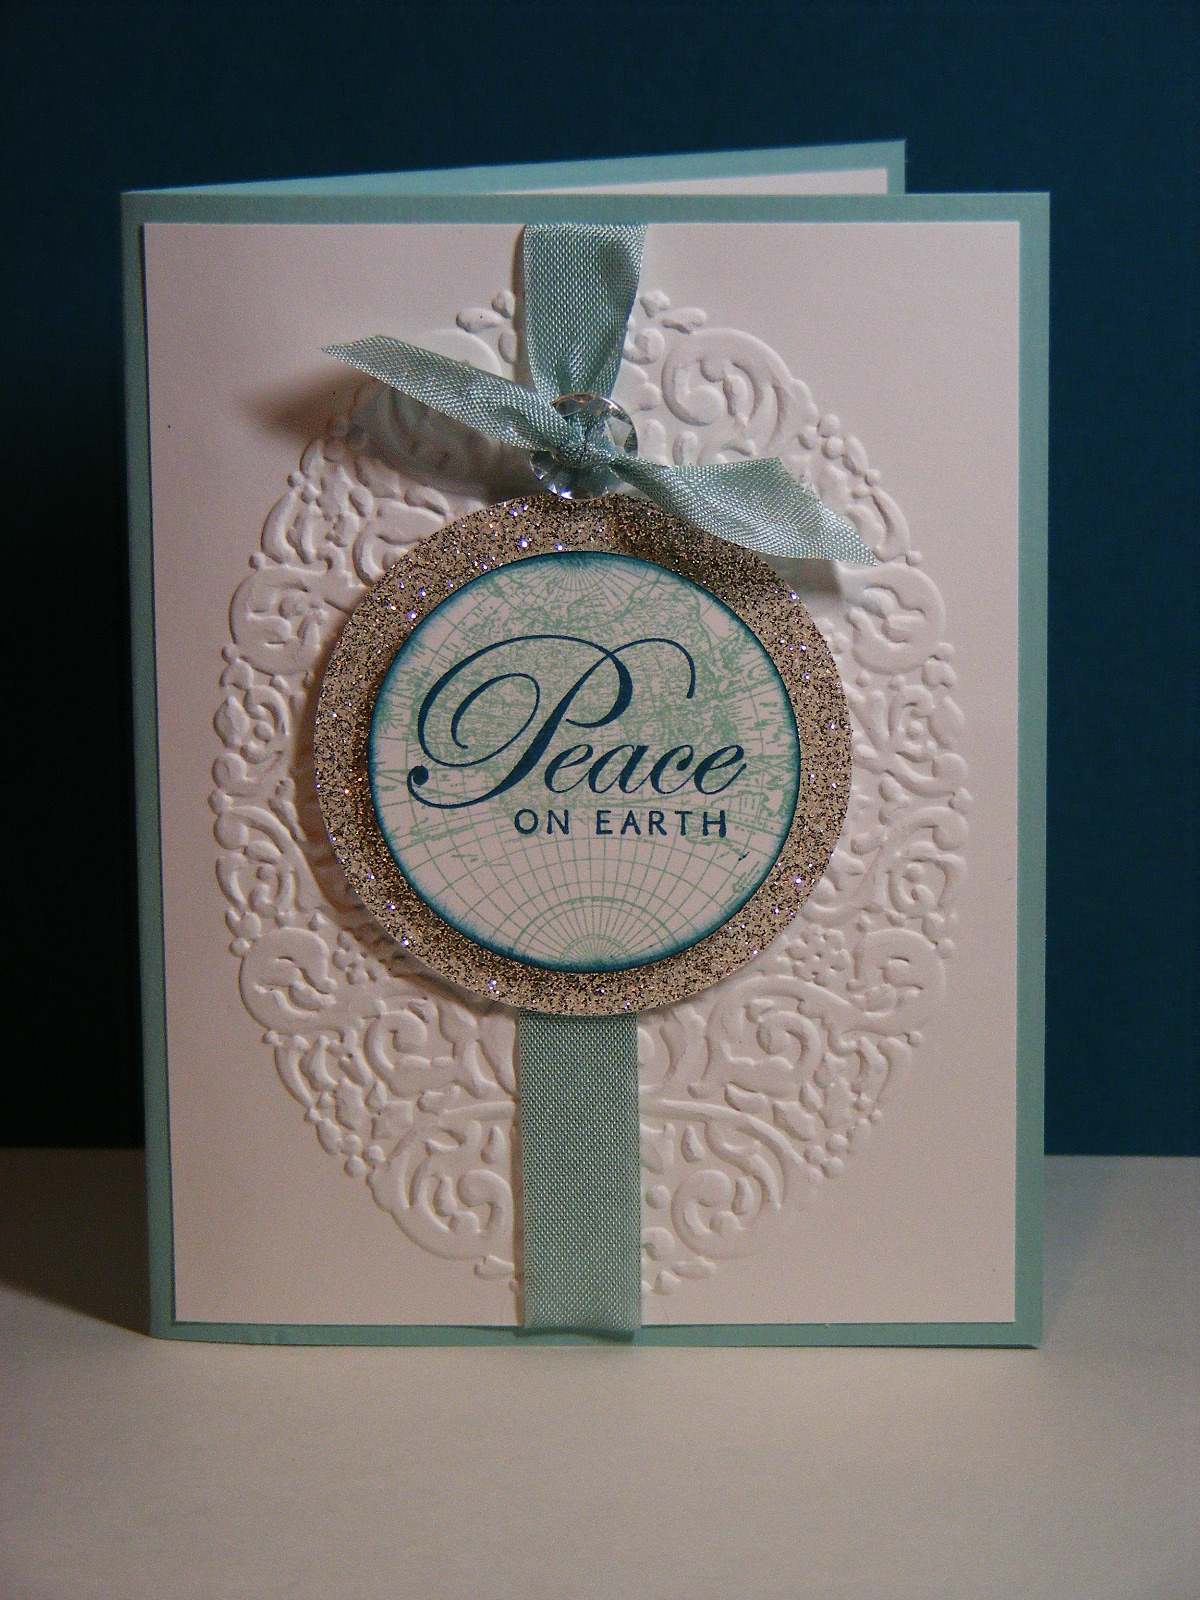 |
| 12 Days of Christmas Day 11 featuring the Open Sea and Greetings of the Season stamp sets. |
The Open Sea (CM 123032, WM 123030)
*Greetings of the Season (CM 128033, WM 128030) pg. 8
Whisper White CS (100730)
Pool Party CS (122924)
Silver Glimmer Paper (124005)
Pool Party ink pad (126982)
Island Indigo ink pad (126986)
*Holiday Frame TIEF (127820) pg. 7
Big Shot (113439)
Pool Party Seam Binding ribbon (125582)
Vintage Faceted Designer buttons (127555)
If you've been enjoying this series, you're going to LOVE my Holiday kick-off event! Check out my Upcoming Events page for details about my Ornament Keepsakes Stamp Camp happening at the end of August. It will be SUPER fun (I sound like my 5-year-old there!) and will definitely get you going on your holiday crafting. Here is a photo of the projects we'll be making:
 |
| Ornament Keepsakes Stamp Camp Projects |
The best part is that in addition to leaving with 4 completed projects, you'll also get to keep your stamp set! Call or email for additional information or to register.
I'll be back tomorrow to celebrate the final day of the Twelve Days of Christmas and the launch of the new Holiday Catalogue...see you then!
Monday, July 30, 2012
Twelve Days of Christmas (in July!) Day 10
Today I have another card for you that uses more fabulous new products from the Holiday Catalogue. That fantastic new book goes live on Wednesday and I am SO excited! There are so many wonderful items to make your holiday crafting simply spectacular! Here is today's project:
Cute, huh? I love the new Scentsational Season stamp set and coordinating Framelits! I love them even more because I got them for 60% off retail! Just one of the many fabulous perks of being a Stampin' Up! demonstrator! Anyhow...I digress! This card is even better because it SMELLS as yummy as it looks! Those candy canes are embossed with the new peppermint scented embossing powder! Talk about a whole lot to love! The best part is that all of these products will be available in just two more days when the Holiday Catalogue goes live. To help you get started on your wishlist, here is the list of products used to create this card. *Starred items are from the Holiday Catalogue.
*Scentsational Season (CM 121190, WM 121026) pg. 16
Tiny Tags (CM 118592, WM 118091)
More Merry Messages (CM 126402 WM 126400)
*Snow Festival DSP (126908) pg. 10
Gumball Green CS (126840)
Cherry Cobbler CS (119685)
Whisper White CS (100730)
Cherry Cobbler ink pad (126966)
Gumball Green ink pad (126855)
Soft Suede ink pad (126978)
Versamark ink pad (102283)
Cherry Cobbler Scalloped Dots ribbon (124138)
Cherry Cobbler Baker's Twine (123125)
Neutrals Designer Buttons (119743)
*Peppermint Sticks scented embossing powder ( 127830) pg. 16
Heat Tool (129053)
Dotted Scallop Ribbon punch (119275)
Jewelry Tag punch (117190)
Big Shot (113439)
Perfect Polka Dots TIEF (117335)
Adorning Accents Edgelits (125595)
Adorning Accents TIEF (125601)
I am super excited that my 5-year-old is going to camp every morning this week! That means some quality stamping time for Mommy! Don't get me wrong...I love my son to pieces...but it's hard to get much accomplished when he's around. He wants to "help" which is wonderful, but not overly conducive to quality results! I can't wait to ink up some of my other Holiday goodies!!
 |
| 12 Days of Christmas in July Day 10 featuring the Scentsational Season stamp set and Snow Festival DSP |
 |
| Inside view with sentiments from More Merry Messages. |
*Scentsational Season (CM 121190, WM 121026) pg. 16
Tiny Tags (CM 118592, WM 118091)
More Merry Messages (CM 126402 WM 126400)
*Snow Festival DSP (126908) pg. 10
Gumball Green CS (126840)
Cherry Cobbler CS (119685)
Whisper White CS (100730)
Cherry Cobbler ink pad (126966)
Gumball Green ink pad (126855)
Soft Suede ink pad (126978)
Versamark ink pad (102283)
Cherry Cobbler Scalloped Dots ribbon (124138)
Cherry Cobbler Baker's Twine (123125)
Neutrals Designer Buttons (119743)
*Peppermint Sticks scented embossing powder ( 127830) pg. 16
Heat Tool (129053)
Dotted Scallop Ribbon punch (119275)
Jewelry Tag punch (117190)
Big Shot (113439)
Perfect Polka Dots TIEF (117335)
Adorning Accents Edgelits (125595)
Adorning Accents TIEF (125601)
I am super excited that my 5-year-old is going to camp every morning this week! That means some quality stamping time for Mommy! Don't get me wrong...I love my son to pieces...but it's hard to get much accomplished when he's around. He wants to "help" which is wonderful, but not overly conducive to quality results! I can't wait to ink up some of my other Holiday goodies!!
Subscribe to:
Posts (Atom)
