Showing posts with label Shaving Cream technique. Show all posts

Thursday, August 28, 2014

Today is the day!

Today is a BIG day!  Not only does the Holiday Catalogue go live, but it is also my first challenge as a  Guest Designer for Just Add Ink!  I am so happy to be counted among such a talented group of artists!  So, without further ado, here is this week's challenge:

JAI 229


...and here is my project...inspired by the last fleeting days of summer:

Birthday card featuring the Shaving Cream technique and sentiment from the Yippee Skippee stamp set.
The minute I saw that yummy-looking inspiration photo I thought of the Shaving Cream technique!  Those marbled swirls of colour were exactly what I was going for.  I used Tempting Turquoise, Daffodil Delight, Melon Mambo and Perfect Plum reinkers in my shaving cream.  I love the way it turned out!  I die cut three scoops of ice cream (really they're the thought cloud from the Word Bubbles Framelits).  The cone was punched from Baked Brown Sugar card stock using the new Tree Punch from the Holiday Catty and embossed using the Tiny Triangles TIEF.  Once I had assembled my triple scoop ice cream cone I covered the ice cream with Crystal Effects and left it to dry over night.  It gives my ice cream a great sheen...like it's melting and waiting to be licked!


The background layer is embossed with the Decorative Dots TIEF.  I added several scraps of ribbon for even more texture and colour as well as some Candy Dots in Melon Mambo, Tempting Turquoise and Daffodil Delight.  I layered it on a Melon Mambo mat and then a Daffodil Delight card base.
The sentiment is from the Yippee Skippee stamp set and is perfect for this card...after all, what's happier than ice cream??  I die cut the sentiment using the Labels Collection Framelits and layered it on a Tempting Turquoise label cut with the Deco Labels Framelits.


On the inside I added more scraps of ribbon for a faux-banner and stamped the sentiment from Sassy Salutations in black.

Such a fun and happy card...what a great salute to the end of summer!  I'd love to see your interpretation of the inspiration photo, so play along and be sure to post a photo of your creation HERE.

Today is also the LAST DAY to take advantage of the extra $65 in product in the Demonstrator starter kit.
Last chance to get $65 in free product!


Until midnight tonight you get to choose $190 worth of products of your choice for just $125, no shipping and no tax!  I'd love to have you join my Tri-City Stampers team.  To order your kit click HERE

Monday, March 24, 2014

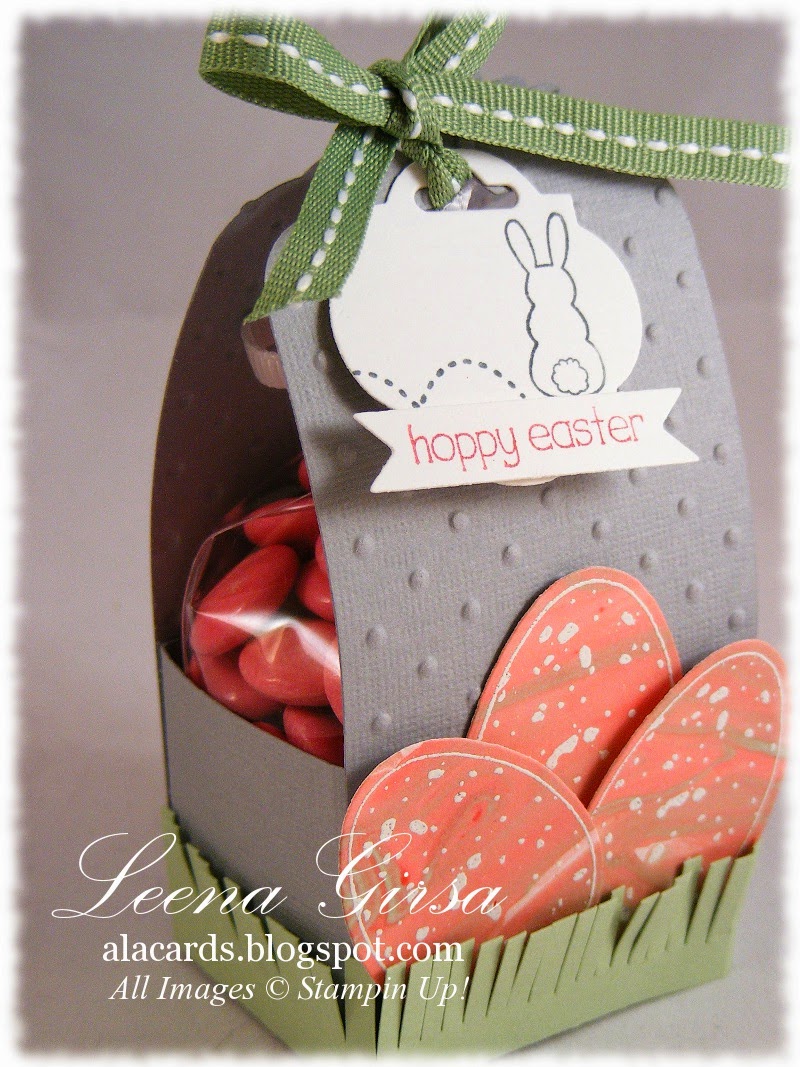
Shaving Cream Eggs

Well, long time no see, huh?  The past few days have been a whirlwind.  My DH's aunt passed away early last week and we had the visitation and funeral this weekend.  I have had little time to think about stamping, but I do want to show you another project I did for this week's challenge at The Technique Twist.  We are all about the shaving cream background technique this time around and I decided it was the perfect look for Easter Eggs.  Check them out:

Easter treat holder made using the Scalloped Tag Topper punch and featuring the Shaving Cream background technique.

Aren't those eggs fabulous??  I love the marbled effect achieved with the Shaving Cream technique!  I created the look following the steps I outlined HERE and then stamped the egg from the Backyard Basics stamp set in Versamark and heat embossed in white.  I then die cut the eggs using the coordinating Backyard Basics Framelits.  Perfect Easter Eggs! 


I added a little strip of Pistachio Pudding grass that I fringed with my paper snips (my Fringe Scissors are on their way!) and nestled the eggs amongst it.


The little tag is stamped with the Eggstra Spectacular stamp set and then die cut using the Window Frames and Bitty Banners Framelits.  I tied the treat holder closed with a piece of Wild Wasabi stitched grosgrain ribbon.  A quick and easy treat holder sure to make anyone smile.  I think I may just do one for each of the teachers at my son's school just to let them know how much they are appreciated!

I'm sorry I've been neglecting my blog of late.  Sometimes life just gets in the way of the things we want to do.  Between flooded stamp spaces and dying relatives there hasn't been a whole lot of time for fun!  Hopefully this week will be much less eventful and I can get back to putting rubber to ink.  In the meantime, have a great week!

Saturday, March 15, 2014

Messy fun!

Happy Saturday!!  Normally I'd be ecstatic about the weekend's arrival, however the weekend at the end of a week of holidays?  Not so much!  Back to work on Monday I go :(

Here's a little something to get your crafting Mojo working this weekend.  It is time for a new challenge over at The Technique Twist and this time we are all about getting messy with shaving cream!  I did this technique with my monthly group this past week and it was such fun!  Here is the card I designed for the challenge, which we also made at my class:

Thinking of you card featuring the Shaving Cream Background technique and using the Hello Lovely, Petite Petals, Flower Shop and Gorgeous Grunge stamp sets
I love the way this one turned out!  It is so pretty and girlie and just plain yummy!  I am so loving all the trendy gold that is turning up these days, so I decided to embrace it on this card.  Here is how I put this together:
  • To create the marbled background, I started by squirting shaving cream (don't use gel...it doesn't work so well) onto a disposable plate.  I smoothed it out and then added several drops of Strawberry Slush and Crisp Cantaloupe reinker.  I swirled the ink around into the shaving cream, taking care not to over mix it so that I could still see the two distinct colours.  I laid my card stock down into the shaving cream and pressed it down to make sure I picked up as much colour as possible.  I removed the card stock and wiped off the shaving cream in a circular motion to reveal the marbled colour beneath.  So messy, but so very cool!!
  • The gold doily is simply one of the white Tea Lace Doilies that I inked completely with Versamark and then heat embossed in gold...such an easy way to get a golden gilded doily!
  • The sentiment is heat embossed in gold and punched with the Decorative Label punch.
  • The flowers are stamped in Strawberry Slush and punched with the Pansy (large) and Petitie Petals (small) punches.  I added a little touch of gold to each flower by inking the edges with Versamark and then heat embossing in gold.
  • Once the marbled background piece was dry I stamped it using the Gorgeous Grunge stamp set and Metallic Gold Encore ink.

On the inside, I stamped a few more flowers in the lower right corner.  The sentiment is from the Best of Greetings stamp set (only available till March 31st...get it now!), stamped in Strawberry Slush and punched with the Decorative Label punch.  I added a punched flower and adhered it with dimensionals.


So, are you ready to get messy this weekend?  Get out the shaving cream and have some fun!  Then be sure to link up over at The Technique Twist so we can all see your fabulous creation! 
Related Posts Plugin for WordPress, Blogger...