Showing posts with label Festive Flurry stamp set. Show all posts

Sunday, October 5, 2014

Flurries of Joy

Happy Belated-World Cardmaking Day!  I was so busy with papercrafting events yesterday I had no time to post, but I sure do have LOTS to share with you!
First of all, I have a new project for you that I designed for our new sketch challenge over at Sunday Stamps.  Here is the sketch:


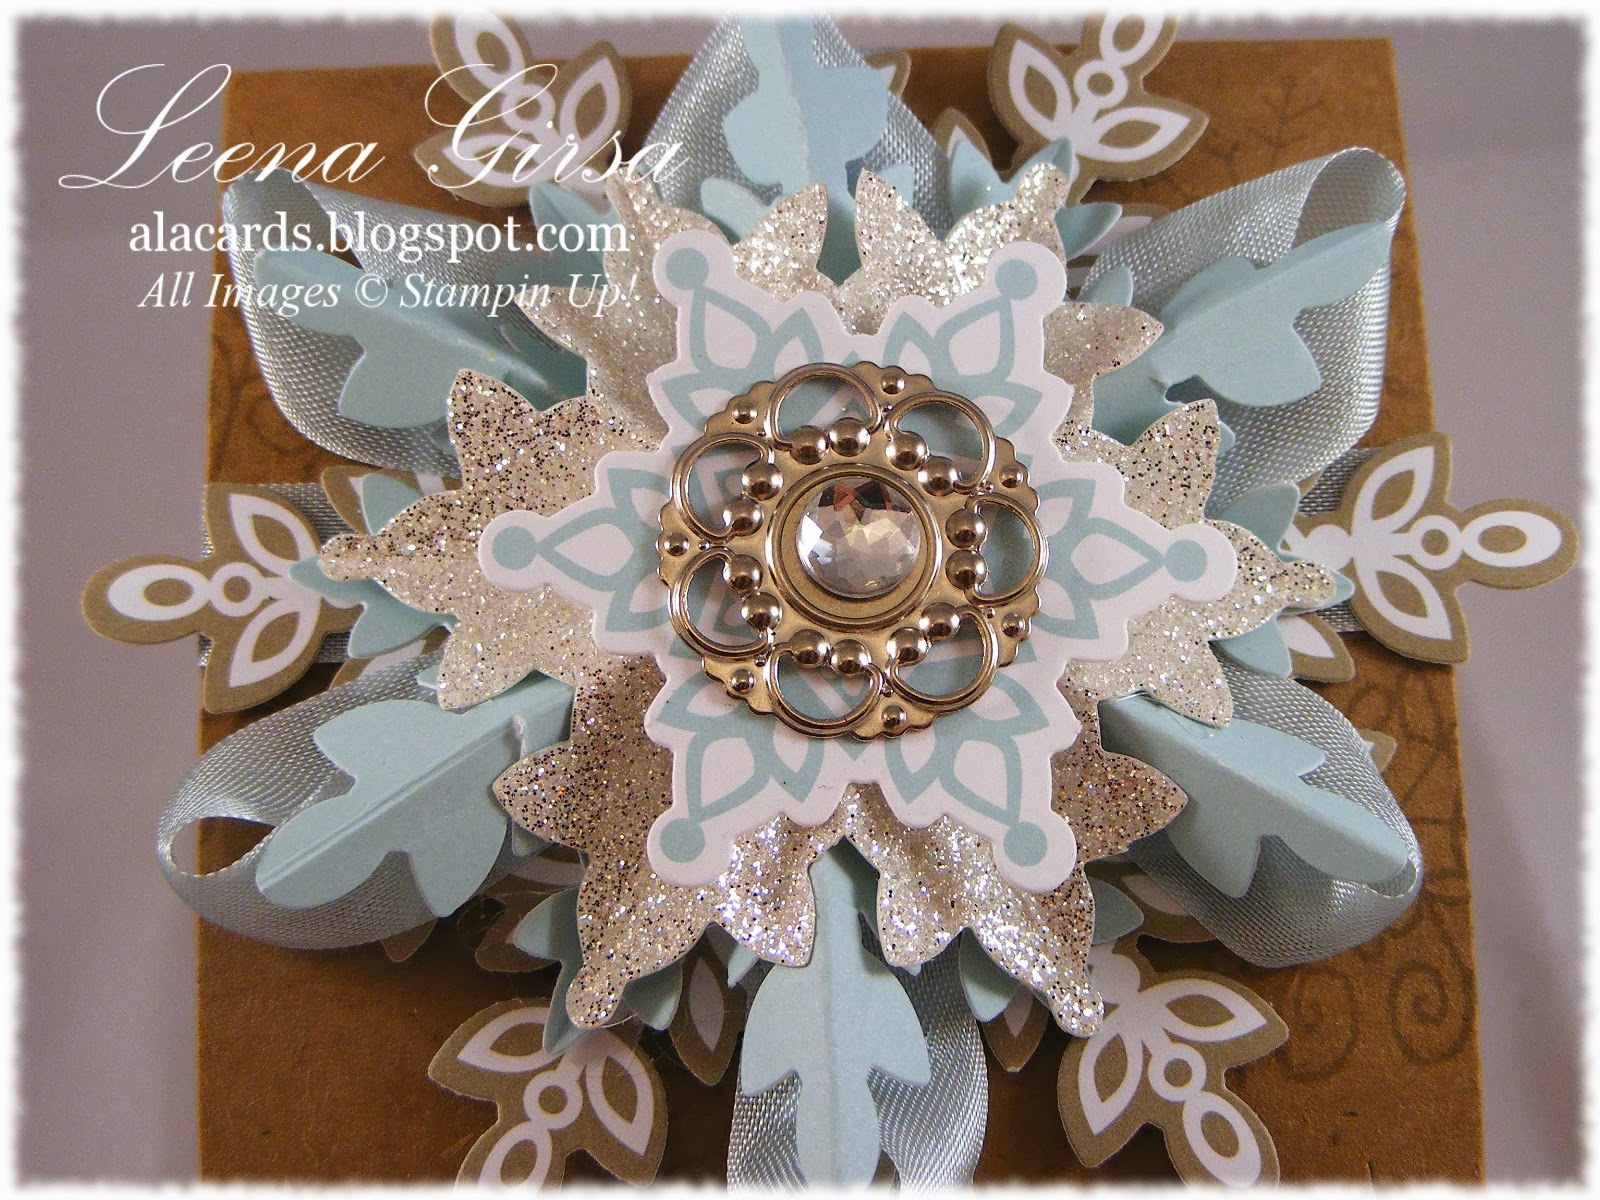
...and here is my project:

Holiday card featuring the Festive Flurry (retired) stamp set and Wonderful Wreath Framelits.
For this one I pulled out my beloved Festive Flurry stamp set and framelits.  These were, by far, my favourite products from last year's Holiday Catalogue and I couldn't resist using them for this challenge.  I stamped various-sized snowflakes in Bermuda Bay, Pool Party and Wild Wasabi ink and die cut them using the coordinating framelits.  I also die cut a couple of snowflakes from Dazzling Diamonds glimmer paper to layer between the stamped flakes for added sparkle. 

The sentiment is die cut from silver glimmer paper using the Wonderous Wreath framelits.  The DSP in the background is from the Nordic Noel pack and the embossed panel was done using the (retired) Snowburst TIEF.  I added some silver stretchy cord I had in my stash and some rhinestones for added bling.

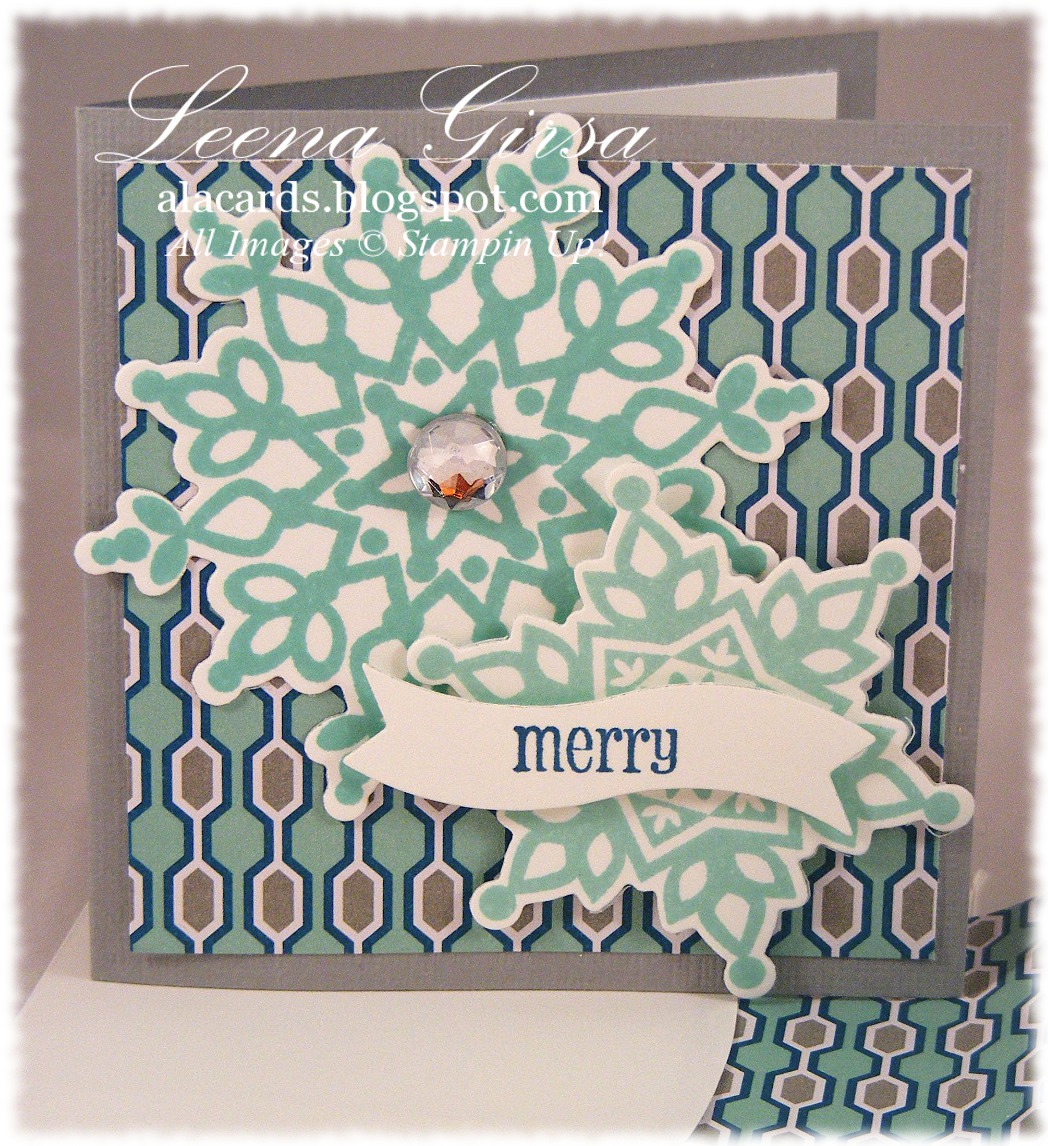
Inside view with sentiment from Christmas Messages (retired)
On the inside I stamped the snowflakes again and added the sentiment, which I stamped on a die cut Whisper White snowflake.
I love this week's sketch...so many possibilities!  You may just see another inspiration card or two from me on this one!  Why not play along with us and link up over at Sunday Stamps?  We'd love to see you creation!

Now for more on what kept me so busy the past couple of days.  Friday and Saturday was Stampin' Up Canada's Fall Conference.  It was held in Kitchener, which is only 20 minutes away from me, so I was plenty excited to attend.  The event was great fun, as members of my team and I got to do cute make-n-takes. play fun games and enjoy chatting with other demonstrators.  Oh, and did I mention we won FREE product??  I came home with over $150 in free stuff with another $20 to come!  I love being a Stampin' Up! demonstrator!!  Here is a shot of me with the FIVE sets of Blendabilities I won playing Let's Make a Deal!

I was just a wee bit excited...I NEVER win anything!  Sure is a nice feeling!
My fabulous day ended with a private class for some high school friends who get together every year for a girls' reunion weekend.  They rented a beautiful cottage and invited me to come and do a mini-stamp-a-stack of Christmas cards with them.  It was the perfect way to celebrate World Cardmaking Day!  Here they are, hard at work:


Everyone had a great time and I got to introduce three of them to the wonderful world of card making!  Have I mentioned how much I love what I do??

Now don't forget that the World Cardmaking Sale ends tomorrow at midnight.  Don't miss the chance to stock up on card stock, ink, envelopes and more at the sale prices!  Click HERE to shop now!

Thursday, December 5, 2013

Festive Flurry Ornament Kit

I am seriously loving the Festive Flurry Ornament Kit!  The finished ornaments are so darned pretty and really easy to make.  I used the kit as one of my Make-n-Takes at my Customer Appreciation Open House last weekend and everyone really enjoyed it.  Here is what the finished ornament looks like:

Holiday ornament made with the Festive Flurry Ornament Kit (135813)
Now, I have no intention of using these as tree ornaments because my tree is a traditional red and green one; but I do intend to use them as beautiful gift toppers for just about everyone.  I'm going to add a little tag with the recipient's name on it which can be removed afterwards if they want to use it on their own tree.  Here are a few more shots showing the dimension to the ornament:


I couldn't just stop at doing the ornament as shown in the how-to video, so I took it up a step...


...and made a pretty little gift box!  I added extra ribbon and a leftover Designer Build-a-Brad from last spring's Occasions catalogue.


I stamped the box using the Endless Wishes photopolymer set (which is sadly no longer available) and Crumb Cake ink.  I added the ribbon in such a way that the box could be opened and closed without having to remove the ribbon, so the box can be reused over and over again!


I think I'm going to use these boxes to package my famous Empire Biscuits that I make every Christmas and give them as gifts to my colleagues at school.  I think they'll like them.  Now to find the time to bake!!

Tuesday, December 3, 2013

Team Treats and Weekly Deals

Last night I held my last team meeting before Christmas.  I wanted to give each of my gals something special to let them know just how much I appreciate them.  So, I whipped up these little boxes of chocolatey goodness:

Gift Box using the Tag a Bag gift Boxes (130927) and the Festive Flurry bundle (133285) and Snowflake Soiree stamp set.
I love how quickly and easily I created these pretty boxes to hold some yummy Lindt chocolate.


Here is how I did it:
  • I started by embossing the plastic sleeve using the Northern Frost TIEF
  • I stamped the large snowflake on Island Indigo card stock and then heat embossed it using white embossing powder.  I die cut it with the Festive Flurry framelits.
  • I stamped the medium snowflake in Pool Party ink on Whisper White card stock and die cut it.
  • I die cut the small snowflake from silver Glimmer Paper.  
  • I layered each snowflake using dimensionals.
  • The tag is stamped with the sentiment from the Snowflake Soiree stamp set in Island Indigo and punched with the Decorative Label punch
Such a quick way to add so much to a simple package!  Try it when you're stuck for a way to wrap a small gift!

Now, here are this week's weekly deals...remember, these prices are only good until next Monday at midnight!


Fun Flowers Bigz Die Item # 121812
Regular Price: $40.95 Discounted Price: $30.71

Hearts Collection Framelits Die
Item # 125599

Regular Price: $32.95  Discounted Price: $24.71

Paper Doily Sizzlits Die Item # 125592
Regular Price: $26.95  Discounted Price: $20.21

Merry Minis Punch Pack Item # 126882
Regular Price: $22.95 Discounted Price: $17.21

1-1/4" Scallop Circle Punch Item # 127811
Regular Price: $21.95  Discounted Price: $16.46

Think Back Photobook Template
Item # 133021

Regular Price: $21.95  Discounted Price: $13.17

Wisteria Wonder 3/4" Chevron Ribbon
Item # 130017

Regular Price: $12.50  Discounted Price: $9.38

Sunday, December 1, 2013

I'm Baaack!

Did you miss me?  Wondering where I've been for the past week?  I wish I had an exciting tale of exotic travels to share with you, but alas, I've just been uber busy!  It is Concert Season for us band directors, which means extra rehearsals, performances and lots and lots of schlepping equipment.  This week promises to be just as nutty, but I have some projects done that I've pre-posted, so hopefully I won't leave you hanging again!

Today is the first day of a brand-new month, which means it is time for a brand-new challenge over at The Technique Twist.  This time we are Double Stamping.  Now I have only ever heard of this technique referred to as masking, but now I've learned a new name for it!  Here is my card:

Wintery card featuring the Double Stamping technique using the Best of Snow and Festive Flurry stamp sets.
I have to admit, I had some trouble getting this to work...I've been away from stamping so long it took me several tries to get my creative Mojo working again!

 Here is a quick how-to for this card:
  • starting with a 4" x 5-1/4" piece of Whisper White card stock, I stamped the Let It Snow label using Bermuda Bay ink.
  • I punched a bracket label (the same shape as the stamped image) out of a post-it note and stuck it over the stamped label to mask it.
  • I stamped the larger snowflake in Pool Party ink randomly over the card stock.
  • I stamped the smaller snowflake in Coastal Cabana randomly all over the card stock
  • I stamped the larger snowflake again using Versamark ink and then heat embossed with Irridescent Ice embossing powder.
  • At this point I remove the post-it note mask.
  • I sponged along the edges of the stamped card stock using Pool Party ink.
  • I layered the stamped card stock on a piece of 4-1/8" x 5-3/8" Bermuda Bay card stock and then adhered the whole thing to a Smokey Slate card base.
  • I die cut a snowflake frame from Silver Glimmer Paper using the Festive Flurry framelits and adhered it over the label using Dimensionals.
  • I added a little red bow made from 1/8" Taffeta ribbon in Real Red.
  • I added a little extra bling with some strategically-placed rhinestones.
Here is a shot of the inside of the card...it is pretty self-explanatory:

Inside view with sentiment from the Endless Wishes Photopolymer stamp set (sadly no longer available!)
 Give this technique a try this week and link up over at The Technique Twist...we'd love to see what you come up with!

Now I need to take care of some business!  Yesterday I held my annual Customer Appreciation Open House.  I had a wonderful afternoon visiting with some of my favourite people.  It give me great pleasure to annouce the winners of my door prizes (drawn by my expert impartial judge, Max!)...

Winner of the Pop 'n' Place Tags Kit:  Pam Radtke

Winner of the Build a Banner and Accessories Kit:  Connie Renna

Winner of the Big Shot Magnetic Platform:  Chris Light

Congratulations to all!!

One more bit of news...be sure to check back tomorrow for some 24-only Cyber Monday deals from Stampin' Up!  There are some fantastic items on sale for tomorrow only.  Also, don't forget that tomorrow is also the final day of the Holiday Sale.  Don't miss out on the great sale prices!

Monday, November 11, 2013

A Day to Remember


Today we remember and honour those who sacrifced so much, that we may enjoy the freedom and peace that we so often take for granted.  Lest we forget...


Monday, October 21, 2013

Double Embossing for The Technique Twist

This week's challenge at The Technique Twist is Double Embossing.  Now, I had always considered Double Embossing to be where one used both dry and heat embossing on a project, but leave it to the creative gals over at the Twist to switch it up!  This take on Double Embossing uses different coloured embossing powders to colour an image.  Check out my project:

Christmas Card featuring the Double Embossing technique using the Festive Flurry stamp set (131781), coordinating Framelits (132193) as well as the Expressions Thinlits (132171)
I twisted this already twisted technique by stamping and heat embossing my snowflake on acetate. 


I used white, Tempting Turquoise and Pool Party embossing powders.  I did a second, smaller snowflake for the inside.

Inside sentiment is from the More Merry Messages stamp set (126402)
This technique really is as easy as heat embossing, you just use multiple colours of embossing powder rather than a single one.  One tip for heat embossing on acetate: be sure to use your Embossing Buddy liberally before stamping.  Because acetate tends to hold static electricity, the embossing powders will stick where you don't want them if you don't use the Buddy!  You also may need to use a card stock shim when die cutting with acetate to ensure the Framelits cut all the way through.
Give this technique a try...its fun and easy...then be sure to link up over at The Technique Twist so we can admire your work!

Friday, September 20, 2013

More Sketchy goodness

Happy Friday!!  TGIF!!!  It's time for another project inspired by this month's inspiration sketch.  First, here is the sketch...


...and here is my festive project...

Holiday card featuring the Festive Flurry Bundle, the Northern Frost TIEF and Winter Frost DSP stack with sentiment from Sweet Essentials.

This card was my way of using up scraps...gotta love it when you can clean up your desk AND make something pretty at the same time!


Here is a quick rundown of how I put this one together:
  • the snowflake is heat embossed in silver on Vellum and then die cut with the Festive Flurry Framelits.
  • The DSP is from the Winter Frost stack.  That stuff lasts FOREVER!
  • The Whisper White background is embossed using the Northern Frost TIEF.
  • The sentiment is from the Sweet Essentials stamp set and is stamped in Basic Gray ink.
This is another quick and easy take on this sketch.  Give it a try and see what you come up with!  Have a great, crafty, weekend!!

Wednesday, August 28, 2013

One More Sketch-inspired Project

Today I have my last project using this month's inspiration sketch...and in my opinion, I've saved the best for last...

Holiday card featuring the Festive Flurry bundle (133285) and Expressions Thinlits.


This project came together easily thanks to the Festive Flurry stamp set and Framelits.  It will most certainly be part of my Holiday class line-up, but if you want to recreate it yourself, here are some tips:
Isn't it amazing how many different looks you can get from one simple sketch?  What a great way to inspire one's creativity!

Friday, August 23, 2013

Perfect Project Kits Day 5

Well, it's my last day of relaxation at the lake and I have one more kit-based project to show you. 


Gift set of eight 3"x 3" note cards with coordinating envelopes featuring the Festive Flurry bundle (133285), Winter Frost DSP stack (132183) and embellishments from the Christmas Banner Accessories Simply Created Kit (132697).  The "merry" sentiment is from the Pennant Parade stamp set (122742).


 This  box is one of the Decorative Window Gift Boxes (132146) and it holds a set of eight note cards with lined envelopes.  All of the ribbon and rhinestones were what I had left over from creating the banner I showed you yesterday.  The Christmas Banner Accessories kit has SO much product in it!  It is the perfect embellishment kit for any Holiday project...not just a banner!


Unbelieveably, I had enough ribbon and rhinestones to do two of each of the above cards and embellish the box!  It is an incredible value at just $11.95, here in Canada!  For about the price of a single roll of ribbon you get generous amounts of three different ribbons (one of which is exclusive to this kit), five Vintage Faceted Buttons, ten large rhinestones, four pre-scored strips of DSP to make rosettes, 4 die cut DSP circles, and three die cut glittery snowflakes.  Talk about awesome!!  Did I mention that it all coordinates?  And that it also coordinates with the Winter Frost suite of products in the Holiday catalogue?  So many options to create gorgeous Holiday projects for very little money.  These kits are one of my favourite things in the Holiday catalogue!
I hope you've enjoyed this little feature on two of my favourite Simply Created Kits.  Stay tuned over the coming weeks for more using these fabulous products.  Now here's the really great news...you can get your favourite project kit for FREE!  This month, new members of my Tri-City Stampers team get to choose a project kit to add to their Starter Kit for free!  What a great bonus!  Click HERE to learn more about this promotion and click "Join My Team" above to learn about all that Stampin' Up! has to offer you.  I would love to welcome you to my team!
Have a fabulous weekend!!

Monday, August 5, 2013

Playing with the Pop 'N' Cuts

Sometimes it takes me a while to get to using new products.  Althought the Pop'n'cuts dies have been around for a while I only recently cracked one open to try it out.  Here is the result of my first attempt...

Holiday card featuring the Festive Flurry stamp set with card base made using the Pop'n'cuts die.
The inside view...I used the Deco Label insert.  Sentiment is from Greetings of the Season (128033), which is on the carryover list from last year's Holiday catty and still available to order.
Pop up detail...I like the depth this die allows!
Inside sentiment from Many Merry Messages (retired)
So...whaddya think?  Not bad for a first attempt, if I don't say so myself!  Honestly, this die is so easy to use the learning curve is almost nil.  Here are some tips for recreating this card:
  • For the front of the card I embossed a panel of Pool Party card stock using the Northern Flurry TIEF, sponged with Whisper White craft ink and then with Illuminate ink to give it some shimmer.  
  • On the inside I used a bit of the Quatrefancy Specialty window sheets to cut the label.  I wanted it to be subtle so as not to distract from the snow storm happening around it...haha.  
  • The snowflakes are stamped on Whisper White using Pool Party ink and then die cut using the Festive Flurry Framelits (try saying that one ten times fast!).  I adhered them all at different depths using glue dots and dimensionals.  
  • The Greetings of the Season is heat embossed in pewter and die cut using the Chalk Talk Framelits.  I couldn't resist using one of the those gorgeous Designer Brads leftover from last spring's Occasions Catalogue. 
  • The inside sentiment is from the long retired Many Merry Messages set and is stamped in Basic Gray. 
This card is plenty thick...not one you'd want to send through the mail, but certainly one that would be much appreciated by the recipient!

Wednesday, July 31, 2013

It's the last day of July!!

How is it possible that today is the last day of July?!?  Where did the month go?  There is lots to tell you about but first, a little Christmas!  Check out this card I designed for this week's Friday Mash-up Christmas challenge using the sketch from this week's Retro Sketches challenge...

Here is the sketch:


Holiday card for RS74 and FM120 featuring the Festive Flurry stamp set and Framelits (available tomorrow in the Holiday Catalogue) with sentiment from More Merry Messages.
I am dying for my Holiday Catalogue order to arrive!!  I held off ordering all but a few incentive redemptions until after Convention, knowing I would likely get some freebies.  My order is arriving tomorrow, but that didn't stop me from using a couple of new items on this card.  The Festive Flurry stamp set and coordinating Framelits are available in a bundle for 15% off...I know you'll want to add them to your wishlist!  I paired them with some silver Glimmer Paper and This and That Epic Day DSP for a little Christmas in July. 
Now for a few reminders: 
  • Today is the LAST DAY  to take advantage of the Buy-three-get-one-free DSP offer.  Don't miss this chance to stock up on your favourite packs of DSP!
  • Today is also the LAST DAY to purchase Single Stamps.  After today these oh-so-popular stamp images will be gone for good.
I will be placing an order this evening, so be sure to call or email with your order by 7:00 pm or visit my online store to have your order ship directly to you.  Be sure to stop by tomorrow...there will, no doubt be lots of exciting news to share with you and I'll have a new challenge from The Technique Twist!!
Related Posts Plugin for WordPress, Blogger...